, Newer type of rechargable, giving best performance for a rechargable.
Voltage:
3.7 V
Capacity:
1000 mAh
Watt hours:
3 Wh
Weight: 1.0 oz
Dimensions:
1.4 in
x
1. 1 in
x
0.5 in
Charger Battery Ports:
0
Duracell camera and camcorder batteries deliver equivalent performance to the manufacturers original and are supplied with a 2 year limited warranty.
For use with GoPro Hero3 series action cameras
Fits GoPro Hero 3, Hero 3 Plus
Brand Name: Duracell branded product.
At Duracell Direct we are proud to offer our customers our huge range Duracell laptop spares and accessories. If you can’t find the part you’re searching for, contact our customer services team below and we’ll help you find it quickly.
Talk to Us
401 214 2530
Bestsellers
AHDBT-302 Newmowa 1300mAh Rechargeable Battery (2-Pack) and Rapid 3-Channel Charger for Gopro Hero 3, Gopro Hero 3+, AHDBT-301, AHDBT-302
AHDBT-302 Newmowa 1300mAh Rechargeable Battery (2-Pack) and Rapid 3-Channel Charger for Gopro Hero 3, Gopro Hero 3+, AHDBT-301, AHDBT-302
Product Features:
More Power for More Video: Each2300mAh battery offers you more power to shoot more videos; charge inside the camera or with 2. 1A input charger to maximize charging efficiency
3 Ways to Charge: Can be charged by wall, car, and power bank charging for added convenience.
Fully Compatibility: Made to the exact specification of AHDBT-302/AHDBT-301 battery, compatible with Gopro Hero3/Hero 3+
Multiple function of the 3-channel charger: each charging port can charge AHDBT-301/AHDBT-302 which work for Gopro Hero3/Hero 3+ & AHDBT-401 for Gopro Hero 4
100% Safety Guarantee: Features four layers of protection (over-charging, short-circuit, high-temperature, and surge protection) with a high-quality, fire-resistant construction
Price: $16.99
Buy at Amazon US
Buy at Amazon UK
Amazonで購入
Share This Product:
| Product Description:
The Newmowa® AHDBT-302 Battery and 3-Channel Charger Kit:
2 batteries::3.7V 1300mAh
1 3-Channel charger with a Mini USB code: Input: 5V 2A Output: 8. 4V 600mA*2
Compatible with: Gopro AHDBT-302/301/201 for Gopro Hero 3/3+ Gopro AHDBT-401 for Gorp Hero 4
The Newmowa 3-Channel Charger for Gopro Battery is designed to simplify the process of charging 3 or more batteries, especially when travelling.
◆ Gone are the days of having to use one plug point per battery. It allows you to charge three batteries at the same time with no fuss.
◆ To make charging process more convenient, it can be powered by several different types of power supply, such as a standard phone adapter, car charger, AC/DC mains transformer, USB socket, power bank or solar panel.
◆ Each battery is independently monitored and its charging/full status is shown by a red or green LED, so battery units can be replaced for charging as and when.
| Product Information:
Newmowa 1300mAh Rechargeable AHDBT-302 Battery (2-Pack) and Rapid 3-Channel Charger
◆Innovative design for Gopro Hero 3 /3+ /4 ◆Made of high quality material, durable and light weight. ◆Allows for charging 3 or 2 batteries at the same time ◆Compatible with both AHDBT-401 and AHDBT-301 3 independent Smart LED lights indicated RED when charging and GREEN when completed ◆Package include: 2 X AHDBT-302 Batteries 1 X Rapid 3-Channel Charger 1 X USB-MINI Cord
Related Products
Newmowa 60 LED High Power Rechargeable Clip Fill Video Light with Front & Back Clip, Adjusted 3 Light Modes for Phone, iPhone, Android, iPad, Laptop, for Makeup, Selfie, Vlog, Video Conference
18” Newmowa 288 LED Ring Light with Tripod Stand, Adjustable Color Temperature Circle Lighting for Vlog, Makeup, YouTube, Video Shooting, Selfie, Live Streaming, Compatible with iPhone & Android
Newmowa EN-EL19 Battery(2-Pack) and Dual USB Charger kit for Nikon Coolpix S32, S33,S100, S2800, S3100, S3200, S3300, S3500, S3600, S3700, S4100, S4200, S4300, S5200, S5300
NP-BX1 Newmowa Battery (2-Pack) and Dual USB Charger set for Sony NP-BX1, NP-BX1/M8 and Sony Cyber-shot DSC-RX100, DSC-RX100 II, DSC-RX100M II, DSC-RX100 III, DSC-RX100 V, DSC-RX100 IV, HDR-CX405
Have suggestions and questions? Leave us a message
Best Sell
ABOUT US
CONTACT INFO
Email: service@newmowa. com Official Website: www.newmowa.com
Newmowa Rapid 3-Channel Charger for Sony NP-F550, NP-F750, NP-F970 Newmowa AZ16-1 Replacement Battery (2-Pack) and 3-Channel USB Charger for Xiaomi…
GoPro Batteries – Huge selection at the best prices
1,673 results
Capture the Action With a GoPro Battery
GoPro cameras are designed to go where you go, providing a hands-free way to document your active lifestyle. Whether you’re attaching the GoPro to your bike, using it while you ski, or simply recording a tour of your favorite local hiking trail, you’ll need a fresh GoPro battery to make sure you don’t miss a thing. Here’s what you need to know about choosing, changing, and caring for your GoPro battery.
What type of battery does a GoPro camera use?
The HD Hero GoPro camera comes equipped with a rechargeable lithium-ion battery pack. This has been the standard in GoPro’s product line since 2014. It features durable construction designed to withstand the vigorous activities and sporting events you record with your GoPro camera and charges while connected to the camera through a USB port. This battery is also used in the 360-degree GoPro Fusion camera. The Digital Hero 5 (2006) uses two AAA batteries.
What size battery do you need for your GoPro camera?
Battery capacity is as follows for common GoPro camera models:
Hero Session, Hero5 Session: Integrated 1000 mAh lithium-ion battery ion battery
Hero Fusion: Replaceable 2620 mAh lithium-ion battery
How long will a fully charged GoPro battery last?
You can find a range of new and preowned GoPro batteries on eBay with various battery lives. The affordable GoPro Fusion battery can record continuously for 75 minutes in 5. 2K 30 mode and 60 minutes in 3K 60 mode. The GoPro Hero7 Black battery lasts for 45 to 90 minutes. The Silver and White versions of this model have a built-in battery that lasts for 106 to 146 minutes. The Hero6 battery lasts for 70 to 110 minutes depending on shooting resolution. The Hero5 battery lasts for about two hours. The Hero5 Session battery lasts for about one hour and 35 minutes. The GoPro Hero4 ranges from one hour and 20 minutes to one hour and 45 minutes depending on the model. Keep in mind that performance varies depending on conditions, settings, age of the battery, and other factors.
How should you care for your GoPro battery?
You can extend the life of your camera battery with proper care. If you’re using the GoPro outside in the cold or in cold water, battery life will be shortened. The more features that are enabled on the camera while you’re recording, the shorter the life of the battery charge. Allowing the battery to completely drain before recharging will improve its overall life and performance.
An absolute powerhouse lies within this tiny, perfectly formed, enclosure with enough processing capability to take on the most powerful Intel Mac Pro systems out there, while only a quarter of their price (and size). Add to that its energy-saving credentials and relative portability, and this is a machine that was built for the needs of both demanding studios and on-the-road life.
TODAY’S BEST DEALS
Pros
+
Incredible processing power
+
Energy saving credentials
+
Dedicated media engines
+
Portable form-factor
+
Cost effective high-end workstation
Cons
–
Limited user upgradability
–
Lots of ports, but maybe not enough
–
No keyboard and mouse included
Why you can trust Digital Camera World
Our expert reviewers spend hours testing and comparing products and services so you can choose the best for you. Find out how we test.
The Apple Mac Studio M1 Ultra definitely fills a gap. Following the launch of Apple’s own M1 silicon, customers have been treated to a year full of benchmark-breaking product announcements across pretty much their entire product line. With chips that set a new standard in terms of speed and efficiency, each update to existing products has impressed users as they saw the machines they know and love get the “M1 speed boost” they’ve been looking for.
Related articles
With the launch of the Mac Studio, however, Apple has opened a path to a new product category – not just an update to an existing machine – arguably sitting somewhere between the latest M1 Mac Mini and Intel Mac Pro tower in terms of power and price point.
Apple Mac Studio (Silver) at Best Buy for $1,799
There is a baseline Studio Max model which has plenty of power of its own, but here, we’ve reviewed the top-end Studio Ultra.
Specifications (as tested)
Processor: Apple M1 Ultra chip CPU: 20-core with 16 performance cores and 4 efficiency cores GPU: 64-core GPU with 32-core Neural Engine RAM: 128GB Unified memory with 800GB/s bandwidth Storage: 2TB SSD Video engines: 2 decode, 4 encode and 4 ProRes encode & decode
Key features
The Mac Studio is just a box with a power cable. Keyboard, mouse and monitor are extra. (Image credit: Paul Reiffer)
Here’s the new M1 Mac family. The M1, left, is the ‘baby’ of the group, the Pro is used in higher-end MacBooks, while the Max is in the baseline Studio model. The Ultra, right, tested here, has two of these Max chips. (Image credit: Paul Reiffer)
Designed as an under-screen desktop workstation, the Mac Studio is set to be a hybrid system – portable enough to carry between locations when needed, but powerful enough to be a user’s main system for almost any activity, driving up to 4x 6k XDR displays and 1x 4k display at the same time.
As with other M1 releases, don’t let the Mac Studio’s relatively compact size deceive you. In return for your investment in a Mac Studio, you get a choice of the very latest Apple M1 Max or M1 Ultra System-On-A-Chip (SoC) hardware – with their ultra high speed processors, unified memory, GPUs and video engines.
While the M1 Max edition delivers the same processing power as the latest top-end MacBook Pro 14” and 16” models, the M1 Ultra version gives you access to a system made up of two of these chips combined into one system, with the 20-core CPU setup we’ve tested here.
The addition of external ports will leave most users satisfied – with standard 10Gb Ethernet & HDMI, 2x classic USB-A ports for older peripherals, a front SD card slot and either 4 (Max) or 6 (Ultra) Thunderbolt 4 ports available both front and back (or an extra 2x replacement USB-C ports on the front for the Max model).
Put together as a package, the Mac Studio is reassuringly aimed at a high-end creative workflow – whether back at base, or on the road – where power, connectivity and flexibility are critical to a project’s success.
Design and operation
The Mac Studio has the same styling as the Mac Mini but in a taller box. You can use an iPad as a display, but the new Apple Studio Display (sold separately) is the obvious candidate. (Image credit: Paul Reiffer)
There’s a good selection of ports, which is not always an Apple strong point. (Image credit: Paul Reiffer)
It’s hardly a laptop, but the Mac Studio is perfectly portable and could make a great mobile workstation. (Image credit: Paul Reiffer)
Housed in the signature Apple unibody aluminum enclosure, the unit shares some strong similarities with the Mac Mini, but with an increase in height, weight, ports and cooling systems (not that the system ever seems to get hot) to allow for the extra power inside.
With a single light on the front for operation and the on/off switch on the rear corner, the minimalist approach could easily fool you into thinking this is a stripped-down machine – except for the fact that it’s currently the fastest M1 system that Apple has produced to date.
Compatible display options are plenty – from the simultaneously released 27” 5k Studio Display which sits perfectly on top of the Mac Studio’s footprint, to the premium 6k Pro Display XDR for more color-critical work in a larger format, to almost any other thunderbolt or HDMI display you want to plug in. Further, the Mac Studio is also capable of running an iPad as either a desktop extension or as the primary display if you so choose.
With that in mind, it also makes the Mac Studio a perfect on-location companion, driving creative workflows in remote environments, and a lot easier to transport than a rack-mount or full tower option.
While the Mac Studio itself does not ship with a keyboard and mouse as standard (in the box is literally the computer and its power cable), the new Magic Keyboard with Touch ID and Magic Mouse (available to add-on to an order) are designed to match its aesthetic perfectly.
• See Best Mac mouse & Best Mac keyboard
The addition of the extra two ports (USB-C or Thunderbolt 4) and SD Card Reader on the front of the box make connectivity and download a lot easier (no reaching around and fumbling, or external readers to plug in), while the single-line rear layout helps to keep cables neat while in use.
Performance
(Image credit: Paul Reiffer)
(Image credit: Paul Reiffer)
With processor speeds that rival even the most impressive of Intel Mac Pro tower configurations, there’s no doubt this is an incredible piece of hardware engineering in its own right.
Topping the 16” MacBook Pro’s 64GB memory limit with double that available at 128GB, along with twice the cores, GPUs and video engines, you’d be forgiven for thinking the Mac Studio should be twice as fast – but it’s not.
It’s very, very fast, for sure. But in testing, the single-application benchmarks we ran showed a reasonable, yet not ground-breaking, speed improvement over its laptop format M1 siblings – and there’s a reason why.
The single core speed of the M1 Ultra is the same as that of the M1 Max – it’s literally the same processor, doubled. So for truly multi-processor aware applications that can make use of all that multithreaded activity, you’ll see a huge bump in speed, but for many applications the developers simply haven’t quite caught up.
Where the M1 Ultra does, however, come into its own is in how it handles those tasks while performing others. In testing, our single-application benchmarks were left untouched when asking the system to perform them while another high-intensity task was also completing – and the Mac Studio never once broke a sweat.
With that performance in mind, this machine feels more like using my top-spec Intel Mac Pro than plugging in a 16” M1 Max MacBook Pro to work.
And all of this is occurring while listening to minimal fan noise, reduced heat output and (most importantly in today’s world) a power saving of around 70% over that of the Mac Pro system (370W vs 1280W). That’s almost a kilowatt saving for each and every hour you have this machine on instead of an Intel Mac Pro tower while achieving the same amount of work!
Verdict
(Image credit: Paul Reiffer)
It’s always good to reflect after the dust has settled on a new product launch. As the hype subsides and reality sets in, our opinions often change from the original excitement to include any real-world niggles that we’ve come to bear.
Not with my new Mac Studio, it must be said. After two weeks of intensive work, Apple’s latest little workstation is still sat proudly running alongside my Intel Mac Tower, and is a joy to use.
Interestingly, when I’ve switched from Mac Pro to Mac Studio, my office temperature has dropped in by 3ºC as a result of the 1kW reduction in power use between the two, almost equally performing, machines.
However, this is not, and was never going to be, a Mac Pro replacement for those who really push Apple’s top end system. The Mac Studio lacks the user-upgradability, absolute speed and expansion options for ports that its big brother still delivers in droves. Neither is it designed to be as complete a portable solution as the latest 14” and 16” M1 MacBook Pro’s.
But for many desktop / remote-based users, what it delivers is complete, ample, and in a single box that just works. A box that’s flexible, portable between locations, and able to deliver a high-end creative workflow with ease, in a package that’s cost effective to both purchase and run.
To me, that’s a new Apple product category that I can really get behind.
Best monitor for Mac mini
The best Mac webcams
The best Mac printers
Apple Mac Studio: Price Comparison
$999. 99
View
$1,999
View
No price information
Check Amazon
powered by
Thank you for reading 5 articles this month* Join now for unlimited access
Enjoy your first month for just £1 / $1 / €1
Already have an account ? Sign in here
*Read 5 free articles per month without a subscription
Join now for unlimited access
Try first month for just £1 / $1 / €1
Already have an account ? Sign in here
Paul Reiffer is an award-winning photographer and landscape artist. As a global ambassador for both Phase One and Capture One, he specialises in grand vistas, electrifying cityscapes and iconic views. His images have been published all around the world in well-known books, newspapers and magazines as well as supporting global travel and hospitality brands to reach and excite their audiences. His technical expertise is regularly called upon for industry insights, and through his luxury workshop programme as well as online channels, he’s carved out a unique style of teaching that is now appreciated by thousands worldwide. Shooting with ultra-high-resolution Phase One cameras, his work is used commercially by interior designers and clients ranging from National Geographic to British Airways, Marriott, Land Rover and many more.
Best photo editing PC 2023
When you purchase through links on our site, we may earn an affiliate commission. Here’s how it works.
(Image credit: Unsplash / Glenn Carstens-Peters)
The best photo editing PCs are capable of effortlessly running the very best photo editors and boosting your whole creative workflow.
But with so many computers for photo editing on the market, it’s not always easy to know where to start or what you should look for. Even the best free photo editors can be resource intensive, so it’s often worth prioritizing CPU and RAM. After that, a dedicated graphics card and a good-sized SSD are worth getting to make image editing smooth.
To help you find the best photo editing PC, we’ve tested out a host of Windows and Mac computers with a focus on photography and photo editor apps. As part of our review process, we assess performance, budget, and every last spec from CPU to connectivity. We’ve also reviewed the best laptops for photographers and the best photo editing monitor to help you find the best setup for every project.
The best PC for photo editing 2023
(Image credit: Future)
1. iMac (24-inch, 2021)
Best photo editing PC overall
Specifications
CPU: Apple M1 chip with 8‑core CPU
Graphics: Integrated 7-core – 8-core GPU
RAM: 8GB – 16GB unified memory
Screen: 24-inch 4.5K Retina display
Storage: up to 2TB
Today’s Best Deals
Reasons to buy
+
Excellent screen
+
Striking new design
+
Fantastic webcam
Reasons to avoid
–
Lack of ports remains
–
Mac mini may offer better value for some
If you think that the new iMacs couldn’t possibly be as good as they look, you’d be wrong.
Not only are they an improvement on their 21. 5-inch predecessor externally, touting a fresh new face that comes in several different colors. But they also come with fresh new specs, thanks to Apple’s new M1 chip that makes it much more powerful than the previous Intel iMacs. That means they’re more than equipped to handle video and photo editing without slowing down the creative workflow.
In fact, we’d go as far as to say that the new iMac (24-inch, 2021) is the best all-in-one for photo editing we’ve ever tested. It’s certainly earned its place in our best Macs list. You’ll also be happy to know that you’re getting great value here, as you’re getting the Magic Keyboard and Magic Mouse included – in matching colors, we might add.
Read the full iMac (24-inch, 2021) review
(Image credit: Future)
2. iMac (27-inch, 2020)
Best photo editing PC for your home office
Specifications
CPU: 10th-generation Intel Core i5 – i9
Graphics: AMD Radeon Pro 5300 – Radeon Pro 5700 XT
RAM: 8GB – 128GB 2666MHz DDR4
Storage: 256GB – 8TB SSD
Display: 27-inch (diagonal) 5120 x 2880 Retina 5K display
Today’s Best Deals
Reasons to buy
+
Improved internals
+
Can be configured to be very powerful
Reasons to avoid
–
Design is getting old
–
Just two Thunderbolt ports
Even though the iMac 27-inch’s last update was only recent, Apple couldn’t help but step up in the upgrades department with its follow-up. Specs-wise, this model sports some massive improvements while also upgrading its webcam and microphones for a felicitous update.
More people are working from home these days, and the 1080p FaceTime HD webcam and studio-quality microphones ensure better video calls, now an essential part of any home office.
The glare-preventing nano-texture glass finish on the display comes as an optional extra. This seems like the best all-in-one PC to invest in without being forced to make some considerable space in your existing area. Sure, its overall design hasn’t seen so much as a tweak, making it look a bit tired, but power trumps design for photo editing.
Read the full iMac (27-inch, 2020) review
(Image credit: Future)
3. Mac mini (M1, 2020)
Best photo editing Mac for fans on a budget
Specifications
CPU: Apple M1 chip with 8-core CPU
Graphics: Integrated 8-core GPU
RAM: 8GB – 64GB unified memory
Storage: 256GB – 2TB SSD
Dimensions (W x D x H): 19. 7 x 19.7 x 3.6 cm
Today’s Best Deals
Reasons to buy
+
Same lovely design
+
Very good performance
+
New M1 hardware has potential
Reasons to avoid
–
Can’t use eGPUs
One of Apple’s biggest surprises of the year is the update to its smallest Mac. The brand-new Mac mini now touts Apple’s M1 chip, while keeping things the same in its much-loved design.
An ideal photo editing computer, it’s more powerful than ever – Apple claim that the M1 will offer the world’s best CPU performance per watt, with its 8-core CPU consisting of four high-performance cores and four high-efficiency cores to balance workloads, enabling it to process tasks nearly three times faster than the chip in the previous Mac mini.
With more than decent video editing performance, even at 8K, and can now run iOS apps and games, thanks to this new chip, but it still keeps its title as the cheapest Mac ever – terrific news for budget-minded creatives.
Read the full Mac mini (M1, 2020) review
4.
Lenovo ThinkCentre M900
Best photo editing PC with configuration flexibility
Specifications
CPU: Intel Core i7
Graphics: Up to NVIDIA Quadro K420 2 GB DVI + DP
RAM: Up to 64GB
Storage: 1TB HDD
Connectivity: Gigabit Ethernet, 802.11ac Wi-Fi
Dimensions (W x D x H): 175 x 413 x 406mm
Today’s Best Deals
Reasons to buy
+
Powerful CPU
+
Dedicated GPU
Reasons to avoid
–
Not the biggest amount of ports
The Lenovo ThinkCentre M900 is one of the best PCs for photo editing, as it combines speed and power with excellent build quality and reliability which is essential for computers used for heavy-duty image manipulation.
The M900 comes with an Intel Core i7 processor that is tailored to keep up with the workload of gamers and so should have little trouble handling the editing demands of even the busiest of photographers. Although if you’re keeping the PC busy, the fan can be a little on the noisier side.
Best of all, the Lenovo ThinkCentre M900 comes in a range of configurations, with the top-end model boasting a huge amount of power. This flexibility lets you build a Lenovo ThinkCentre M900 that suits your needs, and there’s plenty of room to upgrade and expand this desktop in the future.
(Image credit: Future)
5. Microsoft Surface Studio 2
Best PC for photo editing and creative work
Specifications
CPU: Intel Core i7
Graphics: Nvidia GeForce GTX 1060 – GTX 1070
RAM: 16GB – 32GB
Storage: 1TB – 2TB SSD
Display: 28-inch 4,500 x 3,000 PixelSense display
Today’s Best Deals
Reasons to buy
+
Powerful
+
Nothing like it
Reasons to avoid
–
Very expensive
If you’re looking for an incredibly powerful, yet stylishly designed, all-in-one PC for photo editing that’s not made by Apple, then Microsoft’s brilliant Surface Studio 2 will be for you. It comes at a price, but for build quality and performance, you’ll not want to look any further, especially if you work with image editing applications.
And that’s because, while not for everyone, the Surface Studio 2 has been designed with digital artists and content creators in mind, So, those looking to use their PC for photo editing would be wise to consider it.
Microsoft’s all-in-one machine fits comfortably on a desk, and its built-in screen makes your photos look fantastic, even before you’ve edited them. As it runs Windows 10 you get a huge range of comparable photo editing apps as well.
Read the full Microsoft Surface Studio 2 review
(Image credit: Apple)
6. Apple iMac Pro
Best PC for photographers who need powerful performance
Specifications
CPU: Intel Xeon W
Graphics: AMD Vega 56, Vega 64
RAM: 32GB, 64GB
Storage: 1TB ssD
Connectivity: Ethernet, 802.11ac Wi-Fi
Dimensions (W x D x H): 65 x 20.3 x 51.6cm
Today’s Best Deals
Reasons to buy
+
Most powerful Mac ever
+
Excellent design
Reasons to avoid
–
Very expensive
–
Non user-upgradable
If you’re a professional photographer and digital creative, then the iMac Pro is one of the best PCs money can buy. This is a seriously powerful all-in-one with cutting-edge tech, and a choice of powerful Intel Xeon W processors, bags of RAM and hefty graphical processing power.
All of this is in an iconic Apple design. If you have the budget for it, the iMac Pro is one of the best PCs for photo editing money can buy. For professionals needing a dedicated workstation to streamline a heavy-duty workflow though, the price is worth it.
However, for some people, you may find it has a level of power that you do not require. If that is the case, then read on for more modest (and affordable) PCs for photo editing.
Read the full Apple iMac Pro review
(Image credit: Future)
7. Lenovo Yoga A940
Best photo editing iMac alternative
Specifications
CPU: 8th-generation Intel Core i7-8700
Graphics: AMD Radeon RX 560 4 GB
RAM: 32 GB DDR4 2666 MHz
Storage: 1 TB 5400 RPM + 256 GB PCIe SSD
Display: 27″ 4K UHD (3840 x 2160) IPS Multi-touch
Today’s Best Deals
Reasons to buy
+
Good price
+
Stylus included
Reasons to avoid
–
Older components
–
Screen not great in direct light
Lenovo’s latest all-in-one offering isn’t as powerful as Apple’s premium AIO, the iMac Pro, or even the recently updated iMac, which now offers a 9th-generation Intel Core configuration. After all, the 8th-generation chips and Radeon RX 560 graphics are aging at this point.
However, it is still plenty powerful to meet the needs of professional photographers who can’t afford Apple’s more pricey machines.
The 27-inch screen boasts a 4K resolution with 100% Adobe RGB support and Dolby Vision. This makes visuals on the screen look bright and vibrant, and that Adobe RGB support is essential for any photographers who require accurate colors.
The in-built webcam can be used to log in with just a glance, while there’s also a stylus and dial as well, for better control over your photo editing work.
Dimensions (H x W x D): 20. 3 x 25.6 x 8 inches (51.6 x 65.0 x 20.3cm)
Today’s Best Deals
Reasons to buy
+
Stunning 5K display
+
Quiet under load
Reasons to avoid
–
SSD upgrades are expensive
If the iMac Pro above is too expensive (and offers a level of performance that you simply don’t need) but you want an Apple all-in-one, then the standard iMac is more than capable of helping you with your photo editing.
While the iMac 2019 doesn’t feature a touchscreen or an adjustable stand, the option for a 4K P3 wide color gamut display means it will accurately display your photos. Plus, there’s the fact that because the iMac (27-inch, 2019) is no longer the latest model, it should be getting some tempting price cuts.
The 2019 iMac is certainly an upgrade on the 2017 model, especially for creative professionals, and one of the best premium all-in-one PCs that money can buy. Though beware that memory and storage upgrades don’t come cheap.
Read the full Apple iMac 27-inch (2019) review
(Image credit: HP)
9.
HP Pavilion Wave
Best PC for photo editing audiophiles
Specifications
CPU: Intel Core i3 – Intel Core i5
Graphics: Intel HD Graphics 530 – AMD Radeon R9 M470
RAM: 8GB
Storage: 1TB HDD
Today’s Best Deals
Reasons to buy
+
Unique, stylish cylindrical form factor
+
Clever and effective audio solution
Reasons to avoid
–
No optical audio port
–
Unflattering specs
If you appreciate the beauty of minimalism – and you rely on music as a muse for your photographic creativity – then the unique HP Pavilion Wave might just be the PC pick for you. It’s a PC that aims to combine the bulk of a personal computer and speakers into one sophisticated, and compact, unit.
Though at first you might confuse it for a fabric-woven Mac Pro refresh, the HP Pavilion Wave is anything but. This compact Windows machine packs in sixth-generation Intel Core processors and optional discrete AMD graphics with a uniquely integrated Bang & Olufsen speaker.
Wrapped in a handsome fabric exterior, this is the perfect PC to have on the desk. If you love listening to music while you edit your photos, then this is a brilliant – and stylish – photo editing PC.
If you’re looking for a great desktop experience for photo editing, but don’t have a lot of space, look no further than the Intel Hades Canyon NUC. In this tiny bare-bones PC, you have an insanely powerful 8th-generation Intel Core i7 processor, and discrete-class Radeon graphics – once you throw in some RAM and storage, you’ve got a small and easily portable PC that can handle photo editing with ease.
At first glance, it may look more like a set-top box than a desktop PC, but the device is interesting enough to look like more than just a plain box in your home entertainment setup while also not being too distracting if you decide to use it as your work computer.
Also, if you often travel around and want a powerful and dependable PC for photo editing, then this is definitely worth considering.
Read the full Intel Hades Canyon NUC review
Best PC for photo editing: FAQs
How to choose the best photo editing PC
Why you can trust TechRadar
We spend hours testing every product or service we review, so you can be sure you’re buying the best. Find out more about how we test.
When choosing which photo editing PC is best for you, it’s a good idea to have a clear idea how you’ll be using the machine. Given the considerable variance in costs between some of the PCs featured in this list, it’s important to get a solid grasp of the level of photo editing performance you require.
If you’re an amateur photographer who would love to simply spend a little more time editing shots taken in your spare time, then you’re unlikely to need to shell out on some of the more powerful machines in this list.
Conversely, if you’re a professional photographer who relies on being able to turn around a considerable number of photos during working hours in order to pay the bills, eyeing up the powerful models will prove a shrewder decision in the long run.
There are of course more subjective choices to be made too. Windows or Apple is the main one, of course, but there are also aesthetic choices like whether you want something that will sit unmoved in a defined office space, or whether you require something portable.
When selecting your photo editing PC, look for those that offer a high amount of RAM and SSD storage. Memory and disk are really important, even more than picking a high-powered CPU and GPU (although they really help ease workflows, of course). Ideally, choose a computer offering a minimum of 16GB RAM and 1TB SSD storage for best results.
Why do I need a photo editing computer?
Photo editing software is resource-hungry – so you need a computer that can keep pace, especially for more complex projects.
Professional software like Adobe Photoshop, and the best Photoshop alternatives can force the computer to work hard. That leads to a lowering of performance, slowing down creative processes, and outputting images that don’t match the vision you had in your head – or what the client wanted. As a result, your work and your workflow suffers.
For a PC for photo editing, we recommend minimum specs of 16GB RAM and 1TB of SSD storage – paired with the best photo cloud storage for backups.
Photo editing: PC vs Mac
Below is an excerpt of “The Digital Darkroom: The Definitive Guide to Photo Editing” by James Abbott, published by Ilex Press (£17.70 on Amazon.co.uk). James talks briefly about the differences between Apple and Windows-based devices when it comes to photo editing.
“With two major systems available in Apple and Windows computers, which one is truly better for photo editing? All professional photographers use Macs, don’t they? And aren’t Macs simply much better at running photo editing software than Windows PCs? When Photoshop 1.0 was launched back in 1990 it was Mac-only software, and it wasn’t until 1993 with version 2.5 that it became available for Windows computers. Macs remained the favorite option for graphic designers, and this, alongside the fact that digital typography began on Macs, helped to create the idea that Macs were best for running Photoshop.
The reality is that running Adobe and Affinity Photo (ed: probably the most potent rival to Adobe’s hegemony – read our Affinity Photo review) is identical on both Mac and Windows PCs. There really are no differences in performance, features or functionality, although faster and more powerful computers of both types are preferred. This means that you don’t have to switch from Windows to Apple when you first begin editing – you can use whichever system you prefer.
I used to use Macs, but once Apple made it difficult to upgrade components such as RAM and hard drives, I switched to a Windows PC because I knew I’d be able to upgrade all components when I wanted to. The switchover was seamless, and while I miss the clean simplicity of the macOS operating system, the versatility of the Windows PCs I’ve owned since I switched has been well worth it.
Just one more thing: with improvements in the processing power of both Android and iOS tablets, it’s now possible to edit images using these smart devices. The ability to use touch can provide a highly tactile approach to editing, and with Affinity Photo and different versions of Photoshop and Lightroom (read our Lightroom review) available for tablets, there’s huge scope for using these devices.
From a workflow point of view, computers remain the best devices for image editing because of their greater processing power, larger screens and increased space for storing image files. Tablets, however, are a great option when travelling for image editing on the go.
How we test the best PC for photo editing
In our run down of the ten best PCs for photo editing, we’ve rigorously tested all PCs using our standard reviewing process for laptops and desktops. This begins with looking at the built quality of all models, assessing its design and build to see how robust it feels, testing the functionality of all ports, switches and latches.
We looked at screen quality, testing brightness and tone, and the overall weight and size of the machine. We also considered the machine’s compatibility with the leading photo editing software, and ran the rule on battery life and (key in the case of photo editing) processing speed.
Best laptops for graphic design: For staying creative on the move
Round up of today’s best deals
Apple iMac 24-inch M1 2021
$1,229
$1,058
View
See all prices
Apple iMac 27-inch (2020)
$1,799
View
See all prices
Apple Mac mini (M1 2020)
$999. 55
$946.37
View
See all prices
Microsoft Surface Studio 2
$4,299.99
View
See all prices
Low Stock
Apple iMac 27-inch (2019)
$1,999
View
See all prices
powered by
Sign up to the TechRadar Pro newsletter to get all the top news, opinion, features and guidance your business needs to succeed!
Contact me with news and offers from other Future brandsReceive email from us on behalf of our trusted partners or sponsors
Matt is TechRadar’s Managing Editor for Core Tech, looking after computing and mobile technology. Having written for a number of publications such as PC Plus, PC Format, T3 and Linux Format, there’s no aspect of technology that Matt isn’t passionate about, especially computing and PC gaming. Ever since he got an Amiga A500+ for Christmas in 1991, he’s loved using (and playing on) computers, and will talk endlessly about how The Secret of Monkey Island is the best game ever made.
With contributions from
Steve ClarkB2B Editor – Creative
Editing photos and videos in Windows
Windows 11 Windows 10 More…Less
Whether you want to apply changes that affect the quality, quality, and appearance of your photo, or you want to add information on top of photos, the Windows Photos app gives you all kinds of options to make your photos and videos look their best .
Photo change
With the Photos app, you can easily crop, rotate, customize the look, add a filter, and write or draw on a photo to communicate and provide context.
In the search box on the taskbar, type Photos . Select Photos from the list. Then select the photo you want to change.
org/ListItem”>
Select Change image ( CTRL + E ) at the top of the screen.
Select Trim , Adjust , Filter or Markup to start editing.
Use these functions to adjust the light, color, look and feel of your photo.
Tip: To undo all changes applied to a photo, click the Reset button at the top left of the screen.
What each function does
Crop, flip or rotate photos to crop unwanted parts manually or use preset aspect ratios. You can also rotate the photo left and right by 90 degrees or incremental degrees, or rotate the image by 180 degrees.
When viewing an image, select Edit Image at the top of the screen.
Select Crop , and then on the toolbar at the bottom, select one of the options:
Turn clockwise or counterclockwise
Use preset aspect ratio
org/ListItem”>
Vertical or horizontal
Free rotation of the photo using the slider
Adjust the light and color to set the mood and quality of your photos.
Select Change image at the top of the screen.
Select Adjust , and then in the adjustment panel on the right, adjust the light and color sliders.
You can click and hold the spacebar to view the original photo.
Use the filters to refine the tone of your images or add special effects to transform your photos with one click. To get started, open a photo.
Select Change image at the top of the screen.
Select Filter , and then in the Filter panel on the right, select one of the fifteen available filters. Don’t worry if you don’t want to apply any filters – you always have the option “Original “.
You can click and hold the spacebar to view the original photo.
Photos of markings . Sometimes there is more to a story than what photographs can convey on their own. Add a personal touch to your favorite moments by drawing on your photos.
To get started, open the photo or video you want to tag.
Select Change image at the top of the screen.
Select Markup , and then on the toolbar select one of the three drawing tools (2 available pens and one marker).
Select the line type (regular line, single arrow line, double arrow line) and color and size from the pen options.
Go ahead and draw directly on your image, and don’t worry if you mess up – you can always erase the markings you don’t like with Eraser . Or, clear the entire drawing by selecting Clear all ink strokes next to the Eraser tool.
Photo change
With the Photos application, you can easily crop, rotate, auto-enhance, and apply filters to your photos.
Enter photos in the search box on the taskbar. Select Photos from the list. Then select the photo you want to change.
Select Edit & Create at the top of the screen.
Select Edit , then Crop and Rotate , Filters or Adjust .
Use these functions to change lighting, color, sharpness, and red-eye removal.
Tip: To make minor changes or edit errors, select Edit & Create > Edit > Corrections. Then select Red Eye or Spot Correction .
For more options, select Edit & Create, and then select Add 3D Effects or Edit with Paint 3D .
Get creative with your photos and videos
In some cases, there is more to photos and videos you can add something special. Make them more personal by painting something new on them.
First, open the photo or video you want to enhance.
Select Edit & Create at the top of the screen.
org/ListItem”>
Select Draw , and then select one of the three drawing tools from the toolbar.
Select the selected tool a second time to view color and size options.
Draw something directly on the image. If you do something wrong, don’t worry – you can always erase the drawn elements that you don’t like using the Eraser tool. Or, clear the entire drawing by selecting Clear all handwriting strokes .
For more options, select Modify & Create and then select Add 3D Effects or Modify with Paint 3D .
Share your creations
If you are happy with your drawing, share it! To share a still resized image or animated drawing, select Share .
For more information about editing a video, see Create a video.
See also
Removing the background of a photo with Paint 3D
Grouping photos by faces
View all photos
Photo editing software – free and paid
We often see great photos, beautiful, stunning, with perfect focus and color saturation. Let’s consider what programs for photo processing are – free and paid.
The merit lies in the subsequent work carried out with photo editing programs, the purpose of which is to improve and optimize photographs, interfering with white balance, colors, contrasts, exposure, brightness, focus and many other factors that retouch images by removing what don’t like to make room for something else.
Among the paid programs, Photoshop is still the best, despite the fact that there are good alternatives, while Gimp, among the free photo editing programs, is the closest version to Photoshop itself, but free, even if it requires a little more effort and dedication than other free alternatives.
Best Free Photo Editing Software
Irfan View
The free version is well organized, intuitive to use and has several features that are typical of higher category software.
It’s great for beginners, but not forgotten by professionals who can find it a worthy alternative to other competing and more expensive programs.
What’s more, it is suitable for both Windows and Apple.
Some functions are not allowed and are limited to those who own the free form program, although it is already complete in all respects, at least for photo optimization.
Otherwise, it lacks some of the features that paid programs have, but among the free programs, it is certainly one of the simplest and most functional.
Those who want to start experimenting with photo editing can find Infran View one of the best tools to get started and practice.
Pros:
Ease of use
Cons:
Lacks some features
Lacks graphics
PhotoVintage
This photo editor has all the necessary functions for standard photo editing. In processing, you can remove stains, scratches and other defects. There is an option to turn black and white photos into color in an instant. You can also apply effects and labels.
The program is completely in Russian and is intuitive, flexible color correction allows you to turn a picture into a masterpiece of art. By the way, the app has over 100 effects. In most cases, you will need no more than 5 minutes to process a photo.
You can download the program from the official website. There is a paid version that opens up all the features of the software.
Gimp
Gimp wants to be a free replacement for Photoshop or other famous but paid programs.
Let’s just say that the creators have done a good job and are making improvements every day as it is an open source platform.
Even the presentation and interface are very similar to Photoshop, reminiscent of a very professional style, with opening windows, information and features just waiting to be used to their full potential.
It is simpler than many paid alternatives, but compared to free alternatives it is not an easy program and requires study, but, unfortunately, there are few official tutorials on it.
However, this also means that it is quite extensive, and therefore has more concepts to learn, and is therefore not as easy as other much more simplified and leaner free programs in terms of post-production alternatives.
The color enhancement is done positively and comprehensively, and it is also easy to notice that there are many other tools for adjusting the main parameters in order to get high-quality and even photos.
This invites the photographer to take some time at the beginning to experiment, trying to move between masks and levels.
Pros:
Masks and layers
Feature richness
Professional retouching
Cons:
Lack of comprehensive teaching aids
Difficulty in mastering
Photocollage
By the way, there is also a program Photo COLLAGE. The software allows you to create spectacular collages from images and photos. You can use the program to create collages for the holidays. There are many built-in templates, so you won’t spend much time creating a collage from scratch.
You can download the trial version and, if you wish, purchase it on the official website.
InkScape
It’s free and has a feature that many others don’t have, namely vector graphics.
This format is very useful if you want to create custom graphics for web design.
Various tools are at your disposal with which you can create a logo or banner ad without neglecting basic retouching, which is useful for giving the best look to your photographic images. There are tools in this sense, but they are very limited, and it seems that this area has been somewhat neglected.
Vector graphics are definitely a big plus, which not everyone has and which allows you to work while minimizing quality losses, especially when converting formats and creating renders.
Pros:
Vector graphics
Web design
Cons:
Basic photo editing with reduced functionality
9000 2
Paid / photo editing software
AVS Photo Editor
The program from the AVS4YOU platform works well when it comes to easily editing photos, their inherent colors, saturation, contrast, exposure and brightness.
It’s also easy to apply effects to photos by bringing them back to the past with sepia tones, grayscale, black and white, or various other variables.
The application of filters is practical and intuitive, and changes can be observed in real time in a small window comparing the processed image with the original, although this aspect is the weak link of the program, as details are lost.
However, when looking at the end result, there are no problems.
If the goal of processing is to optimize a photo, AVS Photo Editor is more than good as it offers good value for money, but if the intention is contouring, creating graphics, adding or removing elements, creating image overlays or photo montage, this software has serious drawbacks , since such functions, although related to the subject, are not part of the program.
Pros:
Value for money
Immediacy of functions
Cons:
Rough real-time display
903 41 Some typical photo editing features are missing
Windows only.
Adobe Lightroom
This is an image editing program that we can put on a lower level than Photoshop, but there are so many tools available and they are all useful that many photographers are often already satisfied with the result and do not even switch to other programs editing.
The controls are very intuitive as this software is designed for those who are passionate about photo retouching.
Some tutorials are available free of charge to make learning easier. An interesting aspect is the ease of tagging, which makes it possible to create an ordered and organized archive, making it easier to search in the future.
Another positive aspect is the ability to save work in the cloud and share it with others.
Lightroom can be seen as a precursor to Photoshop or as its replacement, especially for photo optimization and much less for graphics.
Pros:
Easier than many other similar programs
Also designed for beginners
Features available
Cons:
Lacks graphics parts
Adobe Photoshop
Photoshop is a must- have, a benchmark in photo editing due to its completeness and the possibilities it offers in the processing phase.
With this program, the operator can really do everything or almost everything, up to creating a fictional scene that seems real.
You can artificially make a sad person smile, add missing components to a group photo, process graphics for commercial, funny or other purposes, change a person’s facial features, turn a dog into a cat.
In a word, the possibilities in this regard are almost limitless.
Then there is the part strictly related to photography, and here the program is also complete and interesting in the sense that it allows precise intervention in images or even parts of them.
Photoshop’s authoring engine is based on Adobe Camera Raw, and the program’s automatic features are much appreciated, capable of generating improved processing results that are true in many ways.
The interface is comprehensive and provides a lot of information, although from a graphical point of view there are those who offer a more modern and up-to-date look.
One of the downsides is the fill function: in Photoshop it’s not as accurate as you might expect.
The program is very popular, perhaps the most popular in history, and in case of problems it is easy to find help.
Pros:
Help
Functions available
Versatility
Automatic function
Cons:
Outdated interface
Fill function could be improved
Affinity Photo because it’s new and recent, but it’s a direct competitor to Photpshop, at least in the minds of young developers.
Although the two programs run on two different development engines, they compete for user preferences.
Affinity Photo shows a lot of positive and outstanding features, such as modern and attractive graphics, a very good fill function, but lacks automatic adjustment, which is almost non-existent.
Even from the adjustment of the sectional areas of the images, one would expect something more, although what is offered deserves attention, despite the lack of the ability to freely create color or brightness ranges.
It’s great to work with the brush tool, which offers great control and a lot of action, while face modifications, although possible, look unnatural (Photoshop is better for this).
However, we have a modern and good editing program that can not disappoint expectations.
Pros:
Brush tool
Interface
More advanced software
Cons:
No auto adjustment
Area retouching
Less versatile than Photoshop when retouching photos.
FAQ: Frequently Asked Questions
What is photo editing software? What is photo post-production used for?
Photo editing program is a program that allows you to edit photographic images, optimizing them and making them theoretically better than they were originally.
The software performs the operations, but it is the person (in this case the photographer) who needs to know how to act on the photograph in order to understand how to improve it, where and how to correct it, recognizing mistakes made at the shooting stage, or interpreting the image, presenting its improved compared to reality.
Photo editing software also serves to bring the creativity of the person sitting in front of the computer into reality, perhaps by combining several images to create an effect that could not be achieved with a single shot.
How is a photo edited?
A photograph is edited by intervention to correct errors made in framing or shooting.
The main improvements are more correct exposure, better brightness and contrast, and greater color saturation.
But retouching photographs is also a very common and useful practice to correct imperfections (eg people) or to remove interfering elements (eg high voltage wires in a panoramic shot, a crane or a person in the background).
Using the mouse, you can open the various menus of the program and discover all the various functions available, and then use them to the best of your ability to get the correct image as expected.
How to make a good post-production?
In order to define a good and successful photo post-production, you need to set goals.
You can simply adjust an image to optimize it by affecting brightness, color, contrast, and exposure characteristics, or you can do it differently to prepare graphics for commercial, social, and marketing use by adding special effects, filters, and more.
Post-production offers great opportunities, but only on the basis of goals, you can choose the best photo editing program and judge the result of the work done.
Are there any differences between free and paid photo editing software?
There are differences between free and paid editing programs, and they are quite noticeable.
The functions related to the correction of contrasts, light, exposure, saturation are very similar in both free and paid programs.
The main differences relate to functions beyond the basics: cropping a photo, applying a photo montage, merging multiple images, changing people’s faces: these functions, found in the best paid programs, are not available in free solutions on the Internet.
Should I choose free photo editing software?
If the goal is to adjust the light intensity, contrast, whiteness and colors, perhaps to clear the image of some interfering elements, then an inexpensive or even free program will suffice.
If it is about creating spectacular images, at the limit of the imagination, or in any case about creating an image obtained by combining several images (this practice, for example, is used to demonstrate the perfect photograph of the starry sky), then you need to invest a little money, because the software software that can be found for free on the net is not enough.
«1. Overview and Specifications2. Focusing3. Optical Features4. Lens Comparisons5. Summary6. More Image Samples7. Reader Comments»
This is an in-depth review of the Sigma 50mm f/1.4 DG HSM Art prime lens that was announced on January 6, 2014 for Sigma SA, Canon EF, Nikon F and Sony A mounts. Ever since Sigma announced its new “Art” lens line, it has been releasing superb new lenses and updates. The Sigma 35mm f/1.4 DG HSM Art received the highest praise from us at Photography Life, especially after we compared it to the Nikon 35mm f/1.4G and other 35mm lenses in our extensive review.
So when I first found out that Sigma had plans to update its existing Sigma 50mm f/1.4 EX DG HSM, I got really excited, since I knew that the new Art-series lens would not disappoint. It has been too long since both Nikon and Canon updated their 50mm f/1. 4 primes. In the case with Nikon, its newer 50mm f/1.8G yields better sharpness than the bigger and heavier 50mm f/1.4G. In short, the Nikkor 50mm f/1.4G is just not good enough for modern high-resolution sensors and its performance at maximum aperture is rather disappointing (and the Canon 50mm f/1.4 is quite similar in that regard). The Sigma 50mm f/1.4 Art announcement was very timely because it hits a sweet spot between the sub-par 50mm f/1.4 Nikon and Canon lenses, and the exotic manual focus Zeiss Otus 55mm f/1.4.
Canon EOS 6D + 50mm @ 50mm, ISO 100, 1/800, f/1.6
Sigma wanted to be upfront about its intentions with the Sigma 50mm f/1.4 DG HSM Art – it wanted the photography world to know that the lens was not to compete with all other 50mm f/1.4 DSLR lenses. Instead, Sigma was to compete head-to-head with the now legendary Zeiss Otus 55mm f/1.4, known to be the sharpest standard lens on the market. When the pricing of the 50mm f/1.4 Art was finally revealed at $950 MSRP, it became clear that Sigma’s strategy was to capture the pro-market that wanted superior performance without the hefty price of the Otus.
I shared my initial thoughts on the 50mm f/1.4 Art back in April, with pretty high expectations after seeing the MTF performance and the price of the lens. Since the Canon EF version of the lens was released first, I was able to get a copy along with the Canon 6D about a month ago. Since then, I have taken over a thousand pictures with the lens and was able to use it extensively during my trip to London. In this review, I will focus on my experience with the lens and what I think of it so far.
Canon EOS 6D + 50mm @ 50mm, ISO 100, 1/2500, f/1.4
My biggest concern with the Sigma 50mm f/1.4 Art was its wide-open performance at f/1.4. Since I am not comfortable with shooting the Nikon 50mm f/1.4G wide open, I wondered how the Sigma would do in comparison. As you will see from this review, most of the sample images were taken at f/1.4 to demonstrate the sharpness of the lens, its subject isolation capabilities and bokeh. Some scenes were specifically shot at very wide apertures in the f/1. 4 – f/2 range.
Canon EOS 6D + 50mm @ 50mm, ISO 100, 1/500, f/5.6
Sigma 50mm f/1.4 DG HSM Art Specifications
Mount Type: Sigma, Nikon, Canon and Sony
Focal Length: 50mm
Maximum Aperture: f/1.4
Minimum Aperture: f/16
Lens Construction: 13 Elements in 8 Groups
Angle of View: 46.8º
Number of Diaphragm Blades: 9
Minimum Focusing Distance: 40cm/15.7in
Filter Size: 77mm
Maximum Magnification: 1:5.6
Dimensions (Diameter x Length): 85.4×99.9mm/3.4×3.9in
Weight: 815g/28.7oz.
A lens hood, front & rear lens caps are included with the lens
Canon EOS 6D + 50mm @ 50mm, ISO 100, 1/3200, f/1.4
Other technical information, including manufacturer-provided MTF chart can be found in the Sigma 50mm f/1.4 DG HSM page from our lens database.
Lens Handling and Build
The Sigma 50mm f/1.4 DG HSM is built very differently compared to previous generation Sigma lenses – it has a very nice all-metal barrel instead of a plastic barrel like on the older Sigma 50mm f/1. 4. The lens feels very solid in hands and it has a far better feel to it than the Nikon 50mm f/1.4G, which feels and handles plasticky in comparison. At 815 grams, the lens is a beast! And it had better be, with its complex optical design featuring 13 elements in 8 groups, 3 low-dispersion (SLD) elements and an aspherical lens element. Almost three times heavier than the Nikon 50mm f/1.4G and only 155 grams lighter than the Zeiss Otus 55mm f/1.4, it definitely lets itself know when mounted on a camera. It will surely make a lightweight DSLR front-heavy, although it does balance out quite well on pro-level DSLRs. Built like a tank with an all-metal exterior and a metal mount, it feels like a Zeiss-class lens that will last a lifetime.
Canon EOS 6D + 50mm @ 50mm, ISO 100, 1/100, f/5.6
The Sigma 50mm f/1.4 Art features a 77mm filter thread, which makes it easy to use common clear, polarizing and ND filters without having to purchase different filters or resorting to using adapter rings. The LH830-02 petal-shaped plastic hood is pretty large and does a nice job in both protecting the front element and reducing ghosting / flare. If you like using manual focus or shooting video, you will find the focus ring to be large and very smooth. Similar to all modern Nikkor lenses, the focus ring gives a bit more resistance when you get to minimum focus distance and infinity marks, and rotates past those. From my quick measurements, the distance scale seems pretty accurate and is marked for both feet and meters on top of the lens. The small plate with the letter “A” shows that the lens belongs to the “Art” category of lenses that I mentioned earlier in the review. Right next to the “Made in Japan” text on the side of the lens, there is a switch that can be used to switch from Autofocus to Manual Focus.
Canon EOS 6D + 50mm @ 50mm, ISO 100, 1/4000, f/1.4
There is really nothing to complain about in terms of the lens build except one area – weather sealing. While the lens itself probably can take plenty of abuse, the lens mount is not sealed with a rubber gasket like on the new Nikon lenses. This means that you have to watch out for dust between the lens and the camera mount or it will easily make it into the camera and potentially even into the lens. As I explained in my “what to do with dust inside lenses” article, it is quite normal for lenses to suck air in and out when focusing, so I recommend to try to keep the rear metal mount area clean at all times.
Canon EOS 6D + 50mm @ 50mm, ISO 100, 1/320, f/2.0
«1. Overview and Specifications2. Focusing3. Optical Features4. Lens Comparisons5. Summary6. More Image Samples7. Reader Comments»
Disclosures, Terms and Conditions and Support Options
Filed Under: Cameras and Lenses Tagged With: Lens Reviews, Lenses, Normal Lens, Sigma, Sigma Lens, Sigma Reviews
Review – Canon EF 50mm f/1.4
Review – Canon EF 50mm f/1.4 By: Justin VanLeeuwen | Twitter Discuss the Canon EF 50mm f/1.4
First-time Digital SLR owners often approach me, asking “What should my next lens purchase be?” They’ve quickly outgrown the use of their kit lens, and are looking to try and re-create images that they’ve seen online and in publications. In almost every situation, they want to create great portraits of family members and kids, or take killer detail shots of their cooking. In these cases, their desire to create an image with a shallow depth of field, where focus quickly fades to a blurred background, is what motivates their search. I whole-heartedly recommend that anyone with a SLR should purchase a 50mm lens. It’s a bokeh gateway drug with its ability to create pleasing out of focus backgrounds for anyone at every budget.
At the time of this writing, Canon produces a 50mm f/1.8, a 1.4 and a 1.2 (Sigma currently produces a 50mm f/1.4 as well). Each of these lenses increases the amount of available light to your camera sensor, as well as decreasing the area of sharp focus as the number lowers. With the increase of light, comes an increase in price too. The Canon 50mm f/1.4 is resting comfortably below the middle at ~$399.99 (SRP). To jump up to the 50mm 1.2, you’d be looking at a four-fold increase in price while the 50mm 1. 8 is a budget lens at $125.99 and comes with some noticeable compromises in quality.
Build
While the outer shell of the 50mm 1.4 is clearly stronger than the 50mm 1.8, it doesn’t stands up to the high quality build of the 50mm 1.2. The added weight gives me more confidence in the lens and its durability as often the correlation is more metal parts (and often larger glass). The larger shaft also allows for a focus meter, which the 50mm 1.8 lacks. The focus ring is small but useful for manual focus, and its autofocus is fast, though a bit noisy. The front element does extend when focusing on closer objects and retracts when approaching infinity. Since it’s not an L-lens, there’s no expectation of weather sealing and, indeed, it is not sealed. Lens hoods are also not included with non L-lenses, though they are available to purchase separately, and while its perfectly useable without one, it is prone to some flare, which a hood would serve to minimize or eliminate.
Image
When buying the Canon 50mm f/1.4, the main selling factor, for me, was its comparative image quality. It is sharp at f/2.0 and I didn’t find a large enough difference with it over the 50mm 1.2 (at least, not for the price), but enough of a change of sharpness, vignetting, and chromatic aberration over the 50mm 1.8 to justify the slight added expense. Of particular interest, I find a bokeh comparison a great way to judge the quality.
I made some adjustments to boost contrast to help see how defined the pentagon shape of the bokeh produced by the 50mm f1.8 is, but hardly see any difference in the shape between the 1.4 and 1.2. These results become less obvious when wide-open, but this is reflective of how your bokeh may be formed when shooting. This is also not a commentary on the overall quality of the bokeh, which is more of a personal feel, but this type of test was my original reason for avoiding the 1.8 and going for the 1.4.
I’ve never been particularly concerned with vignetting and chromatic noise; it’s something we have to work through with any lens. The 50mm 1.4 handles these things very well, with a manageable vignette that I find compliments many portraits. When correcting for (minor) lens distortion in Lightroom, I often leave the vignette correction off, embracing its vignetting ability to help drive focus on the image I created.
As I mentioned, the Canon 50mm f/1.4 is sharp at f/2.0 onwards which is where I most often shoot it. F/1.4 is still usable but be wary of how shallow your depth of field becomes at this focal range and aperture. I find it best to shoot objects just close to infinity (between five and ten feet) to maximize the background blur while still achieving focus on my subject. Much closer and I have difficulty keeping a subject all in focus unless I stop down to increase the depth of field.
Who’s it for?
Anyone and everyone. Seriously! Where can’t you find use for a 50 mm lens? Light, fast and inexpensive, the Canon 50mm f/1.4 can infiltrate low-light situations, light weddings or photojournalist work. Not just for portraits, a fast 50mm can work as an optimal “detail” lens: versatile in capturing bouquets, dinner placing, all allowing focus to be drawn to the subject while beautifully blurring out the background.
Aspiring food photographers may find better use of a 50mm lens than a 100mm macro (believe me, I get asked this a lot) since it provides suitable distance from the plates to encompass a setting as well.
Families with children, pets, or both, with larger professional photographic aspirations, or not, should all own this lens. You will take the photos you always wanted to take* by using a 50mm relatively wide-open. It’s the only lens I took to the hospital to photograph my son’s birth, requiring no flash, and I certainly never felt like I needed something else.
It’s great for taking portraits of all kinds, including full-body on a full-frame camera (behaves a lot like an 85mm on a crop body), and reasonably close portraits. Nothing’s prohibiting you from stopping it down to more manageable apertures like 2. 8 either.
*Of course a fundamental understanding of the operation of your camera, shutter speed, white balance, aperture, and composition will also be quite useful. But you get what I mean.
Conclusion Given direct comparisons between Canon’s other 50mm offerings, I can only conclude that the 50mm f/1.4 offers the best value for quality, and perhaps so of any lens. While so much of my kit has been sold off and “upgraded” to those magical red L-rings, I’ve happily stuck with my 50mm f/1.4. Not even using a 50mm 1.2 for a month was able to convince me otherwise. Was the later better? Sure! Absolutely, it was a remarkable lens to use, and I look back at some of my images and those of others who own the lens and it’s helped create some truly magical moments. But so has the 1.4, and for significantly less money. While the pros and wealthy may always flock towards the top of the line “best of”, some of us can give up minute gains that we’d never much notice in favour of something more affordable and almost as good.
Purchase Options:
Canon EF 50mm f/1.4: Adorama
Pros:
Great quality
Fast glass, zoom zoom.
Very nice quality of bokeh
Buy this lens over the 50 1.2 and get $900 extra in your wallet! (from not spending more)
Cons:
Not as sharp at equal apertures as the 50mm f/1.2 L
Colour and contrast not as nice as the 50mm f/1.2 L
Weight and build not as nice as the 50mm f/1.2 L
It’s not the 50mm f/1.2 L
A bit old and lacking some of the modern advancements in optics, potentially replaced in the lens lineup soon (replacement will cost more though, as does the Sigma 50mm f/1.4)
Overview of fast lenses Canon EF 50mm F1.2L USM and 50mm F1.4 USM
Both lenses are veterans in the world of Canon EF optics. True, the faster and more expensive L-tool is 12.5 years younger, but its age is more than respectable. In both cases, “life expectancy” should not be embarrassing: in fact, why try to improve something that works well even without alterations? Of course, this does not mean that the manufacturer will not release updated versions. We will attempt a direct comparison of the two heroes of today’s review. First, let’s take a closer look at the specifications.
Specifications
Canon EF 50mm f/1.2L USM
Canon EF 50mm f/1.4 USM
Bayonet
Canon EF
Body material
metal
composite
Focal length
50 mm
Maximum aperture value
F1.2
F1.4
Minimum aperture value
F16
F22
Number of aperture blades
8
8
Optical design
8 elements / 6 groups
7 elements / 6 groups
Minimum focusing distance
0. 45 m
0.45 m
Diagonal viewing angle
46°
46°
Maximum magnification
0.15×
0.15×
Autofocus
internal
Autofocus Motor
Annular ultrasonic motor (USM)
micro USM
Stabilization
no
Dust and moisture protection
yes
no
Filter thread
∅72 mm
∅58 mm
Dimensions (diameter and length)
∅85.8/65.5 mm
∅73.8/50.5 mm
Weight
580 g
290 g
Average price
ask prices
ask prices
In addition to the obvious differences in aperture (plus half a stop), weight (twice as much) and size, the Canon EF 50mm f/1.2L USM has a metal body, a high-speed ring ultrasonic autofocus motor, and is equipped with dust and moisture protection, which confirms its belonging to the class of professional optics marked “L”.
Construction
The build quality of both lenses is very high, but the Canon EF 50mm f/1.2L USM is much more solid and reliable, as professional L-optics should be.
Canon EF 50mm f/1.2L USM
Canon EF 50mm f/1.4 USM
Rubberized manual focus control rings are located closer to the front lenses. Each of the lenses has only one switch – focus mode (automatic / manual). The distance scale is double: in feet (green) and meters (white).
The optical design of both lenses inherits the “double Gauss” (see front pair of lenses). The circuits themselves are similar, like siblings, but the more expensive Canon EF 50mm F1.2L USM has an additional diffuser element in the rear group, and the latest lens has been replaced with an aspherical one. This (theoretically) allows you to sharpen the resulting image.
Rear view. Bayonet fittings are carefully polished. On the Canon EF 50mm f/1.2L USM, this provides dust and moisture resistance when used with eligible Canon cameras.
MTF or Frequency Response graphs (manufacturer data): gray at maximum aperture, black at f/2, blue at f/8; thick lines – 10 lines/mm, thin lines – 30 lines/mm; solid curves are for sagittal structures, dashed curves are for meridional ones. Recall that, ideally, MTF curves should be parallel to the horizontal axis, have no rises and blockages, and be located as high as possible along the y-axis. The MTF curves indicate that both lenses are not perfect, but the professional Canon EF 50mm f/1.2L USM is somewhat inferior to its rival, and its resolution is lower, especially at maximum aperture and when reproducing 30 lines/mm. However, no MTF chart gives an idea of the “character” of the lens – the picture, the bokeh structure and other features that are clearly more significant in portrait optics than sharpness and even contrast.
Laboratory test
Canon EF 50mm f/1.2L USM
Canon EF 50mm f/1.4 USM
Resolution (frame center)
Resolution (frame edge)
Distortion, chromatic aberration (center of frame)
Distortion, chromatic aberration (frame edge)
Resolution curves
Lenses show the expected resolution at all apertures. The center of the frame stays at 80% in both cases, but the Canon EF 50mm f/1.2L USM looks much more stable at the edge.
Chromatic aberrations for both lenses are about the same, rather weak. Oddly enough, they are most noticeable in the center of the frame. At the edge, there is some dispersion at open apertures – the lenses also practically do not differ in this. The distortion is almost imperceptible, although you can detect some tendency to barrel formation on the Canon EF 50mm f/1.4 USM and padding on the Canon EF 50mm f/1.2L USM.
Separately, I would like to note that the Canon EF 50mm f/1.2L USM sets an excellent example of increasing aperture: the resolution not only does not drop, as it usually happens, but also stabilizes at a fairly high level.
Hands-on photography
We tested the lenses in the field with Canon EOS 5D Mark IV and Canon EOS 6D Mark II cameras. In this case, the following parameters were used:
aperture priority,
center-weighted exposure metering,
single-frame autofocus,
center focus,
automatic white balance (ABB).
Captured frames were saved on a storage medium as uncompressed RAW files, which were subsequently converted to JPEG with minimal compression. In situations with complex and mixed lighting patterns, the white balance was adjusted manually. In some cases, in the interests of the composition, they resorted to cropping the frame.
General Impressions
Canon EF 50mm F1.4 USM is, of course, twice as light and noticeably smaller, but the Canon EF 50mm F1.2L USM does not look like a monster, especially in comparison with Canon EF 85mm F1.2L of similar aperture II USM or the old Canon EF 50mm F1.0 USM, long discontinued.
Autofocusing for both subjects works quickly and confidently even at full disclosure, but the faster aperture rival is slightly inferior in terms of its reaction speed. However, this is understandable: the moving mass of glass in his case is much larger. Both lenses allow you to override autofocus control and manually adjust the focus.
The marriage that often occurs when autofocusing at an open aperture when using both rivals is not related to the specifics of the lenses themselves, but to the work of the photographer, since the depth of field at f / 1. 2 and f / 1.4 is critically small, and getting into the right point, especially when shooting close-ups, is very difficult.
First, let’s evaluate the work of our wards in simple conditions with sufficient lighting and strong aperture.
Far
Canon EF 50mm f/1.2L USM
Canon EF 50mm f/1.4 USM
Krylatskoe, Moscow ; f/8; 1/500s; ISO 100
Krylatskoe, Moscow ; f/8; 1/500s; ISO 100
Pedestrian bridge “Bagration”, Moscow ; f/8; 1/40 c; ISO 500
Pedestrian bridge “Bagration”, Moscow ; f/8; 1/50 c; ISO 640
The sharpness in the center of the frame is almost the same, but at the edges the Canon EF 50mm F1.2L USM demonstrates a noticeable superiority over the competitor. On the top pair of photos (plein air), the white balance worked out the same, and on the bottom, a colder image tone is noticeable in the Canon EF 50mm F1. 4 USM. These are, apparently, the features of the ABB camera, and not the optics.
Let’s move on to a detailed comparison of the results of both lenses at different aperture openings. For each, we give two pictures: the top one without applying a specific lens profile, the bottom one with a profile that corrects distortion, vignetting and chromatic aberration. The shooting location is an exhibition of ice buildings in the Victory Park on Poklonnaya Hill in Moscow.
Canon EF 50mm f/1.2L USM
Canon EF 50mm f/1.4 USM
F1.2
1/8000 s; ISO 100 without profile
1/8000 s; ISO 100 with profile
F1.4
1/8000 s; ISO 100 without profile
1/8000 s; ISO 100 with profile
1/8000 s; ISO 100 without profile
1/8000 s; ISO 100 with profile
F2
1/6400 s; ISO 100 without profile
1/6400 s; ISO 100 with profile
1/6400 s; ISO 100 without profile
1/6400 s; ISO 100 with profile
F2. 8
1/3200 s; ISO 100 without profile
1/3200 s; ISO 100 with profile
1/2500 s; ISO 100 without profile
1/2500 s; ISO 100 with profile
F4
1/1250 s; ISO 100 without profile
1/1250 s; ISO 100 with profile
1/1250 s; ISO 100 without profile
1/1250 s; ISO 100 with profile
F5.6
1/640 s; ISO 100 without profile
1/640 s; ISO 100 with profile
1/800 s; ISO 100 without profile
1/800 s; ISO 100 with profile
F8
1/400 s; ISO 100 without profile
1/400 s; ISO 100 with profile
1/320 s; ISO 100 without profile
1/320 s; ISO 100 with profile
F11
1/160 s; ISO 100 without profile
1/160 s; ISO 100 with profile
1/160 s; ISO 100 without profile
1/160 s; ISO 100 with profile
F16
1/80 s; ISO 100 without profile
1/80 s; ISO 100 with profile
1/80 s; ISO 100 without profile
1/80 s; ISO 100 with profile
F22
1/50 s; ISO 125 without profile
1/50 s; ISO 125 with profile
Both lenses exhibit severe vignetting at maximum aperture and down to f/5. 6. The Canon EF 50mm F1.4 USM has a more pronounced vignette at comparable aperture ratios (at f/1.4-f/4). Moreover, its edge darkening is not fully corrected by the profile application.
The sharpness in the center of the frame is practically the same for the subjects. At the edges of the frame at f / 2.8-f / 8, it is noticeably higher for the Canon EF 50mm F1.2L USM. At f/11, the lenses are almost indistinguishable in terms of sharpness both in the center and at the edges. The effect of diffraction starts to show on the Canon EF 50mm F1.4 USM at f/16 when the competitor is ahead again, but the result is quite good at f/22 (the more expensive competitor does not have this aperture).
Now let’s study the properties of our wards at the maximum comparable aperture (f/1.4).
Medium shot
Canon EF 50mm f/1.2L USM
Canon EF 50mm f/1.4 USM
f/1.4; 1/40 c; ISO 250
f/1.4; 1/50 c; ISO 320
f/1. 4; 1/320s; ISO 100
f/1.4; 1/400s; ISO 100
f/1.4; 1/125 s; ISO 100
f/1.4; 1/200s; ISO 100
Pairs of photographs taken without the help of a tripod and therefore suffering from zooming, do not reveal significant differences in the behavior of our subjects. Subjectively, we can only judge that the picture of the Canon EF 50mm f/1.2L USM is slightly more pleasant.
Close-up
Canon EF 50mm f/1.2L USM
Canon EF 50mm f/1.4 USM
f/1.4; 1/40 c; ISO 100
f/1.4; 1/50 c; ISO 100
f/1.4; 1/160s; ISO 100
f/1.4; 1/125 s; ISO 100
f/1.4; 1/125 s; ISO 100
f/1.4; 1/125 s; ISO 100
There is practically no difference in detail and pattern of light-tone transitions. The structure of the background blur (more precisely, its structurelessness) looks more pleasing on the Canon EF 50mm f/1. 2L USM. ABB variations reflect the specifics of the camera, not the optics.
Foreground blur (front bokeh)
Canon EF 50mm f/1.2L USM
Canon EF 50mm f/1.4 USM
f/1.4; 1/160 s; ISO 100
f/1.4; 1/125 s; ISO 100
f/1.4; 1/40 s; ISO 125
f/1.4; 1/50 s; ISO 125
f/1.4; 1/80s; ISO 100
f/1.4; 1/80s; ISO 100
In our opinion, the bokeh differs slightly in the above scenes, but still the Canon EF 50mm F1.2L USM has a slightly softer bokeh.
Let’s move on to a detailed study of the bokeh phenomenon at different aperture values.
Background Blur
Canon EF 50mm f/1.2L USM
Canon EF 50mm f/1.4 USM
F1.2
1/320 s; ISO 100 without profile
1/320 s; ISO 100 with profile
F1.4
1/250 s; ISO 100 without profile
1/250 s; ISO 100 with profile
1/200 s; ISO 100 without profile
1/200 s; ISO 100 with profile
F2
1/125 s; ISO 100 without profile
1/125 s; ISO 100 with profile
1/100 s; ISO 100 without profile
1/100 s; ISO 100 with profile
F2. 8
1/50 s; ISO 100 without profile
1/50 s; ISO 100 with profile
1/50 s; ISO 100 without profile
1/50 s; ISO 100 with profile
F4
1/40 s; ISO 160 without profile
1/40 s; ISO 160 with profile
1/40 s; ISO 160 without profile
1/40 s; ISO 160 with profile
F5.6
1/50 s; ISO 320 without profile
1/50 s; ISO 320 with profile
1/40 s; ISO 320 without profile
1/40 s; ISO 320 with profile
F8
1/50 s; ISO 640 without profile
1/50 s; ISO 640 with profile
1/40 s; ISO 640 without profile
1/40 s; ISO 640 with profile
The Canon EF 50mm F1.2L USM has no difference in bokeh at f/1.2 and f/1.4. At f/1.4-f/4, the Canon 50mm F1.4 USM is only slightly behind its rival. At f / 5.6-f / 8, the picture is almost the same.
Gallery
The rest of the photos taken in the course of practical photography, we have collected in the gallery without comments.
Summary
The Canon EF 50mm f/1.2L USM is a professional lens with ultra-fast aperture, rugged construction, dust and moisture resistance. The Canon EF 50mm f/1.4 USM is a more compromise option, featuring a much lower price, but lacking the listed advantages.
When analyzing the resulting images, the difference between the lenses is revealed in the higher peripheral sharpness and better background blur pattern of the Canon EF 50mm f/1.2L USM. However, these nuances are noticeable only in direct comparison. It can be concluded that the need for a more expensive model arises when an additional half-stop of aperture is needed, and nothing can make up for this. In other situations, especially at aperture, the Canon EF 50mm f/1.4 USM can achieve almost the same results.
Copyright photographs taken with Canon 50mm fast EF lenses can be found in this album: for testing
Canon EF 50mm F/1.4 USM vs Sigma 50mm F1.4 DG HSM Art: What is the difference?
76pts
Canon EF 50mm F/1. 4 USM
86pts
Sigma 50mm F1.4 DG HSM Art
€ 559
Sony ELeica LNikon FCanon EF
Comparison Winner
€ 559
vs
33 facts in comparison
Canon EF 50mm F/1.4 USM
Sigma 50mm F1 .4 DG HSM Art
Why is Canon EF 50mm F/1.4 USM better than Sigma 50mm F1.4 DG HSM Art?
525g lighter? 290g vs 815g
6f smaller aperture (aperture) at maximum focal length? 22f vs 16f
0.1TStop more gears? 1.8TStop vs 1.9TStop
19mm filter size? 58mm vs 77mm
6f smaller aperture at minimum focal length? 22f vs 16f
Why is Sigma 50mm F1.4 DG HSM Art better than Canon EF 50mm F/1.4 USM?
3P-MPix sharper result? 13P-MPix vs 10P-MPix
Does it include lens hood?
0. 05m shorter minimum focus distance? 0.4m vs 0.45m
Has rounded aperture blades?
1 more aperture blades? 9 vs 8
Reversible hood?
0.03x Better Magnification ratio? 0.18x vs 0.15x
10µm less ESS chromatic aberration? 9Canon EF 50mm F/1.4 USM
vs
Canon EF 50mm F/1.8 STM
Sigma 50mm F1.4 DG HSM Art
vs
Nikon AF-S Nikkor 50mm F/1.4G
Canon EF 50mm F/1.4 USM
vs
Canon EF 85mm F/1.8 USM
Sigma 50mm F1.4 DG HSM Art
vs
Sigma 50mm F1.4 EX DG HSM
Canon EF 50mm F/1.4 USM
vs
Sigma 50mm F1.4 EX DG HSM
Sigma 50mm F1.4 DG HSM Art
vs
Sigma 85mm F1.4 DG HSM Art
Canon EF 50mm F/1.4 USM
vs
Canon RF 50 mm f/1.8 STM
Sigma 50mm F1. 4 DG HSM Art
vs
Sony FE 55mm F1.8 ZA Carl Zeiss Sonnar T*
Canon EF 50mm F/1. 4 USM
vs
Canon EF 24-105mm F/4L IS USM
Sigma 50mm F1 .4 DG HSM Art
vs
Sony FE 50mm f/1.2 GM
Canon EF 50mm F/1.4 USM 9
vs
Nikon AF-S Nikkor 50mm F/1.8G
Canon EF 50mm F/1.4 USM
Canon EF 50mm F/1.8 II
Sigma 50mm F1.4 DG HSM Art 03
vs
Sigma 30mm F1. 4 DC HSM A
Sigma 50mm F1.4 DG HSM Art
vs
Sigma 35mm f/1.4 DG DN Art
Canon EF 50mm F/1.4 USM
vs
Nikon AF Nikkor 50mm F/1.4D
Sigma 50mm F1.4 DG HSM Art
vs
Nikon Nikkor Z 50mm f/1.8 S
Price comparison
Sigma 50mm F1.4 DG HSM Art
Buy used:
€399
Product
Store
Price
9001 5
Sigma 50mm F1,4 DG HSM Art Objektiv (77m. ..Sigma 50mm F1,4 DG HSM Art Objektiv (77mm Filtergewinde) für Sony A-Objektivbajonett
€559
Sigma 50mm F1,4 DG HSM Art für SIGMA SD/. ..Sigma 50mm F1,4 DG HSM Art für SIGMA SD/DP Kameras für SIGMA SA Mount 90 020
€ 759
User Reviews
Overall Rating
Canon EF 50mm F/1.4 USM
0 User Reviews
Canon EF 50mm F/1.4 USM 900 03
0.0 /10
0 User reviews
Sigma 50mm F1.4 DG HSM Art
1 User Reviews
Sigma 50mm F1.4 DG HSM Art
8.0 /10
1 User Reviews
Features
Build Quality
No reviews yet
10.0 /10
1 votes
Autofocus
No reviews yet
10.0 /10
1 votes
Sharpness
90 002 No reviews yet
10.0 /10
1 votes
Distortion
No reviews yet 002 1 votes
Chromatic aberration
No reviews yet
10.0 /10
1 votes
Optics
maximum focal length
More The maximum focal length allows you to focus on a small part of the scene and also offers a narrower angle of view than shorter focal lengths.
minimum focal length
short minimum focal length allows you to get more of the scene in the photo, and offers a wider viewing angle than longer focal lengths.
has a built-in optical image stabilizer
✖Canon EF 50mm F/1.4 USM
✖Sigma 50mm F1.4 DG HSM Art
Optical image stabilization uses gyroscopic sensors to track camera vibration. The lens adjusts the optical path accordingly, preventing image blur before it is captured.
maximum angle of view
At the short end of the lens you get the widest angle of view. This allows you to fit most of the scene into a photo (based on the APS-C format).
minimum angle of view
At the long end of the lens you get the narrowest angle of view. This allows you to fit a small part of the scene into the photo, as if you were pointing the camera at the subject (based on the APS-C format).
magnification
A true macro lens has a 1:1 magnification. This means that the image is a life-size representation of the subject being photographed.
optical zoom
The zoom range is the ratio between the longest and shortest focal lengths. A higher zoom range means the lens is more versatile.
Aperture
wide aperture (main camera)
This is the widest aperture available at the minimum focal length. With a wider aperture, the sensor can capture more light, helping to avoid blur due to faster shutter speeds. It also provides a shallow depth of field, allowing you to blur the background to focus on the subject.
widest aperture at maximum focal length
This is the widest aperture (aperture) available at maximum focal length. With a wider aperture, the sensor can capture more light, helping to avoid blur, at the cost of a faster shutter speed. It also provides a shallow depth of field, allowing you to blur the background to focus on the subject.
Has rounded aperture blades
✖Canon EF 50mm F/1.4 USM
✔Sigma 50mm F1.4 DG HSM Art
Similar to the number of aperture blades, rounded blades affect how light passes through the sensor. Rounded lobes, often found only on more expensive lenses, enhance the appearance of out-of-focus objects. This allows you to achieve better, softer bokeh in your photos.
aperture blades
The aperture determines how much light passes through the camera’s sensor. More blades are often an indication of a better quality lens. They also achieve better bokeh when they blur the background, while a lens with fewer blades often results in harsher, more polygonal bokeh.
smallest aperture at maximum focal length
This is the smallest aperture (aperture) available at maximum focal length. A smaller aperture reduces the amount of light reaching the sensor. This is important in bright environments where a wide aperture can cause your shot to overexpose (overexposure). Another benefit is that with a smaller aperture you get a greater depth of field and can keep all images in focus.
smallest aperture at minimum focal length
Smaller aperture reduces the amount of light reaching the sensor. This is important in bright conditions where a wider aperture can cause your shot to be overexposed. Another benefit is that with a smaller aperture you get a greater depth of field and can keep the entire image in focus.
Focus
Can focus to infinity
✔Canon EF 50mm F/1.4 USM
✔Sigma 50mm F1.4 DG HSM Art
Many lenses let you focus to infinity. This is very important if you want to take photos of distant subjects, such as when shooting landscapes, in order to make sure everything is clearly visible and in focus.
Has a focus motor
✔Canon EF 50mm F/1.4 USM
✔Sigma 50mm F1.4 DG HSM Art
Lenses with a built-in focus motor can autofocus even if the camera does not have its own focus motor.
Has full manual focus
✔Canon EF 50mm F/1.4 USM
✔Sigma 50mm F1.4 DG HSM Art
With full manual focus, you can move the focus ring while it is in AF (autofocus) mode ). This means that you can make manual adjustments once the AF mode has ended without changing the settings in manual mode.
has a quiet focus motor built into the lens
✔Canon EF 50mm F/1.4 USM
✔Sigma 50mm F1.4 DG HSM Art
Lenses with a built-in focus motor allow faster focusing on a subject than lenses without a motor, which is located on the camera’s motor housing.
minimum focus distance
This is the closest distance at which the lens can focus. A short minimum focal length allows you to get closer to your subject, and this is especially important when you take macro shots.
Geotagging
sharpening result
10P-MPix
13P-MPix
Sharpness result from the DxOMark feature set. This result is based on the MTF (Modulation Transfer Function) measurement and gives a general idea of the sharpness of images taken with a lens. Tested with Nikon D7000 or Canon 7D. Source: DxOMark.
chromatic aberration
DxOMark lateral chromatic aberration results. Chromatic aberration is a type of distortion that results in color fringing along the edges within an image. Tested with Nikon D7000 or Canon 7D. Source: DxOMark.
DxOMark score
DxOMark is a set of tests to measure the performance and quality of lenses and cameras. The DxOMark score is the overall score given to a lens. Tested with Nikon D7000 or Canon 7D. Source: DxOMark.
distortion
Distortion results from the DxOMark feature set. Lens distortion refers to the change in magnification of the entire image. More distortion will affect the lines that were not written correctly in the picture. Tested with Nikon D7000 or Canon 7D. Source: DxOMark.
gear
1.8TStop
1.9TStop
The result of gears from the DxOMark feature set. The transmission determines the amount of light that reaches the sensor through all the glass elements of the lens, a lower TSTOP means more light. This is important because the less light that hits the sensor, the higher ISO or slower shutter speed is required. Tested with Nikon D7000 or Canon 7D. Source: DxOMark.
Description LEGO® Technic: Monster Jam Grave Digger
Ready for the ultimate smashing, crushing, gravity-defying monster truck experience? Then strap in and prepare for the performance of a lifetime with the LEGO® Technic Monster Jam® Grave Digger®. See the ghost and fire details, just like on the real truck. Huge tyres and pull-back action make high-speed jumps and flips easy. Time for something new? Rebuild your truck into an off-road buggy.
Let monster truck fans recreate favourite stunts with the LEGO® Technic Monster Jam® Grave Digger®(42118) building kit. Authentic features include huge tyres, sticker details and more
Twice the fun! The monster truck toy rebuilds into an off-road buggy so kids can enjoy 2 building challenges and heaps of vehicle roleplay action
With a pull-back motor, the monster truck and off-road buggy speed along easily, just like the real-life vehicles
Looking for the best gifts for kids who love monster truck toys? This set is ideal for kids aged 7 and up who love Monster Jam® shows or awesome toy vehicles
Cool features include the bendable flag which moves up and down and red headlights, just like on the real Grave Digger® truck
This Monster Jam® toy measures over 4 in. (11 cm) high, 9.5 in. (24 cm) long (with flag) and 4 in. (11 cm) wide
Instructions for the Grave Digger® model are included. You’ll also find digital Instructions PLUS in the free LEGO® Building Instructions app. Instructions for the off-road buggy are available online
The LEGO® Technic universe offers advanced buildable models for young LEGO fans ready for their next building challenge
LEGO® Technic components meet stringent industry standards to ensure they are consistent, compatible and connect reliably every time – it’s been that way since 1958
LEGO® Technic components are dropped, heated, crushed, twisted and analysed to make sure they meet stringent global safety standards
Build, race and recreate impressive stunts from the Monster Jam® arena with this action-packed building kit. Monster truck fans will love all the realistic details packed into this cool set, designed in partnership with
Monster Jam®. Discover heaps of realistic details and functions. The monster truck rebuilds into an off-road buggy. Includes digital Instructions PLUS for the off-road buggy. Pull back and release to send the truck speeding. Monster Jam® fans will love the authentic details. Off-road buggy features the same cool pull-back function. The play goes on with this fun-filled set. When kids are ready for a new challenge, the model rebuilds into an off-road buggy.
Construction manual 42118
View the building instructions for this LEGO® set.
Download – 42118_01_Build_Alt
Download – BI 3101, 64+4, 42118 V29
Download – BI 3101, 64+4, 42118 V39
LEGO 42118 Monster Jam Grave Digger Set Parts Inventory and Instructions
Set Filecard
Average Review Rating: (0 Reviews)
Year Released: 2021
Advertised Number of Pieces: 212
Actual Number of Pieces: 212
Total Weight of Pieces: 0. 86 lbs
Weight of Original Box: Unavailable
Weight of Original Instructions: Unavailable
Dimensions of Original Box: 10-3/8″ by 5-1/2″ by 3-5/8″ (26.2 cm by 14.1 cm by 9.1 cm)
Came with Instructions: Yes
Number of Minifigs:
Items related to LEGO 42118 Monster Jam Grave Digger available on eBay
Buy new lego technic monster jam grave digger 42118 ages 7 plus 212 pieces 6328589
Buy lego technic monster jam grave digger 42118 model building kit 212pcs jan.1,21
Buy lego technic 42118 monster jam grave digger truck set building kit 2021 212 pc p
Buy lego technic monster jam grave digger truck set building kit (212 pieces) 42118
Buy lego technic monster truck jam 7″ grave digger 42118
Buy lego technic: monster jam grave digger (42118)
Buy lego technic: monster jam grave digger (42118)
Buy lego technic monster jam grave digger 2 in 1 set 42118 – not complete
Buy lego technic monster jam grave digger 42118 model building kit 212pcs jan. 1,21
Looking for a fun toy or gift for boys and girls who love Monster Jam® trucks? The LEGO® Technic™ Monster Jam Grave Digger® 42118 pull-back truck is packed with features that kids will love. Authentic touches include Grave Digger graphics with ghost and fire details, plus huge tires, a movable flag and red headlights. See the exciting world of Monster Jam come to life as kids recreate the epic stunts of one of the most famous and iconic monster trucks of all time.
Awesome 2-in-1 toy Time for a new challenge? Great news! The Grave Digger model rebuilds into an off-road buggy for even more building fun. Check out the free LEGO Building Instructions app to find Instructions PLUS. This interactive guide includes zoom and rotate tools to help kids get building.
Inspiring the next generation of engineers With vehicles that look and function like the real thing, the LEGO Technic universe offers a great introduction to engineering and mechanics for young LEGO fans.
Let monster truck fans recreate favorite stunts with the LEGO® Technic™ Monster Jam® Grave Digger®(42118) building kit. Authentic features include huge tires, sticker details and more.
Twice the fun! The monster truck toy rebuilds into an off-road buggy so kids can enjoy 2 building challenges and heaps of vehicle role-play action.
With a pull-back motor, the monster truck and off-road buggy speed along easily, just like the real-life vehicles.
Looking for the best gifts for kids who love monster truck toys? This set is ideal for kids aged 7 and up who love Monster Jam® shows or awesome toy vehicles.
Cool features include the bendable flag which moves up and down and red headlights, just like on the real Grave Digger® truck.
This Monster Jam® toy measures over 4 in. (11 cm) high, 9.5 in. (24 cm) long (with flag) and 4 in. (11 cm) wide.
Instructions for the Grave Digger® model are included. You’ll also find digital Instructions PLUS in the free LEGO® Building Instructions app. Instructions for the off-road buggy are available online.
The LEGO® Technic™ universe offers advanced buildable models for young LEGO fans ready for their next building challenge.
LEGO® Technic™ components meet stringent industry standards to ensure they are consistent, compatible and connect reliably every time – it’s been that way since 1958.
LEGO® Technic™ components are dropped, heated, crushed, twisted and analyzed to make sure they meet stringent global safety standards.
The manufacturer suggests this set for ages 7+.
Inventory of Parts Needed to Build LEGO 42118
Got It
Image
30374
Bar 4 Long – Lightsaber Blade
4
Lime
25214
Brick, Round 1 x 1 d. 90 Degree Elbow – No Stud – Type 2 – Axle Hole
2
MdStone
2525
Flag 6 x 4
1
Black
75c07
Hose, Rigid 3mm D. 7L / 5.6cm
1
Black
12787c01
Pullback Motor 6 x 5 x 3
1
DkStone
42118stk01
Sticker Sheet for Set 42118 – (72176/6323380)
1
Multi
24316
Technic, Axle 3 with Stop
4
RedBrown
15462
Technic, Axle 5 with Stop
1
RedBrown
11214
Technic, Axle Pin 3L with Friction Ridges Lengthwise and 1L Axle
3
Red
41239
Technic, Liftarm 1 x 13 Thick
1
DkStone
99773
Technic, Liftarm Triangle Thin, Type II
4
Black
24116
Technic, Panel Curved 3 x 6 x 3
4
Black
24119
Technic, Panel Curved 7 x 3 with 2 Pin Holes through Panel Surface
2
Black
11946
Technic, Panel Fairing #21 Very Small Smooth, Side B
1
Black
11947
Technic, Panel Fairing #22 Very Small Smooth, Side A
1
Black
71709
Technic, Panel Plate 3 x 7 x 1
2
Black
32556
Technic, Pin 3L without Friction Ridges Lengthwise
2
Tan
18654
Technic, Pin Connector Round 1L
1
MdStone
18654
Technic, Pin Connector Round 1L
6
Lime
18654
Technic, Pin Connector Round 1L
5
Black
62462
Technic, Pin Connector Round 2L with Slot (Pin Joiner Round)
2
Lime
2780
Technic, Pin with Friction Ridges Lengthwise WITH Center Slots
37
Black
43093
Technic Axle / Pin Transition Connector with Friction Ridges Lengthwise
6
Blue
32062
Technic Axle 2 with Notches
4
Red
4519
Technic Axle 3
3
MdStone
6587
Technic Axle 3 with Stud One End
2
DkTan
32073
Technic Axle 5
2
Yellow
44294
Technic Axle 7
1
MdStone
60485
Technic Axle 9
1
Yellow
3708
Technic Axle 12
2
Black
41678
Technic Axle Joiner Perpendicular Double Split, and Pin Connector
4
Black
63869
Technic Axle Joiner Perpendicular Triple, and Pin Connector
1
Black
42003
Technic Axle Joiner Perpendicular with 2 Holes, and Pin Connector 3L Pin
2
MdStone
6536
Technic Axle Joiner with Perpendicular Pin Connector
3
Lime
60483
Technic Beam 2 with Hole and Axlehole, Liftarm Thick Pin Axle 1 x 2
4
Black
41677
Technic Beam 2 x 0. 5 Liftarm, Thin 1 x 2
4
Blue
43857
Technic Beam 2, Liftarm Thick 1 x 2
2
MdStone
60484
Technic Beam 3 x 3 T Shape, Liftarm T-Shape Thick
3
MdStone
32009
Technic Beam 3 x 3.8 x 7 Liftarm Bent 45 Double, Thick 1 x 11.5
2
Black
32526
Technic Beam 3 x 5 Bent 90, Liftarm L-Shape Thick
1
Lime
32523
Technic Beam 3, Liftarm Thick 1 x 3
2
Lime
32523
Technic Beam 3, Liftarm Thick 1 x 3
6
Black
32348
Technic Beam 4 x 4 Liftarm Bent 53. 5, 4 – 4 Thick 1 x 7
2
DkStone
32524
Technic Beam 7, Liftarm Thick 1 x 7
2
MdStone
32524
Technic Beam 7, Liftarm Thick 1 x 7
2
Lime
40490
Technic Beam 9, Liftarm Thick 1 x 9
5
Black
32278
Technic Beam 15, Liftarm Thick 1 x 15
2
Black
3713
Technic Bush
4
Red
4265c
Technic Bush 1/2 Smooth
6
MdStone
32016
Technic Connector for Axle and Pin, Angled Size #3 157. 5 Degrees
4
Lime
32140
Technic Liftarm 2 x 4 L-Shape Thick
5
Black
4274
Technic Pin 1/2 Half Length
1
MdStone
6558
Technic Pin Long with Friction Ridges Lengthwise
25
Blue
32054
Technic Pin Long with Friction Ridges Lengthwise and Stop Bush
3
Lime
98138
Tile, Round 1 x 1
2
TrRed
55976
Tire 56 x 26 Balloon
4
Black
56145
Wheel 30. 4 x 20, 30.4mm D. x 20mm without Pinholes with Reinforced Rim
4
Lime
LEGO 42118 Monster Jam Grave Digger Reviews
No reviews yet. Be the first.
Your Review
Own this LEGO set? Tell everyone what you like about it – add a review.
Name:
Review:
Rating:
1 2 3 4 5
Sell
Have one to sell? We buy!
Reviews
Attention! If you own this LEGO set, share its merits with other LEGO enthusiasts today – write a detailed review below.
Share
Ask Toy Tech
reviews, photos and characteristics on Aredi.ru (10090983763)
Our website displays products that are automatically imported from allegro.pl and translated into Russian.
Since we are not the seller of the product displayed on our site, we cannot have all the information about a particular product. Additional information about the goods can be found in several ways:
1. Read the description in detail. Usually all the necessary information is in the official description on the lot page.
2. If the information you are interested in is not in the description, you can ask the question directly to the seller. He will respond to you within one business day.
3. If you have a rich experience of surfing the Internet, you may be able to find information about this product in various forums and other Internet resources using global Internet search services.
4. If you do not speak the language or do not want to clarify the information for any other reason, please contact us – we will be happy to help you. In order for us to ask the seller a question, place an order and write down your questions in the comments to the product. During the day we will make a request to the seller, comments will appear in your personal account.
1.Search by keywords, check the catalog on the left
Suppose you want to find a headlight for AUDI, but the search engine returns a lot of results, then you will need to enter the exact make of the car in the search box, then in the list of categories that is on the left, select a new category (Auto Parts – Car Parts – Lighting – Headlights headlights). After, from the presented list, you need to select the desired lot.
2. Shorten the query
For example, you need to find the front right fender for KIA Sportage 2015, do not write the full name in the search box, but write the fender KIA Sportage 15 . The search engine will say “thank you” for a short, clear question that can be edited based on the search engine’s results.
3. Use similar combinations of words and synonyms
The system may not understand any combination of words and translate it incorrectly. For example, the query “computer desk” has over 700 lots, while the query “computer desk” has only 10 lots.
for example, looking for glass on your smartphone, you need to score “glass on xiaomi redmi 4 pro” and not “glass on xiaomi redmi 4 pro”.
5. Write abbreviations and abbreviations in English
If you give an example, the phrase “bmw e65 hub” will give no results due to the fact that in e65 the letter e is Russian. The system does not understand this. In order for the automation to recognize your request, you need to enter the same thing, but in English – “BMW e65 hub”.
6. Few results? Look not only in the title of the ad, but also in the description!
Not all sellers write the necessary search parameters in the ad title, so use the search function in the ad description! For example, you are looking for a turbine and you know its number “711006-9004S”, insert the number into the search line, select the “search in description” checkbox – the system will return much more results!
7. Feel free to search in Polish if you know the name of the desired thing in this language
You can also try using Yandex or Google translators for these purposes. Remember that if you have unresolvable problems with the search, you can always contact us for help.
Shadow billionaire: how the former gravedigger Mark Leonard earned $ 2 billion :: RBC Pro
Pro
Project partner*
TV channel
Pro
Investments
Events
RBC+
New economy
Trends
Real estate
Autonews
Sport
Style
National projects
City
Crypto
Debating Club
Research
Credit ratings
Franchises
Newspaper
Special projects St. Petersburg
Conferences St. Petersburg
Special projects
Checking counterparties
RBC Library
ESG index
Policy
Economy
Business
Technology and media
Finance
RBC CompanyRBC Life
Section material Basic
Self-development
  ·
business guru
Business strategies
Articles
RBC
Canadian businessman Mark Leonard is practically unknown to the general public, but his achievements are impressive: Constellation Software, which he created, owns 500 IT companies, their total revenue reaches $6. 15 billion. Youtube
There are many paradoxes in the biography of Mark Leonard. His fortune exceeds $2 billion, but almost no one knows anything about him. He is one of the richest entrepreneurs in the IT field, but he has not founded a single startup in his life. His holding bought hundreds of promising technology firms, but sold only one of them (the entrepreneur still regrets this).
Mark Leonard, 66, is now 66 years old and his conglomerate Constellation Software, founded in 1995, owns 500 companies in 75 different industries and has one thing in common: each develops specialized software aimed at the needs of a limited number of customers. The capitalization of the corporation reaches $50 billion, revenue over the past 12 months is $6.15 billion (data as of the end of March 2023). Leonard, who is the president of Constellation Software and owns 7% of its shares, has big plans – he intends to acquire several hundred more businesses over the next ten years. And, of course, no one is going to sell.
The Beatles: Get Back Docuseries Available on Blu-ray™ and DVD July 12
Image
“COUNTLESS PERFECT MOMENTS”
– Rob Sheffield, Rolling Stone
The Beatles: Get Back is now available to own on a Blu-ray Collector’s Set and DVD. Directed by Peter Jackson, the series offers unprecedented access to the band as they prepare to record the Let It Be album.
Fans and critics everywhere have celebrated the “mesmerizing” (Kenneth Womack, Salon.com), “epic” (Tim Glanfield, RadioTimes.com) and “extraordinarily intimate” series (Sheila O’Malley, RogerEbert.com).
A winner at both the Producers Guild of America and American Cinema Editors Awards, The Beatles: Get Back is also Certified-Fresh on Rotten Tomatoes™. Travel back in time and witness the creative process of the Fab Four by adding The Beatles: Get Back to your collection on Blu-ray and DVD July 12.
Series Synopsis Directed by Peter Jackson, The Beatles: Get Back is a three-part documentary series that takes audiences back in time to the band’s intimate recording sessions. The documentary showcases the warmth, camaraderie and creative genius that defined the legacy of the iconic foursome, and is compiled from 60 hours of unseen footage shot in January 1969 (under the supervision of Michael Lindsay-Hogg and his director of photography Tony Richmond) and more than 150 hours of unheard audio, all of which has been brilliantly restored. Also featured – for the first time in its entirety – is The Beatles’ last live performance as a group: the unforgettable rooftop concert on London’s Savile Row, as well as other songs and classic compositions featured on the band’s final two albums, Abbey Road and Let It Be.
Cast John Lennon Paul McCartney George Harrison Ringo Starr
Directed by Peter Jackson
Produced by Jonathan Clyde Clare Olssen Peter Jackson
Producers Paul McCartney Ringo Starr Yoko Ono Lennon Olivia Harrison
Executive Produced by Jeff Jones Ken Kamins
Product Specifications Street Date Physical: July 12, 2022
Product SKUs Physical: Blu-ray, DVD
Series Run Time Approx. 468 Minutes
Aspect Ratio Physical: 1.85:1
U.S. Audio Blu-ray: English Dolby Atmos, English 7.1 PCM, English 2.0 PCM, 2.0 English Descriptive Audio DVD: English 5.1 and 2.0 Dolby Digital, 2.0 English Descriptive Audio
U.S. Subtitles Blu-ray: English SDH, Spanish, French DVD: English SDH, Spanish, French
3-Disc set includes: Part One – The band gathers at Twickenham Film Studios to rehearse for a planned concert. Part Two – Recording sessions start at Apple Studios, rehearsals continue and the mood lifts. Part Three – The Beatles perform on the rooftop of their Apple offices
Where to Buy – Billboard
Ringo Star used his feet to promote the film, which won best streaming docuseries at the Hollywood Critic’s Association TV Awards on Aug. 14.
THE BEATLES: GET BACK
Courtesy of Apple Corps Ltd
All products and services featured are independently chosen by editors. However, Billboard may receive a commission on orders placed through its retail links, and the retailer may receive certain auditable data for accounting purposes.
The Beatles: Get Back is still in stock, but that may not last very long. Ringo Starr went viral over the weekend after posting a picture of his feet along with a Blu-ray copy of the film, which won for best streaming docuseries non-fiction at the Hollywood Critic’s Association’s HCA TV Awards on Sunday (Aug. 14).
Explore
Explore
The Beatles
See latest videos, charts and news
See latest videos, charts and news
Peter Jackson’s epic documentary series, featuring previously unseen footage of the Beatles’ 1969 recording session was initially slated for release on Blu-ray and DVD in February, but the date was pushed back to July.
Physical copies of the documentary are available at Amazon, Walmart, Target and Best Buy, although prices and quantities may vary depending on the retailer. The triple-disc collection retails for $24.99 and up, and features nearly eight hours fully restored, archival footage with Dolby Atmos sound.
The special collector’s edition Blu-ray gift set, which comes complete with collectible cards, is currently sold out at Walmart, Target and Best Buy, but you can find it at Amazon, while supplies last.
Amazon
The Beatles: Get Back, Collector’s Edition Blu-Ray
$79.95 $99.95
Buy Now 1
Jackson’s six-hour documentary arrived on Disney+ last year in three two-hour episodes that premiered over Thanksgiving weekend. The film takes audiences inside the band’s recording of the groundbreaking album Let It Be. The documentary compiles over 60 hours of unseen footage with more than 150 hours of unheard audio showcasing the creative genius of the Fab Four.
The Beatles: Get Back captures the group writing and rehearsing 14 new songs that were meant for a live album, and other songs featured on The Beatles’ final albums, Abbey Road and Let It Be. The film also shows footage of The Beatles’ legendary rooftop concert at London’s Saville Row. The performances marked their last live show as a group.
In January, fans got a chance to relive that unforgettable concert in IMAX theaters. The release date coincided with the 53rd anniversary of the original performance. The Beatles: Get Back – The Rooftop Performance Concert was screened in IMAX at the Apple Corps headquarters in London and various theaters around the U.S.
Jackson attended the London showing and participated in a Q&A that was broadcast simultaneously in participating theaters. The 60-minute film returned to IMAX screens for a short theatrical run Feb. 11-13.
“I’m thrilled that the rooftop concert from The Beatles: Get Back is going to be experienced in IMAX, on that huge screen,” Jackson said in a statement at the time. “It’s The Beatles’ last concert, and it’s the absolute perfect way to see and hear it.”
For more gear celebrating the Fab Four, check out our list of the coolest Beatles merch that you can buy on Amazon.
Get weekly rundowns straight to your inbox
Sign Up
How to repair a scratched CD/DVD/Blu-ray disc?
DownloadWindows
CD, DVD, Blu-ray disc recovery utility
trustpilot
Recovery Toolbox for CD Free
Recovery Toolbox for CD Free can recover data from unreadable CD / DVD / Blu-ray and other optical discs.
How to repair CD
How to recover data from a scratched or damaged optical disc ( CD/DVD/Blu-ray ). Step-by-step instructions:
Insert damaged optical disc into drive on PC
Download, install and run Recovery Toolbox for CD Free from here: https://recoverytoolbox.com/download/RecoveryToolboxForCDInstall.exe
Select drive for data recovery on the first page Recovery Toolbox for CD Free
Select drive and folder to save recovered data
Select files/folders to recover from disk
Brief list of Recovery Toolbox for CD Free features:
Recovering corrupted data from all the most common media types today
Working with data that has become corrupted both after physical damage to the media and due to software errors
Give the user full control over the recovery process
Provide the user with the most detailed report on the data recovery process
But most importantly, all these brilliant features are completely free for the user! From now on, you have an affordable, simple, but at the same time powerful data recovery tool that does not require any costs!
Damaged media recovery utility
The Recovery Toolbox for CD Free utility is designed to recover data from damaged media of all the most common types today: CD, DVD, HD-DVD, Blu-ray, etc. The program allows you to recover files of any type. The utility performs a full scan of damaged disks and saves as much information as possible. In the process of recovering Recovery Toolbox for CD Free uses a large number of different algorithms, which greatly improves the amount and quality of recovered data.
The user will receive a complete, easy-to-read report of all the details of the recovery process.
The program provides the user with extremely convenient options for complete recovery management: from where and what files to recover, to which folder and where to save data, and so on. It is also available to view all the necessary information, both about the source of the recovered data and the place where they were saved.
The utility will be indispensable in the following cases:
physical damage to the media (scratches, contact with liquids, etc.)
Media format corrupted by disc burning programs
OS errors when reading and accessing media
etc. and so on.
In all these unpleasant situations, the program will quickly and efficiently perform all the necessary actions to restore as much data as possible.
Convenient, intuitive interface makes the process of working with the program efficient and enjoyable.
In terms of the number and quality of the algorithms used in the program, ease and accessibility of use, wide functionality, Recovery Toolbox for CD Free is one of the best in its class; and, I repeat, unlike most of its counterparts, it is absolutely free.
How to recover a damaged CD free of charge
To recover data from a damaged CD, it is convenient to use the utility Recovery Toolbox for CD Free . With a high probability, Recovery Toolbox for CD Free can read files from a scratched and unreadable CD. To test this hypothesis, it is enough:
Download, install and run Recovery Toolbox for CD Free
Select media with damaged CD
Select a folder on the hard disk where files from the optical disk will be copied
Start recovery of damaged CD
How to fix a CD free
If you need to quickly fix a CD or DVD, then Recovery Toolbox for CD Free can do this in a couple of clicks. Repairing CD/DVD discs occurs by copying and repairing files from a damaged optical disc to a folder on your hard drive.
Requirements:
Windows 98/Me/2000/XP/Vista/7/8/10/11 or Windows Server 2003/2008/2012/2016 or higher
How it works
Screenshots
Video
Select drive with damaged optical disc ( CD/DVD/Blu-ray etc.)
Select the folder where the recovered files from the disk will be saved
On the third page, the user can view and choose to save the recovered files
1
2
3
Selecting a disk for file recovery
Select drive and folder for saving files
Selecting folders/files to save
Recovery log
1
2
3
4
How to recover data from DVD and DVD-RW, CD, CD-RW
How do I recover files from CD-RW?
How to recover data from CD-RW? Or how to recover files deleted from DVD, CD and DVD-RW? On this page, we will show you the best way to get back all data files from CD or DVD. We will introduce you some useful tips that can help you recover all data or deleted files easily and effectively.
Part 1: Check the CD/DVD for damage or scratches
Part 2: How to recover saved CD-RW, CD, DVD-RW, DVD data on PC
Part 1: Check the CD/DVD for Damage or Scratches
If your DVD or CD won’t play on your DVD player or computer, there are some things you need to do first. Namely – check your CD or DVD manually. In this way, you will be able to determine the exact problem of your disk and then recover the data on it.
First, dust off the CD or DVD with a clean, dry cloth.
Second, try inserting a CD or DVD into your DVD player or computer CD-ROM. This will check the availability of the disk. If it’s still available, copy the saved data from your CD or DVD. If not, carefully check the surface of an unreadable or scratched CD or DVD.
Third, try to manually repair the surface of a scratched CD or DVD that is not being detected. Apply a thin layer of Vaseline toothpaste to the CD or DVD. Then wipe the disc inside and out with a clean soft cloth. After that, check again if your CD or DVD is available.
Part 2: How to recover saved CD-RW, CD, DVD-RW, DVD data on PC
WARNING: Wondershare Recoverit cannot recover files directly from CD or DVD. It only can help you recover lost CD or DVD files that are stored on your computer, hard drive, USB or memory card.
If you have stored videos, photos on CD or DVD on your computer but lost them in an accident, you have a way to get your data back. Namely, use a professional data recovery software and scan the storage device where you saved your CD or DVD backup files.
Here we recommend you Wondershare Recoverit Data Recovery . It is a powerful data recovery software that can help you recover data or deleted files. In addition, it supports the recovery of any data files from any media.
Download and install Wondershare Recoverit Data Recovery on your computer. Connect the device that contains the backup files from the CD or DVD to your computer. Then follow the next step to perform DVD data recovery on Windows computer. If you are on a Mac, you will need to download Recoverit Data Recovery for Mac and follow similar steps.
Download Windows version Download Mac version
Step 1. Select the location
Launch Wondershare Recoverit on your computer, then select the device to restore the backup CD or DVD files. Click the “ Start ” button to proceed to the next step.
Step 2: Scan storage devices that contain files from a CD or DVD
Recoverit Data Recovery will search for your data files. If you can’t find the files you need after the first scan, you can resort to scanning with the “ Deep Scan ” mode to search for more DVD or CD files.
Step 3: Preview and recover lost data
After scanning is completed, you can preview some of the recoverable files, such as photos.
The game is updated with new features and better than previous!!
The Mouse Accuracy Test is also known as Pointer Click Training. It is perfect for those who are looking to improve their mouse skills. This test is seen by many as a sort of training and rightly so. It helps in accuracy, agility, and makes the user respond very quickly. Mouse Accuracy Test is also a form of target training. This is a perfect game that can be utilized for training as well by those who are amateur game players and also those who are professional game players. What makes the Mouse Accuracy Test even more appealing is the fact that it is a free browser game, playable by anyone who is looking to improve their skills.
HOW TO PLAY MOUSE ACCURACY TEST?
Mouse Accuracy Test is very simple and easy to play. As highlighted above, it mainly involves targeting.
Difficulty Levels:
At first, the user is presented with many options that are concerning the settings and mode of the game. One is difficulty level. In this option, the users have mainly three options; they can opt for either Easy, Normal, or Hard. This option may also be referred to as different modes of the game.
Targets to Hit
The second option is Target Size, which is concerning the size of the thing that the user will be focusing on primarily in the game. The users have four choices; they can opt for either Tiny, Small, Medium, or Large.
Time duration
The third option that the users have with regards to settings is Duration. This option is about the time limit of the game. In this option as well, the users can choose from 15 seconds, 30 seconds, or 90 seconds.
Target Colors
The fourth option that the users have with regards to the settings of the game is Target Color. Again, the target will be the main thing that the user will be focusing on, and as the word itself suggests, it will be the aspect that the game requires users to aim for. The users have many alternatives when it comes to picking the color of the target. They are; red, purple, pink, orange, light blue, and lastly, green.
Cursor Types
The fifth option in relation to the settings is the cursor. This aspect will be the representation of the mouse on the screen of the user’s computer or laptop. And it will be used for targeting as well. The users can either opt for the plus sign or the usual mouse sign that resembles an arrow. The preference is mainly subjective. Users should choose whichever one they are most comfortable with. And they should be careful as to choose one which is most prominent, more significant, and also easier to follow should the game go very fast.
Sound and Voice
The sixth and last option that the users can enable is sound. The users can opt to enable or disable HUD, whatever their preference.
Starting the Game
Before you start: If you want some information about Mouse Double click information, visit.
Upon changing and choosing the relevant settings in these six areas, the user must select the “Start” button in red color.
This button is available at the very bottom of the home page. Once that button is selected, the user will be given 3 seconds for preparation.
Once it started, you will have to hit circle targets and are continuously growing up and more. You will gain some seconds on each target of your hit. You have to very fast to pass the level.
Once the game starts, at the very top right-hand side of the users’ screen, the user will have the option available in the red button, saying “End Session.”
Upon choosing this option, the game will end, and if the user wishes, he/she can restart the game.
Also, on the right-hand side of the screen, towards the middle, the user will be presented with the “Time.” This will show how much time is elapsed and how much time is left. There will also be a section of “Points,” which will show the users how many targets have been successfully clicked during the game. For each successful click on a target, the user will be granted 4 points.
Once the time selected is over, the following will appear: “Time’s Up!” And then, the user will be taken to a new screen, which will present Game Stats and Settings. It will show the time duration, the game difficulty level, and target size selected by the user before the start of the game. It will show the Targets Stats. In this, three aspects will appear; the number of successful clicks, the targets missed by the user, and the targets successfully clicked per second. The third section that the user will see is Clicks. It will show the number of successful clicks, the number of clicks that missed the targets, and the number of clicks per second.
There will also be a Score Overview. The total score will be presented. This overall score will be an addition of the points earned in the game and any bonus points. The second thing offered is the percentage of target efficiency. And lastly, the users are presented with the percentage of click accuracy.
The users also have the option of sharing their scores on twitter. Or they can simply restart the game and change the settings.
Mouse Accuracy or Clicking Game?
Mouse accuracy is a game where no one can cheat as it’s about the accuracy of your clicking targets within a specific time span. That is why its sometimes the most difficult mouse game. But it is the best to target practice game for Fortnite and PUBG game players. You will see much better performance after playing this game.
While on the other hand, clicking game like ‘Click Counter’ has some advantages over mouse accuracy. This is about clicking fast in predefined time and the target is to achieve a high CPS score. The game has options to select, 5 seconds to 100 seconds.
Some gamers use best automatic clickers to cheat and try to get high scores for self-satisfaction and to show their friends. There are more cheating techniques like Butterfly and drag clicking as well.
Cheating on normal flash or HTML 5 games is a bit easy, but it’s difficult to cheat on mouse accuracy games. Auto clickers may use to increase the clicking speed but can’t speed up and click the targets with accuracy.
Random name picker – Spin The Wheel
Aim Trainer & Mouse Accuracy Test
Aim Trainer lets you practice your Aiming Skills in gaming competition and eventually improve your Mouse
Accuracy.
Level
Easy
Normal
Medium
Fast
Target Size
Tiny
Small
Medium
Large
Shape Color
Cursor
Time Period
15
30
45
60
Sound/Voice
0 Hits
0 Timer
0 Miss
About Aim Trainer & Mouse Accuracy Test
Aim Trainer is one of the top popular free pc games available on Steam.
It helps in the improvement of the foremost vital skills of aiming. With the help of Aim Trainer, you can
level up your aim at no cost. You can get started with this basic aim trainer tool to improve you aiming
skills in e-sport champion. It will also help you to stay focused on enemy in game.
Mouse Accuracy test is an internet game that permits players to check and improve their mouse accuracy. It
improves their mouse-clicking speed, agility, and accuracy, etc.
The click speed test is a blessing for
computer users and gamers. The CPS test is a phenomenal device that can help gamers get reasonable control
over the mouse.
Goals Of Aim trainers:
1. With the help of Aim Trainer, one can improve their accuracy and aim.
2. It also helps in influential eSport players of FPS Aim Games like Overwatch, PUBG, Fortnite, etc.
Aim training
Aim training plays a vital role in the life of any gamer who is very much concerned about improving
his shooting skills in FPS games.
Aim Practice
By doing Aim practice regularly, one can increase their accuracy and efficiency. Practice makes
everything perfect and precisely work.
Aim Booster
As the name suggests, Aim Booster may be a platform that you must step in if you wish to spice up
your aiming skills. Aim Booster is that it asks you to show your JavaScript on.
Why Is There A Need To Boost Your Aim Practice?
It would help boost your aim practice for developing the needed skill. This improves mouse accuracy and aim
interval. For MOUSE ACCURACY, AGILITY, AND TARGET TRAINING, you need to boost your aim practice
1. Helping in time saving
You can save time and improve your aim practice by using 3D Aim Trainer. The training schedule for
professional players is 12 hours a day, seven days a week. You can get the best results in less time if you
use the Aim that is available online.
2. More effective
Short Aim Training Sessions with frequent repetition improve mouse accuracy to the test and aid in the
development of motor memory. With frequent repetition short Aim Training Sessions results in mouse accuracy to the test and aid in the
development of motor memory. This will undoubtedly aid you in speeding up your reflexes and latent period.
3. Develop specific skills
Develop training and a consistent course of clicking, flicking, strafing, and tracking will yield enormous
results in improving your skills, tracking, and target switching.
4. Recognize and address your weaknesses
The very first thing you need to do is to examine yourself and understand your flaws and weaknesses, as well
as what you’re doing incorrectly, using the in-depth statistics in 3D Aim Trainer.
Characteristics Of Aim Trainer And Mouse Accuracy Test
Level up aim- First and foremost, the Aim Trainer will level up your aim.
Improve aiming- Mouse accuracy-test helps in Aim Performance Online.
Track your improvement- Helping you monitor your improvement for the most vital Aiming Skills.
Showcases your accuracy- Mouse Accuracy test showcases the accuracy of your target hitting.
How To Use a Mouse AIM Trainer?
Step 1: Begin training your mouse aim
In any competitive sport, including e-sports, having the proper equipment is critical. You’ll need the proper
mouse and mousepad. Start train your mouse aim.
Step 2: Choose a DPI and sensitivity level that is suitable for you
Begin by setting your mouse DPI in Windows or Mac to the 400 – 800 DPI range. Then, in the game you want to
play, experiment with those settings. Adjust the mouse sensitivity as needed in the game’s settings.
Step 3: Examine your posture
Make sure you’re sitting in a comfortable position. You should sit up straight and not slouch. Raise your
chair so that your mousepad is about an inch below your elbow.
Step 4: Learn about the various aiming techniques
When practicing mouse aiming, you should concentrate on many techniques particularly focused on these two:
tracking and flicking.
Step 5: Put your skills to the test by playing games.
Practice with the games you play in addition to using a mouse trainer program.
Frequently Asked Questions
How do we aim better with a mouse?
How do you get good at mouse aim?
How many hours should I aim to train a day?
Other Tool
Check Your Score
Hits: | Miss:
Your Score
in Seconds
Accuracy : %
Online Mouse Test – Genie – Computer Repair
Back to the list of tools
Mouse test will help you determine the functionality of buttons, false double clicks. In the event of a false double-click slipping, the problem lies in the microswitch of the button. If the mouse is budget, then the most logical thing would be to replace it with a new one, for example, buy it in our store, but if the mouse is gaming and is of value to you, it can be repaired. The microswitch can be ordered in China, or we will replace it in our technical center and your mouse will be like new!
Online mouse check
Hover your mouse cursor over the drawn mouse. Check pressing the left, right mouse button, press the mouse wheel, scroll the wheel up, swipe the wheel down. Make a double click with the left mouse button. All clicks must be clearly recorded by our online mouse test. Double click should not skip when trying to press a key once. Scrolling in one direction should not abruptly switch to the other side.
How to clean a mouse
You will need – Cotton swabs, an alcohol solution or Cleaner, a microfiber cloth, a can of compressed air.
Disconnect the mouse from the computer to avoid a short circuit on the USB port (very unlikely indeed)
Spray the alcohol solution onto a tissue and wipe the entire body of the mouse completely. Pay special attention to the legs along the edges of the bottom of the mouse.
Use a cotton swab to clean the mouse sensor window (where the red light glows when the mouse is on).
Use rubbing alcohol and microfiber to clean the mouse cable (if it is not wireless).
Use a can of compressed air to blow out the space between the mouse wheel and the body, dust often accumulates there and interferes with the operation of the wheel’s optical sensor.
Mouse wheel shakes
If, when scrolling in one direction, you experience jitter or page scrolling in the other direction, the scroll wheel optocoupler is to blame. First, try blowing out the dust in the hole between the wheel and the case. If this does not work out, the mouse will have to be disassembled. Unscrew the body bolts (on wired mice they are usually at the bottom, sometimes under glued plastic legs, on wireless mice under the cover where the battery is located.) Remove the top part to gain access to the mouse wheel and two sensors to the right and left of the wheel. Make sure that the holes inside the wheel are clean, free of damage and dirt. Clean the wheel and sensors if contaminated with alcohol and blow with air. Assemble the mouse in reverse order.
Online touchpad test
If you are a laptop user and want to test the touchpad, touchpad, touchpad – you can use our test. Test the left mouse button press on the sensor by quickly touching the center of the sensor, also test the buttons below the sensor (left and right). Check the operation of the double click by quickly pressing the center of the sensor twice. If you need to check the operation of the touch screen on a phone or tablet screen, use our touch screen test
Help the Jinn.ru project
There are no ads on my site, all programs created by me and my friends are free, selected utilities and drivers are checked, all data is on our servers and is available 24/7 (as they say – without registration and SMS). The work of creating a website, renting and maintaining servers costs time and money. I made the project the way I would like to see the modern Internet, where there is no clickbait, garbage and advertising, when you can not be afraid to go to some page and download viruses, when you don’t know where the real “download” button is and where is the malicious link . If you found information, a driver or a program on Jinn.ru that helped you solve a problem, we will be very happy if you support us financially. We also welcome feedback.
Sincerely, Mikhail and the Jinn.ru project
₽ In Russia – MIR card Sberbank (Russian rubles) – 2202 2013 5454 1142 Mikhail K.
$ In the rest of the world – BakaiBank VISA card (US dollars ) – 4714 2400 6990 3442 Mihail K.
₿ To BitCoin wallet – bc1qs4pnfvvxcjykwg7uu3rl5fahfdypcf9rksvwkd
Checking the mouse: all parameters are working
Hello everyone! Sometimes you have to test not only the parameters of the manipulator in order to get specific numbers, but also simply check the device for operability. Today we’ll talk about checking the mouse – what online services and programs can help with this and what exactly they determine.
Online tests
To pass the online test, the Adobe Flash plugin must be activated in the browser, and the site itself must receive user permission to run it. The first in the list is a test for the interval between clicks.
You can find it by following this link. Here you just need to quickly click the main mouse button on the vault field.
The indicator below it displays the speed of pressing, how much time has passed from one click to another and shows the best result.
The second useful resource is a mini-game that will help you check the sensor for positioning accuracy, and the main button for operation. It is located at (this service is not working now, sorry).
The user should click on the red circles appearing and disappearing on the screen. The test shows the number of targets that were hit and has a built-in click counter. Not the most accurate change parameter, since the accuracy is affected by the human factor, but it can also come in handy.
Checking the buttons for operation is located at the address. Doesn’t define anything other than the primary mouse button click. A manipulator can be checked for a double click using the double click test. Go to this address. Displays normal and double clicks. It is useful to take accurate measurements in case, instead of a single click, a double click slips. It also allows you to analyze the performance of the corresponding button.
A test to check the functionality of the mouse buttons is available at: https://cps-check.com/ru/mouse-buttons-test. There are no counters, but you can determine if the application is buggy or if the manipulator has a hardware failure.
Consists of five steps in which the player has to complete various tasks. The rules are indicated in the annotation under the window with the game.
At the address you will find a built-in clicker with a built-in counter. You can determine the number of clicks for the allotted interval and the average number of clicks per second.
These are all more or less sane tests that I could find on the net. The rest of the online tests either work crookedly or turned out to be completely useless. All other parameters will have to be tested using the appropriate software.
Mouse test programs
One of the few programs that actually measure the parameters of interest is Enotus Mouse Test. It measures almost everything – it checks the hertz, sensor sensitivity, response speed, the charge of the built-in battery, etc. Another utility that may come in handy is called Keyboard Mouse Test. Unfortunately, he does not take any measurements, but he can check the operation of the manipulator buttons, as well as the keyboard. Takes up little space and does not require installation.
How to troubleshoot a USB dongle
Wireless mice may be fine in terms of performance, but the device, for some reason, still does not work.
HP EliteDesk 800 G6 Desktop Mini review: affordable but underpowered mini PC
For
Very compact
Good connectivity for office work
Easy to set up
Against
Base model is very underpowered
Other mini PCs offer better value for money
Why you can trust Creative Bloq
Our expert reviewers spend hours testing and comparing products and services so you can choose the best for you. Find out more about how we test.
I really wanted to love the HP EliteDesk 800 G6 Desktop Mini PC. It’s an entire desktop computer wrapped inside a nice little package that measures less than 18 x 18 x 4cm and comes from the maker of some very nice computers I’ve enjoyed testing in recent months.
Sold as a business computer, the EliteDesk Mini PC fits neatly underneath or behind a monitor, and comes with everything you need for a general business computer (apart from the monitor), including a keyboard and mouse, but this particular model won’t be finding its way into any creative agencies.
Perhaps the newer, more powerful (and more expensive) G9 version of the EliteDesk 800 Mini will be able to contend for a place on our list of the best computers for graphic design alongside compact powerhouse Mac mini among others, but this model, with its ageing specs and underpowered processor, never really stood a chance. Still, it could be an option for general office work.
HP EliteDesk 800 G6 Desktop Mini review: Design and build
(Image credit: Future/Erlingur Einarsson)
Here is where the EliteDesk 800 Mini shines. It’s incredibly compact at just over 17 x 17cm across and just over 3cm thick, so it fit right underneath my monitor after I plugged everything into the plentiful ports on offer.
The traditional matte black casing is nondescript and the only flash on show is the fan-bladed front ‘grille’ design. It’s very light, too, weighing less than an average laptop at about 1.4kg, so picking it up to plug everything in, your monitor, keyboard, mouse, webcam and any other accessories I needed, was nice and easy.
HP EliteDesk 800 G6 Desktop Mini review: Features
The highlight for the EliteDesk is the number of ports available for such a compact PC. On the front is the headphone/headset jack and three SuperSpeed USB ports, two Type-A (one charging one) and a Type-C with a 20Gbps signalling rate. And there’s a port party in the rear (stop giggling!) with the power connector, three SS USB-A ports with 10Gbps signalling rate, two DisplayPort 1.4 ports, an RJ-45 ethernet port, an external antenna connector and an HDMI 2. 1 port.
This means you can link multiple monitors, keyboard, mouse, an external hard drive (this is especially important on the smaller 256GB SSD spec), a wired internet connection and a webcam and still have space to charge your phone or connect a camera for image upload, for example. This is an area where the EliteDesk Mini definitely has most laptops in its price range pegged, as many need an external dock for any advanced connectivity.
There is a choice of an i5 or i7 processor when speccing out your PC, with the newer G9 model offering either the Intel Core i5-12500 or the i7-12700, along with 16GB of RAM and a 512GB SSD. The model I tested, however, was the older-gen G6 with the i5-10500T processor and 8GB of RAM and 256 GB SSD storage. It also has an older graphics processor, the Intel UHD Graphics 630 instead of the 770 on the newer model.
Another thing you don’t get with every mini PC is a keyboard and mouse, but these are included here, with a black standard HP keyboard and mouse included in the package.
And unfortunately, with these stunted specs, it all adds up to a rather muted experience.
HP EliteDesk 800 G6 Desktop Mini review: Performance
(Image credit: Future/Erlingur Einarsson)
Now, unfortunately I can’t speak for the newer G9 model, but the HP EliteDesk 800 G6 Desktop Mini struggled to distinguish itself as anything above a decent general office work computer. Its compact size, ease of use and setup and generous port allowance makes it good for all general work, but when it came to pure grunt for more demanding creative tasks, it lagged behind similarly priced mini PCs (including the Mac mini, which in its still-powerful base spec is cheaper than the EliteDesk 800 Mini).
It will run Photoshop and video-editing software, but not many of them at the same time, and would likely struggle with more serious 4K video-editing or 3D design software.
HP EliteDesk 800 G6 Desktop Mini: Benchmark scores
Seeing as the EliteDesk 800 G6 Desktop Mini is not the newest generation of this computer, we shouldn’t expect scores matching £1,500/$1,500 laptops. Still, while the Cinebench score indicated a decent multi-core score for its ability to handle Cinema 4D (slightly below £800-ish laptops on the market today), the Geekbench score felt disappointing for a desktop computer. With six cores and 12 threads, you’d expect this machine to perform better, but even adding a second and third app running contiguously with Photoshop or a video editor, I noticed the processing speed slowing, so unfortunately, this won’t be a creative pro’s go-to machine, unless they go for the highest-spec version of the newer G9 model. And even then, you’ll have hit a price bracket with more powerful options than that available.
And obviously, with its pedestrian native graphics and limited RAM, the EliteDesk 800 G6 Mini isn’t going to break any gaming records, but obviously it’s not marketed or intended as a gaming computer, so I didn’t do much testing in that regard.
The keyboard and mouse, like I said before, are basic propositions. The keyboard I received was the wired 320K keyboard and a wired HP MOFYUO mouse. Both worked perfectly well, but still feel like the budget gear they are. This has been upgraded to the much nicer HP 655 wireless keyboard and mouse combo for inclusion with the G9 version.
(Image credit: Future/Erlingur Einarsson)
HP EliteDesk 800 G6 Desktop Mini review: Price
As the EliteDesk 800 G6 Mini has been superseded by the more up-to-date G9, with a new 12th-gen processor and more RAM, you’ll be able to find this for under £500/$500. If you need a budget desktop for office work, this is definitely an option, but do keep in mind that you need to allocate budget for a monitor on top of this, which would take you into at least the £650/$650 range, at which point you should really be looking at laptops with equal or more grunt than this particular EliteDesk model offers.
Should you buy the HP EliteDesk 800 G6 Desktop Mini?
(Image credit: Future/Erlingur Einarsson)
We are a website for creative enthusiasts and pros, so our buying advice has to reflect that. HP makes good-quality computers and laptops, and there is certainly nothing wrong with the EliteDesk 800 G6 Mini for general office work, but if you need something that demands graphic grunt and capacity for several creative apps running simultaneously, you can get better equipment for those needs, for not much more.
HP EliteDesk 800 G6 Desktop Mini: Price Comparison
No price information
Check Amazon
powered by
Thank you for reading 5 articles this month* Join now for unlimited access
Enjoy your first month for just £1 / $1 / €1
Already have an account ? Sign in here
*Read 5 free articles per month without a subscription
Join now for unlimited access
Try first month for just £1 / $1 / €1
Already have an account ? Sign in here
Erlingur is the Tech Reviews Editor on Creative Bloq. Having worked on magazines devoted to Photoshop, films, history, and science for over 15 years, as well as working on Digital Camera World and Top Ten Reviews in more recent times, Erlingur has developed a passion for finding tech that helps people do their job, whatever it may be. He loves putting things to the test and seeing if they’re all hyped up to be, to make sure people are getting what they’re promised. Still can’t get his wifi-only printer to connect to his computer.
Cheap, functional, upgradeable: HP’s Stream and Pavilion Mini desktops reviewed
Tech —
These inexpensive Windows desktops have a surprising amount to offer.
Andrew Cunningham
–
Enlarge / The Pavilion Mini (left) and Stream Mini (right) are low-cost mini desktops that work out of the box.
Andrew Cunningham
Specs at a glance: Hp Stream and Pavilion Mini
Stream Mini
Pavilion Mini (base model)
Pavilion Mini (upgrade model)
OS
Windows 8. 1 with Bing 64-bit
Windows 8.1 64-bit
CPU
1.4GHz Celeron 2957U
1.7GHz Pentium 3558U
1.9GHz Core i3-4025U
RAM
2GB 1600MHz DDR3 (upgradeable to 16GB)
4GB 1600MHz DDR3 (upgradeable to 16GB)
GPU
Intel HD Graphics
Intel HD Graphics 4400
HDD
32GB M.2 SATA SSD
500GB 7200RPM HDD
1TB 5400RPM HDD
NETWORKING
2.4GHz 802.11b/g/n, Bluetooth 4.0, gigabit Ethernet
PORTS
4x USB 3.0, DisplayPort, HDMI, SD card reader, headphone jack
SIZE
5.71″ x 5.71″ x 2.13 (145 x 145 x 54.1mm)
WEIGHT
1.2 lbs
1.46 lbs
1.46 lbs
WARRANTY
1 year
PRICE
$179.99
$319.99
$449.99
OTHER PERKS
Kensington lock slot
HP’s Stream Mini and Pavilion Mini desktops are for everyone who was excited about Intel’s NUC until they saw the price.
While we definitely like the NUC and think it’s a good value for what you get, the fact of the matter is a lot of people don’t need all the stuff it’s offering: fast-but-expensive PCI Express storage, a brand new Ultrabook-class CPU with a premium integrated GPU, and a build-it-yourself philosophy that your average computer buyer won’t want to deal with.
By contrast, the Stream and Pavilion Mini are inexpensive fully-equipped systems that are ready to work out of the box. They use lower-end processors and have lower specs all around, but they include a Windows license and even a keyboard and a mouse. If you or someone you know has a years-old mini-tower on or under their desk, these systems are attractive, inexpensive drop-in replacements.
If that was all they were, they’d be worth a passing look but not a whole lot more. They are rather low-specced, as you’d expect from $300-and-under desktops, and they use last-generation Haswell processors. The NUC is a showcase for this year’s high-end Ultrabook chips, and these HP desktops are showcases for last generation’s budget models. However, the fun thing about these mini desktops for enthusiasts is that they’re dead simple to open and upgrade, and if you’re willing to spend just a bit more money it’s easy to tweak them to better suit your needs.
Design
PC companies like HP and Dell are paying more attention to design and consistency lately. HP’s EliteBook 1020 looks and feels a lot like a premium version of its Stream 11 and 13 notebooks, and the Stream and Pavilion Mini share some elements in common too. HP still has a huge lineup of different, sometimes poorly-differentiated systems with a bunch of different designs, but here there are signs that the company has created some design conventions being adopted across multiple product lines.
Both of HP’s boxes have a decent port selection. We like the full-size HDMI port, though full-size DisplayPorts are a bit rarer than their mini counterparts.
Andrew Cunningham
The Pavilion Mini comes with a reasonably attractive wireless keyboard and mouse, but they connect to a USB RF dongle rather than the integrated Bluetooth.
Andrew Cunningham
The cheaper Stream Mini comes with a wired keyboard and mouse, contrary to what HP told us in January.
Andrew Cunningham
Beyond size, though, the design of a desktop really doesn’t have a whole lot to do with how you interact with it day-to-day. Both Minis are larger than the latest Intel NUC by quite a bit (the NUC in its entirety will almost fit in the Mini’s shell), but they’re still small enough to fit in most of the places a NUC would go. There’s a good reason for that larger footprint, but we’ll get to that later.
Both the Stream and Pavilion Minis share the same port layout—and, for that matter, the same motherboard, BIOS, driver set, and internal layout. They give you two USB 3.0 ports on the front and another two on the back, a gigabit Ethernet jack, and full-sized HDMI and DisplayPorts. We actually prefer the full-sized HDMI port to the mini version on the NUC since it’s much more common, though mini DisplayPorts seem to be more common than the full-size version. Win some, lose some.
Both PCs also have a headphone jack, though it’s on the back instead of the front as it is on the NUC. The layout you prefer here will depend on your audio setup; if you have speakers on your desk that hook into the jack, having it on the back will make your setup cleaner. If you have the desktop on your desk and want easy access to a port for occasional headphone use, a front-mounted jack is preferable. In any case, the Minis don’t have integrated speakers, so you’ll need to use that jack or send audio over HDMI or DisplayPort to a monitor or TV with speakers if you want sound.
Advertisement
Neither Mini has an integrated IR receiver for use with remote controls as some NUC models do, but both have integrated SD card slots that the NUC lacks. They’re useful for importing photos or expanding storage in a pinch—it’s not the best way to get more space, but it’s the cheapest and easiest way.
Out of the box: Specs and performance
The first differentiation point for the Stream and Pavilion Mini is in specs. At $179, the lone Stream Mini configuration has the least inside it: a 1.4GHz dual-core Celeron 2957U CPU, 2GB of 1600MHz DDR3 RAM, and a 32GB SATA SSD attached via a B-keyed M.2 port. Since they share similar components, power consumption is broadly comparable to the Asus Chromebox we reviewed last year.
At a high level, the spec sheet looks just like the one for the Stream 11 and 13 laptops: Celeron, Intel HD integrated graphics, 2GB RAM, 32GB storage. The Haswell-based Celeron in the desktop has a slightly faster CPU and substantially faster GPU, though, which is something we touched upon a bit in our original Stream 11 review. The sole difference between the Celeron 2957U and the 2955U referenced in that piece is support for Intel’s Quick Sync video encoding and decoding feature.
Another point in the Stream Mini’s favor is that its 32GB of storage is connected to the SATA bus and not the slower eMMC bus.
Because of the way SSDs work, a 32GB drive is going to have lower read and write performance than a higher-capacity model—those drives have more NAND chips on board, and part of SSDs’ performance advantage comes from the ability to perform multiple reads and writes from and to different chips at the same time. It’s why OEM-provided performance numbers for 128GB drives are usually lower than those for 256GB or 512GB drives. Still, having that NAND chip attached to the SATA bus will give you higher disk performance than eMMC.
The Pavilion Mini comes in two flavors: a $320 base model with a dual-core 1.7GHz Pentium 3558U and a 500GB 2.5-inch 7200RPM hard drive, and a $450 upgraded model with a 1. 9GHz Core i3-4025U and a 1TB 2.5-inch 5400RPM drive. Both come with 4GB of RAM. Power consumption in the Core i3 box was broadly comparable to the Haswell NUC we reviewed, with a few watts added to accommodate the spinning hard drive.
The Pentium CPU has the same features as the Celeron—same cache, same GPU, same Quick Sync support—but bumps the maximum speed up by 300MHz. The Core i3 adds another 200MHz plus some other perks, including Hyperthreading, another MB of cache, an HD 4400 GPU, and Wireless Display support.
These are all desirable features, but the price of this model is creeping up into NUC territory (especially if you’re considering RAM or drive upgrades), and Intel’s is still the more capable box. The presence of Quick Sync in the lower-end models also reduces the need for a faster CPU if you plan to use the computer as some kind of media box.
The 2GB stick of RAM in the Stream Mini is problematic for two reasons. First, it’s only 2GB of RAM, which feels especially limiting in 64-bit Windows. Having faster storage along with a better CPU makes the Stream Mini feel faster than the Stream 11 just about all the time, but 2GB is still a tight bottleneck once you get to multi-tab Web browsing and general multitasking.
Second, that stick only populates one of the Mini’s two RAM slots, limiting memory performance to single-channel mode (in other words, you lose half your theoretical bandwidth). This is also true for the Pavilion Minis, which include a 4GB stick of RAM that likewise fills only one slot.
Though the loss of theoretical bandwidth doesn’t hinder your actual performance, it does slow down operations that rely on memory speed. In these systems, the integrated GPU is one of those things, and running in single-channel mode will lower your GPU performance by 10 or 20 percent in most cases.
Advertisement
While the Pavilion Mini’s large hard drives make them better candidates for full-on desktop replacements than the storage-challenged Stream Mini, the fact that it’s a spinning HDD means that the more expensive computer often feels like the slower computer.
Software
The Stream Mini comes with the 64-bit version of Windows 8.1 with Bing, while the Pavilion Mini comes with vanilla Windows 8.1. The only real difference between the two is that the Bing version requires OEMs to leave Bing selected as Internet Explorer’s default search engine in exchange for a discount. Users can change it, though, and since the Pavilion Mini uses Bing as its search default anyway there’s no difference in Windows features or functionality.
Of its 29.8GB of storage, the Stream gives users about 19.4GB of usable space out of the box. 6.71GB of that space is used by a recovery partition and is therefore unusable by default, something we criticized in the Stream 11 and that we’ll criticize again here. Windows 8.1 comes with a “Create a recovery drive” feature that will copy that partition to an external USB drive; once you’ve done that, you should be able to delete the local partition and regain the space.
Because of the relatively small amount of drive space, HP’s add-on software selection is reasonably restrained on the Stream. McAfee is here, easily uninstalled in favor of Windows Defender if you don’t care for it. A 25GB Dropbox offer, various HP support and documentation apps, a handful of Start screen apps and website shortcuts, and an Office demo round out the list. The Stream Mini includes a 200GB-for-two-years OneDrive offer, but no free Office 365 subscription.
The Pavilion is another matter. 26.8GB of the 1TB drive was taken up by the core OS and apps and 20.7GB was dedicated to the recovery partition, leaving 882GB of free space out of the box. Copying the recovery partition over to a (larger) USB drive is still an option, though it’s perhaps not strictly necessary here.
HP uses the larger drive as an excuse to load up more bloatware, though. In addition to all the stuff on the Stream Mini, the Pavilion includes full CyberLink media suite install, a total of 31 (!) WildTangent Games, Foxit PhantomPDF trialware, and Evernote. Neither desktop has a clean “Signature Edition” version available for purchase from the Microsoft store, so you’ll have to clean all of this up yourself if you like stock Windows installs.
Alternatively, at least on the Pavilion, you can use a Windows 8.1 upgrade installer and the product key included in the box to download a stock Windows 8.1 ISO, create a USB installer drive, and perform a clean installation yourself. HowToGeek has fairly thorough step-by-step instructions on how to do it.
Out of the box conclusions
Neither system is perfect as-is. The 2.4GHz 802.11n and Bluetooth 4.0 combo adapter is a weak point in the spec sheet (5GHz 802.11n would be preferable, 802.11ac is still well outside this kind of system’s price range). The Stream Mini’s SSD feels quick but doesn’t give you enough space to replace most full daily-use desktops, while the Pavilion Mini’s HDD has the opposite problem. And neither computer’s RAM configuration is ideal.
But the foundation these desktops are built on is fundamentally pretty good. Sure, we’d like to see some Broadwell CPUs instead of Haswell versions, but Broadwell’s CPU performance improvements are minor (we wouldn’t mind those CPU upgrades, though). Even low-end Haswell GPUs are capable of very basic gaming, and the addition of Quick Sync makes them all fairly appealing HTPC candidates. The Pavilion is a decent desktop replacement, and the Stream is a good TV streaming box or kiosk PC.
Still, you can get more out of these desktops. In the next section, we’ll show you how to get the most out of both. As it turns out, each is dead simple to open and upgrade.
HP Desktop Computers on HOTLINE – buy
Porіvnyati
21 864
UAH
20 165 – 24 142 UAH
All propositions (24)
Change the prices
Porіvnyati
26 505
UAH
25 354 – 28 985 UAH
All propositions (25)
Change the prices
Porіvnyati
19 185
UAH
18 510 – 20 939 UAH
All propositions (25)
Change the prices
Porіvnyati
109 999
UAH
PROTSYK
Buy
Porіvnyati
27 445
UAH
26 377 – 29 179 UAH
All propositions (27)
Change the prices
Porіvnyati
17 029
UAH
16 322 – 18 327 UAH
All propositions (26)
Change the prices
Porіvnyati
18 310
UAH
17 596 – 19 234 UAH
All propositions (30)
Change the prices
Porіvnyati
34 989
UAH
33 484 – 37 046 UAH
All propositions (28)
Change the prices
Porіvnyati
16 584
UAH
15 688 – 18 189 UAH
All propositions (22)
Change the prices
Porіvnyati
27 461
UAH
26 389 – 30 419 UAH
All propositions (30)
Change the prices
Porіvnyati
33 107
UAH
32 714 – 33 499 UAH
All propositions (2)
Change the prices
Porіvnyati
15 030
UAH
14 397 – 16 171 UAH
All propositions (26)
Change the prices
Porіvnyati
39 799
UAH
38 213 – 42 156 UAH
All propositions (30)
Change the prices
Experts to choose a good choice of products How to choose a desktop computerTop-10 gaming PCs for version hotline. ua…inshi stats
Porіvnyati
34 365
UAH
33 260 – 36 630 UAH
All propositions (28)
Change the prices
Porіvnyati
39 543
UAH
37 923 – 41 989 UAH
All propositions (30)
Change the prices
Porіvnyati
33 170
UAH
32 194 – 36 372 UAH
All propositions (23)
Change the prices
Porіvnyati
36 485
UAH
34 980 – 40 599 UAH
All propositions (27)
Change the prices
Porіvnyati
23 044
UAH
21 934 – 24 735 UAH
All propositions (27)
Change the prices
Porіvnyati
45 818
UAH
44 842 – 46 794 UAH
All propositions (2)
Change the prices
Porіvnyati
46 999
UAH
PROTSYK
Buy
Porіvnyati
35 736
UAH
34 238 – 37 879 UAH
All propositions (28)
Change the prices
Porіvnyati
40 406
UAH
39 277 – 44 888 UAH
All propositions (22)
Change the prices
Porіvnyati
26 202
UAH
25 342 – 28 779 UAH
All propositions (23)
Change the prices
Porіvnyati
29 290
UAH
28 850 – 29 930 UAH
All propositions (4)
Change the prices
Review of HP ProDesk 405 G4 Desktop Mini, EliteDesk 705 G4 SFF and Desktop Pro A G2 with AMD Ryzen PRO processors / Notebooks and PCs generations – especially when it comes to the commercial segment of desktop computers.
Such systems have excellent scalability, functionality and, of course, performance – and you will see this on the example of three HP desktops.
⇡#Specifications and packaging
So, the following desktop systems arrived at our test lab: ProDesk 405 G4 Desktop Mini, HP EliteDesk 705 G4 SFF and HP Desktop Pro A G2. These computers have a lot in common, but at the same time they are so different. Naturally, the assembler offers a wide range of PC modifications. You can choose both an entry-level computer and invest in the purchase of the most “pumped” PC configuration. In any case, HP desktops are designed in such a way that you can easily scale them as your business grows. The main characteristics of the systems discussed in this article are shown in the table below.
HP ProDesk 405 G4 Desktop Mini
HP EliteDesk 705 G4 SFF
HP Desktop Pro A G2
CPU
AMD Ryzen 3 PRO 2200GE AMD Ryzen 5 PRO 2400GE AMD Athlon PRO 200GE
AMD A10 APU AMD A6 APU AMD A8 APU AMD Ryzen 3 PRO AMD Ryzen 5 PRO AMD Ryzen 7 PRO
AMD Ryzen 3 PRO AMD Ryzen 5 PRO
Graphics
Integrated in CPU
Integrated in CPU AMD Radeon R7 430 2 GB AMD Radeon RX 550X 4 GB
Integrated in CPU
RAM
Up to 32GB DDR4-2933
Up to 64 GB DDR4-2666
Up to 16GB DDR4-2666
SSD: up to 512 GB HDD: up to 1 TB
SSD: up to 1TB HDD: up to 2TB
SSD: up to 256 GB HDD: up to 1 TB
Wireless module
LAN: Realtek RTL8111EPH LAN Wireless: Intel Dual Band Wireless-AC 9260
LAN: Realtek RTL8111EPH LAN Wireless: Intel Dual Band Wireless-AC 9260
4 × USB 3.1 Gen1 Type-A 4 × USB 2.0 1 × HDMI 2.0 1 × VGA 1 × RJ-45 3 × 3.5 mm mini-jack
Power supply
65 W external
180 W
180 W
Dimensions
177 × 175 × 34 mm
296 × 270 × 95 mm
136 × 262 × 310 mm
Weight
1.26 kg
4.53 kg
4.32 kg
Operating system
Windows 10 Pro Windows 10 Home Windows 10 Home Single Language FreeDOS
Windows 10 Pro Windows 10 Home Windows 10 Home Single Language FreeDOS
Windows 10 Pro Windows 10 Home Windows 10 Home Single Language FreeDOS
Warranty
1 year
3 years
1 year
HP ProDesk 405 G4 Desktop Mini 9 Specifications0003
HP EliteDesk 705 G4 SFF Specifications
Specifications HP Desktop Pro A G2
The screenshots above clearly show that today we will talk about computers with different levels of performance. So, the HP EliteDesk 705 G4 is equipped with an 8-core Ryzen 7 PRO 2700X chip and 32 GB of RAM at once. Naturally, this system unit will be noticeably more productive than its “colleagues”, since the ProDesk 405 G4 Desktop Mini has a 2-core Athlon PRO 200GE and 8 GB of RAM, and the Desktop Pro A G2 has Ryzen 3 PRO 2200G and 8 GB of RAM. All computers use fast solid-state drives – this is very cool, because almost all operations related to accessing SSD cells will be performed as quickly as possible. All PCs were also running Windows 10 Professional, which HP strongly recommends. Specifically, Windows security technologies such as Device Guard, Credential Guard, TPM 2.0, and VBS are supported.
You may have noticed that all three computers use PRO versions of AMD CPUs. These models differ from conventional chips by supporting features such as AMD GuardMI and DASH 1.2. GuardMI technology includes built-in security features. For example, AMD Memory Guard encrypts and decrypts real-time data in RAM. Remarkably, Intel does not have such technology. The AMD Secure Boot feature provides a secure boot process for your computer and prevents threats from infiltrating critical software.
DASH technology, developed by many companies (after all, we are dealing with an open standard), greatly simplifies the management of computers by the administration. So, it allows you to remotely perform tasks regardless of the power state of the computer or operating system. For example, it is possible to securely start the system remotely, even if it is currently turned off. The administrator can get all the necessary information about the health of the system components, even if the operating system is not available.
You can read more about AMD GuardMI and DASH 1.2 by following this link.
Don’t forget that HP business PCs come with a range of exclusive technologies, features and software. Here are some of them:
HP BIOSphere Gen4, running in automatic mode, prevents data leaks, increases performance and reduces downtime.
HP Sure Click protects the system from web attacks.
HP Client Security Manager Gen4 includes HP Multi-Factor Authentication and HP Password Manager. These tools help protect data from theft, attacks, and unauthorized access.
HP Sure Start Gen4 technology has hardware-based security features and is able to automatically recover the BIOS in the event of a malware intrusion.
HP Sure Recover allows you to quickly and safely restore your PC with the latest system image using only a network connection.
HP Image Assistant Gen3 creates custom Windows images.
As you can see, ready-made client solutions have everything you need to work long, fast, reliable and trouble-free. At the same time, everything is fine with such PCs with security, which, as we have already found out, is provided by three parties at once: AMD, HP and Microsoft. In this regard, ready-made HP solutions look much more preferable than, for example, desktops assembled on their own.
Each computer came with a power cable, keyboard, and mouse. It turns out that HP solutions are ready to work, as they say, out of the box – the user only needs to connect the system unit to the monitor.
The HP desktop PCs featured in this review support Hardware Support Onsite, which provides remote hardware support and field service to help improve device performance. The service includes many useful features, which you can read more about here.
⇡# Appearance and functionality
As we have already said, all three system units are very similar to each other. All three computers maintain a certain style – strict, but stylish. In our opinion, this is exactly what enterprise-class system blocks should look like. Cases of all three computers are made of steel, painted in matt black. Only the front panels of the system units are plastic.
But at the same time, the considered models noticeably differ from each other.
HP ProDesk 405 G4 Desktop Mini
HP ProDesk 405 G4 Desktop Mini
HP ProDesk 405 G4 Desktop Mini
So, HP ProDesk 405 G4 Desktop Mini is the most compact system unit reviewed today. Its thickness is only 3.4 cm, and the weight does not exceed 1.3 kg. This computer comes with a VESA mount that allows you to mount it behind a monitor and an external power supply. For clarity, we photographed the HP ProDesk 405 G4 Desktop Mini along with a 6-inch smartphone. Of course, the use of such a PC will allow you to save working space at the workplace as much as possible.
At the same time, the computer has high functionality. On its front panel are two USB 3.1 Gen1 A-type ports and two 3.5mm mini-jacks. On the back, the HP ProDesk 405 G4 Desktop Mini has an RJ-45 connector, two DisplayPort video outputs, VGA, and four more USB 3.1 Gen1 A-type ports. Such a set of interfaces will be enough to connect several monitors and a large number of peripheral devices to a PC at once.
HP EliteDesk 705 G4 SFF
HP EliteDesk 705 G4 SFF
HP EliteDesk 705 G4 SFF
HP EliteDesk 705 G4 and HP Desktop Pro A G2 are noticeably larger than the HP ProDesk 405 G4 Desktop Mini just reviewed, but in fact we are also dealing with compact system units assembled in Micro-Tower cases . HP EliteDesk 705 G4 can be installed both in horizontal and vertical positions – for this, a special stand is included with the computer. The abbreviation SFF in the name of the HP EliteDesk 705 G4 stands for Small Form Factor. Case dimensions are 9,5x27x29.6 cm, and its weight is slightly more than 4.5 kg. On sale you can find a larger version of the HP EliteDesk 705 G4.
The front panel of the HP EliteDesk 705 G4 SFF has two USB 2.0 A-type connectors, the same number of USB 3.1 Gen1, one USB 3.1 Gen1 C-type connector and a 3.5 mm mini-jack. Optionally, the system unit can be equipped with a 9.5 mm optical drive and a card reader.
The back of the HP EliteDesk 705 G4 SFF has DisplayPort video outputs (from discrete graphics), RJ-45, four USB 2.0 A-type connectors, two USB 3.1 Gen1 (also A-type), two 3.5 mm mini jack, as well as two PS / 2 connectors and a serial port. Note that the I / O-panel of the computer may vary depending on its configuration.
HP Desktop Pro A G2
HP Desktop Pro A G2
HP Desktop Pro A G2
Finally, the HP Desktop Pro A G2 is the largest computer reviewed in this material. Its weight is 4.32 kg, and its dimensions are 13.6×26.18×31 cm. On the front panel of the system unit there is a 3.5 mm headset jack and four USB 3.1 Gen1 A-type connectors at once. At the back, the test model found an audio output and audio input, HDMI 2.0, an Ethernet port, a VGA output, and four USB 2.0 A-type ports.
⇡#Upgrade options
All three system units are very easy to disassemble – this does not even require a screwdriver. Therefore, any user without any problems will be able to remove the case cover, clean the system from dust and, if necessary, upgrade the system.
For example, the HP ProDesk 405 G4 Desktop Mini in our test lab can install a second RAM module and connect another SATA 6 Gb/s drive. The HP Desktop Pro A G2 model allows, in addition to the listed components, to also use PCI Express x16, PCI Express x1 and PCI expansion slots. In the case of the SFF version of the desktop, half-height solutions are supported.
HP ProDesk 405 G4 Desktop Mini
HP EliteDesk 705 G4 SFF
HP Desktop Pro A G2
Naturally, the chassis of the considered computers is thought out to the smallest detail. All components of the systems are selected and configured so that the devices work stably, do not heat up too much, do not make noise and do not get clogged with dust. So, desktops use single-fan cooling. Fans have additional shrouds, they better “expel” the heated air outside the case, and their correct location can significantly reduce the suction of dust into the computer.
This, in fact, is another plus of ready-made systems of this level in comparison with self-assembled configurations. HP itself guarantees a high degree of reliability of its desktops, because they have been tested in the HP Total Test Process program.
Note that the HP EliteDesk 705 G4 SFF and HP Desktop Pro A G2 models are equipped with 80 PLUS Platinum power supplies – this means that their efficiency will not be lower than 90% at a voltage of 230 V.
⇡#Efficiency of the cooling system
As a matter of fact, let’s back up the previously expressed words with facts. We tested all three system units with the Prime95 program, which, as you know, loads the CPU very heavily. As a rule, computers will not face such a load in everyday life. This means that if the HP ProDesk 405 G4 Desktop Mini, HP EliteDesk 705 G4 SFF and HP Desktop Pro A G2 pass the test in Prime95, they will work perfectly in 100% of other applications.
And the listed systems have fully coped with their task.
Test results HP ProDesk 405 G4 Desktop Mini
The Athlon PRO 200GE must be clocked at 3.2 GHz when all streams are loaded. And so it happens. The processor reached a maximum temperature of 74 degrees Celsius, and we are dealing with a computer the size of a notebook. At the same time, the noise level of the HP ProDesk 405 G4 Desktop Mini, measured from a distance of 30 cm, was only 39.1 dBA – the computer is audible, but such noise cannot be called loud.
HP EliteDesk 705 G4 SFF test results
The HP EliteDesk 705 G4 SFF has a much more difficult task, as it uses an 8-core Ryzen 7 PRO 2700X in its small chassis, which consumes more than 100 watts of electricity in Prime95. However, the system does not overheat, the maximum temperature of the chip was 82 degrees Celsius, and its frequency varied from 3.5 to 3.8 GHz when all cores were loaded. With such a load, the HP EliteDesk 705 G4 SFF worked noticeably noisier – the measuring device recorded 44.9dBA. It should be noted here that HP desktop fans emit low-frequency noise – it is much easier to perceive by our ears.
HP Desktop Pro A G2 test results
Finally, the HP Desktop Pro A G2 cooler handled the Ryzen 3 PRO 2200G without any problems. The chip at its peak heated up to only 74 degrees Celsius. At the same time, its noise level was below 36 dBA, the computer works almost silently. AMD’s quad-core frequency under multi-threaded load is kept to the declared specification of 3.6 GHz.
⇡#Test results
As we have already noted, all HP solutions use AMD components, the performance of which is strikingly different from each other. Here, the potential owner of the HP ProDesk 405 G4 Desktop Mini, HP EliteDesk 705 G4 SFF or HP Desktop Pro A G2 must determine for himself what tasks he needs this or that system for. Let’s say the ProDesk 405 G4 Desktop Mini is great for office tasks that involve email, web browsing and Microsoft Office class applications. But the HP EliteDesk 705 G4 SFF, along with the 8-core Ryzen 7 PRO 2700X and 32 GB of RAM, is capable of handling the most complex tasks related to graphics rendering, video encoding and processing large amounts of data. HP Desktop Pro A G2 is, in turn, a compromise between the other two systems. This fact is well reflected in the screenshots of the PCMark 10 program – a comprehensive benchmark that studies the efficiency of a computer in various everyday tasks.
Test results HP ProDesk 405 G4 Desktop Mini
HP EliteDesk 705 G4 SFF test results
HP Desktop Pro A G2 test results
A more detailed measurement of computer performance was carried out using the following software:
Corona 1. 3 . Testing rendering speed using the renderer of the same name. Measures the build speed of the standard BTR scene used to measure performance.
WinRAR 5.40 . Archiving a folder of 11 GB with various data in RAR5 format and with the maximum degree of compression.
Blender 2. 79 . Determination of the final rendering speed in one of the popular free packages for creating three-dimensional graphics. The duration of building the final model from Blender Cycles Benchmark rev4 is measured.
x264 FHD Benchmark . Testing the speed of video transcoding to H.264/AVC format.
x265 HD Benchmark . Testing the speed of video transcoding to H.265/HEVC format.
CINEBENCH R20 . Measuring the performance of photorealistic 3D rendering in the CINEMA 4D animation package.
Fritz 9 Chess Benchmarks . Testing the speed of a popular chess engine.
JetStream 2. 0 0304 Chrome ) . Performance testing of Internet applications built using HTML5 and JavaScript algorithms.
All three PCs use SSDs as primary storage devices running Windows 10. The HP ProDesk 405 G4 Desktop Mini and HP EliteDesk 705 G4 SFF models use the WDC PC SN520 SDAPNUW-128G-1006 128 NVMe device GB. The HP Desktop Pro A G2 has a 256 GB LITEON CV8-CE256-HP SATA drive. The level of their performance is indicated in the screenshots below.
WDC PC SN520 SDAPNUW-128G-1006
LITEON CV8-CE256-HP
It is important to understand that the disk subsystem of the considered computers can be formed in different ways. System blocks support the installation of various devices – these can be drives with both SATA and PCI Express interfaces. It can be either SSD or HDD. So, the HP EliteDesk 705 G4 SFF uses a 3. 5-inch hard drive as an additional drive.
Test results HP ProDesk 405 G4 Desktop Mini
HP EliteDesk 705 G4 SFF test results
HP Desktop Pro A G2 test results
Athlon PRO 200GE and Ryzen 3 PRO 2200G processors have integrated graphics. The Ryzen 7 PRO 2700X chip does not have an integrated GPU, and therefore the HP EliteDesk 705 G4 SFF is equipped with a discrete Radeon R7 430 graphics card. These test results clearly show that all three GPUs have a low level of performance when it comes to games. True, solutions of this class do not need more powerful graphics.
⇡#Conclusions
All three considered system units have a similar set of positive qualities:
Functionality. Computers are equipped with everything you need to work right out of the box.
Performance. AMD multi-core solutions are great for a variety of tasks.
Venom x18 | 50cc Automatic Motorcycle | Street Legal
Venom x18 | 50cc Automatic Motorcycle | Street Legal
Regular price $2,399. 99
$1,999.99
Save $400.00
2022 Venom x21 | 50cc Automatic Motorcycle | Street Legal
2022 Venom x21 | 50cc Automatic Motorcycle | Street Legal
Regular price $1,999.99
$1,899.99
Save $100.00
2023 Venom E-Vader 2000W Electric Motorcycle | Brushless | 72V | Street Legal
2023 Venom E-Vader 2000W Electric Motorcycle | Brushless | 72V | Street Legal
Regular price $2,999.99
$1,999.99
Save $1,000.00
2022 Champion Monkey Bike | 125cc Motorcycle | Street Legal
2022 Champion Monkey Bike | 125cc Motorcycle | Street Legal
Regular price $1,899.99
$1,699.99
Save $200.00
50cc Maddog Scooter | Generation IV | Street Legal
50cc Maddog Scooter | Generation IV | Street Legal
Regular price $2,049. 99
$1,949.99
Save $100.00
Sold out
150cc Maddog Scooter| Generation V | Street Legal
150cc Maddog Scooter| Generation V | Street Legal
Regular price $2,699.99
$2,499.99
Save $200.00
50cc Maddog Scooter | Generation V | Street Legal
50cc Maddog Scooter | Generation V | Street Legal
Regular price $2,149.99
$2,049.99
Save $100.00
2023 Leo Champion Bike | 125cc Motorcycle | Street Legal
2023 Leo Champion Bike | 125cc Motorcycle | Street Legal
Regular price $1,899.99
$1,699.99
Save $200.00
2023 Venom X18RS | 150cc Automatic Motorcycle | Street Legal
2023 Venom X18RS | 150cc Automatic Motorcycle | Street Legal
Regular price $2,599. 99
$2,349.99
Save $250.00
2023 Venom x22GT | 250cc Automatic Motorcycle | Street Legal
2023 Venom x22GT | 250cc Automatic Motorcycle | Street Legal
Regular price $3,899.99
$3,299.99
Save $600.00
50cc Venom x20 | Automatic Motorcycle | Street Legal
50cc Venom x20 | Automatic Motorcycle | Street Legal
Regular price $1,999.99
$1,899.99
Save $100.00
2000W E-Vader Electric Motorcycle | Brushless | 72V | Street Legal
2000W E-Vader Electric Motorcycle | Brushless | 72V | Street Legal
Regular price $2,299.99
$1,999.99
Save $300.00
Venom E-Moped | 2000W Brushless Electric Moped Scooter | BD576Z
Venom E-Moped | 2000W Brushless Electric Moped Scooter | BD576Z
Regular price $1,899. 99
$1,799.99
Save $100.00
Sold out
Venom E3 Lifan | 1200W 60V Lithium Electric Moped Scooter | Street Legal
Venom E3 Lifan | 1200W 60V Lithium Electric Moped Scooter | Street Legal
Regular price $2,599.99
$2,399.99
Save $200.00
Velocifero 1600 Watts Mad Electric Scooter – 48 Volts
Velocifero 1600 Watts Mad Electric Scooter – 48 Volts
Regular price
$1,199.99
Issue OSAGO from Sberbank
For uninterrupted and secure access to Sber’s web resources, we strongly recommend that you install certificates or a browser that supports domestic certificates on your devices. Check for a certificate
Go
Best prices
ASSEMBLY
Choose the best offers
from leading insurance companies!
It is easy to issue OSAGO
in the SberBank Online mobile application
Scan the QR code,
to apply for insurance in the application
Fast
Automatically fill in the data of your car by its number
Genuine
The policy number will instantly appear in the database of the Russian Union of Motor Insurers
Economical
900 02 We will take into account the discount for accident-free driving if there are no accidents due to the fault driver
Office
You can apply for an OSAGO policy at the nearest Sberbank office. Find an office
Fast
Automatically fill in the data of your car by its number
Authentic
The policy number will instantly appear in the database of the Russian Union of Motor Insurers
Economical
We will take into account the discount for accident-free new driving, if there are no accidents due to the fault of the driver
B office
You can apply for an OSAGO policy at the nearest Sberbank office. Find office
In partnership
in partnership
3 steps to apply for a policy
3 steps to apply for a policy
Compare offers
To choose the best
Get a policy
The policy will come to the post office within 20 minutes.
Compare offers
To choose the best one
Get the policy
The policy will be sent to the post office within 20 minutes.
Obtain OSAGO for business
OSAGO for business*
Insurance and cashback for legal entities and individual entrepreneurs!
Obtain OSAGO for business
OSAGO for business*
Insurance and cashback for legal entities and individual entrepreneurs!
FAQ
FAQ
Cookies policy
Privacy policy
customer@agentapp. ru
Ask questions. Waiting for a response, check
folder
“Spam”
Checking KBM
Checking OSAGO policies
Frequently asked questions
How to apply
Partners
2 What to do in case of an accident
OSAGO
OSAGO for business*
“Best price” – the minimum offer for the price of the OSAGO policy in comparison with the maximum price received on the marketplace from several insurance companies at the time of calculation based on the results of the study for the period from 01/30/2023 to 02/14/2023, posted on the calmins.com insurance website 03/23/2023, analyzing offers of prices for OSAGO policies from insurers presented on OSAGO marketplaces. The maximum value of the difference in the cost of quotes for policies is up to 76% (between the minimum and maximum offer at the price at the time of calculation) mainly for break-even drivers with a BMR below 0.57 and with a driving experience of more than 14 years, over 40 years of age. This statement does not apply to OSAGO insurance for legal entities and individual entrepreneurs.
OSAGO Marketplace is an online resource for the selection of OSAGO policies from partner companies: PJSC Sberbank, OGRN 1027700132195, legal address: Russia, Moscow, 117312, st. Vavilova, d. 19, General license of the Bank of Russia for banking operations No. 1481 dated 11.08.2015. More details at osago.sberbank.ru. Assistance in the selection of financial services and a technological platform are provided by AGENT UP LLC, a partner of Sberbank PJSC. LLC “AGENT SMART POLIS”, 199155 St. Petersburg, st. Uralskaya d.1, OGRN 1147847083317.
The Hoover WindTunnel High Capacity upright vacuum is equipped with everything you need for a heavy duty clean from floor to ceiling. Confidently power through messes on any floor type, then use the above floor tools and extension wand to get into tight, hard-to-reach places with ease.
Product Details
Model Number: UH71104
SKU(s): 810486090
Specifications
Model number: UH71104
13″L x 13.5″W x 44.5″H
Material: ABS, polypropylene, steel, copper
Product weight: 16.1 lbs.
Wattage: 1440
UL® listed
Power type: Electricity
Assembly required
True color: Black
California Customer WARNING: Cancer and Reproductive Harm. For more information go to : www.P65Warnings.ca.gov
Features
Includes vacuum and extension wand
With 2 channels of suction to lift and remove deep embedded dirt
Powerful performance with no loss of suction
ScatterGaurd technology captures debris
Reach an extra 12′ with the hose and wand
XL capacity dirt cup
Other accessories and décor are not included as shown
Assembly
Assembly required: Yes
Return Policy
If you wish to return your online order, please visit your
order history to start the return process. If you have any issues, contact our Customer Care Support Center at 1-866-BIG-LOTS (244-5687) for assistance with making your return. Please be prepared to provide your order number and email address, or your rewards number, so that we may better assist you.
For return terms, see our full Returns Policy.
Delivery Info
In-Store Pickup
In store pickup is FREE. Orders placed by 5pm local time can be picked up the same day.
Same-Day Delivery
Need it? Get it! Got it. Same Day Delivery available from select stores. You can choose from available delivery windows in cart.
Standard Delivery
Standard Delivery is FREE on orders over $79. Expedited delivery can be chosen in cart for eligible items.
Delivery questions? For more info, visit our Delivery FAQs.
Good to Know
We’ve got curbside pickup! Quick and contactless, simply place your order on Biglots.com. Once you arrive at the store, call the store and describe your car and we’ll bring your order right out to you. Just have your ID ready!
General Disclaimer:
We aim to provide accurate product information, however some information presented is provided by a 3rd party and is subject to change
See our disclaimer.
Interested in the idea of having an upright vacuum? How about one with a cord rewind system and a maintenance indicator?
The Hoover Windtunnel T-Series vacuum does just that. Curious as to whether or not this upright vacuum is the one for you?
Cheap Upright Vacuum
Hoover Windtunnel T-Series
The Hoover Windtunnel T-Series vacuum is a powerful upright vacuum that performs better on carpeted surfaces. The Windtunnel includes variable height adjustment, so it can be used on different carpet heights or services. If you’re vacuuming mostly on carpet and don’t mind the noise, the Hoover Windtunnel is an inexpensive upright that can meet many needs.Check Price
Pros
The internal cord wrap system on this Hoover gives the unit a clean aesthetic with no baggy cords.
The Windtunnel T-Series does a fine job of lifting dirt and debris from carpeted surfaces.
Cons
The Hoover Windtunnel struggles on hard floor surfaces.
This vacuum is on the louder side in terms of decibels compared to other vacuums
Table of Contents
Design
Cleaning Tests
Usability
Value
Specifications
Who Should Buy
The Hoover Windtunnel T-Series vacuum utilizes some features of a standard upright design in addition to a few others. A green and gray color scheme make up most of the unit while hints of red add a bit of pop to certain areas of the vacuum.
This Hoover upright vacuum has a sturdy handle for carrying the vacuum as needed. It also contains an easy-to-read cleaning mode knob, which allows users to change the mode of the vacuum depending on the style of cleaning they’re trying to complete.
Probably the most notable feature about this vacuum is the cord rewind system.
A 25′ cord is stored inside of the vacuum and can be pulled out to the desired length. To replace the cord users can press down on the “rewind” switch located at the base of the unit.
Handle / power button
Cleaning knob
Cord rewind system
Dust bin
There is also a “system check indicator,” which notifies users when the HEPA filter needs to be cleaned or changed.
While this Hoover utilizes the standard upright look, there are certainly some design features that separate it from the rest of the pack.
How It Cleans
The Hoover Windtunnel upright vacuum offers a few different cleaning styles, but each style does use the same amount of suction power. Five different floor height settings are available, which can be adjusted to the appropriate floor type.
Close up shot of the floor head offered by the Windtunnel T-Series vacuum
Size & Dimensions
This Hoover upright vacuum is about average with regard to overall size and weight. The unit stands 44″ tall, 16″ wide, and 12″ deep. Additionally, the Windtunnel T-Series weighs 16.5 pounds.
Height – 44″
Width – 16″
Depth – 12″
Weight – 16.5 pounds
Accessories & Parts
The Hoover Windtunnel upright vacuum comes with a few different parts and accessories, including:
Motorized brushroll
Accessory clip
Crevice tool
Dusting brush
Cleaning Tests
The following vacuum cleaner tests are designed to show how the Hoover Windtunnel T-Series vacuum performs on different surfaces, picking up a variety of debris types.
Overall
85%
Hardwood
57%
Low Carpet
100%
High Carpet
97%
We test on three different floor types, including hardwood floors, low pile carpet, and high pile carpet. For each floor type we test the vacuum cleaner against:
Rice – 3 ounces
Dry Cereal – 1 ounce
Kitty Litter – 3 ounces
Sugar – 3 ounces
Each of the aforementioned debris types was spread across our testing lane. The base surface of our testing lane is an engineered hardwood floor. For our carpet tests, we slide in a low pile and high pile carpet insert on top of the hardwood floor.
Testing Debris – From left to right: Rice (3 oz.), Kitty Litter (3 oz), Cereal (1 oz), Sugar (3 oz)
Our vacuum cleaning process strives to be as consistent, fair, and true to real world use as possible. Our tests utilize the following procedure:
Measure the weight of the testing debris and the weight of the empty vacuum debris container.
Spread the respective debris type evenly across the central portion of the testing lane.
Run the vacuum cleaner over the testing lane.
Measure the weight of the now filled container and take notes on the cleaning performance.
RELATED – Who is the best of the best? Find out in our best vacuum cleaner roundup.
Hardwood Floor
The hardwood floor tests were a struggle for the Hoover Windtunnel. The motorized brushroll was virtually launching each of the debris types around our testing lane, creating a larger mess than the one we started with.
Cereal
10%
Kitty Litter
63%
Rice
71%
Sugar
83%
After completing all four tests, the Windtunnel was not able to pick up more than 83% of debris for each type.
I was a bit surprised to see the vacuum struggle on the hardwood surface. With so many cleaning options available, I expected to see this Hoover upright vacuum breeze through these tests.
FAQ – What is the Best Vacuum for Hardwood Floors?
Low Pile Carpet
The low pile carpet was a much larger success for the Windtunnel vacuum. Each of the four debris types were cleaned up at a level of 99% or higher.
Cereal
100%
Kitty Litter
100%
Rice
100%
Sugar
99%
The friction between the carpet and the debris allowed the motorized brushroll on the bottom of the vacuum to lift and suck the debris instead of flinging it around.
High Pile Carpet
The high pile carpet tests showed results similar to the low pile carpet. The least amount of debris sucked up was the sugar, which was cleaned up to a level of 90%.Rice, kitty litter, and cereal all reached levels of 98% or higher.
Cereal
100%
Kitty Litter
98%
Rice
98%
Sugar
90%
Being a finer debris, the sugar fell deeper into the carpet. The Hoover Windtunnel did a nice job of reaching down into the thicker pile, but the suction power wasn’t quite strong enough to lift all of the sugar up.
Aside from sugar, the Windtunnel was virtually flawless on the high pile carpet tests.
Usability
Using this Hoover upright vacuum is simple. The setup is quick and painless, but it does require a screwdriver. Once all of the parts are unboxed, the handle portion of the unit must be screwed into the base of the vacuum.
After completing this step, setup is finished. Next up, plug it in and put it to work.
RELATED – Looking for something even easier to use? Check out our robot vacuum reviews, including our favorites the Roomba 690, Roomba 980, iLife A4s, and Ecovacs Deebot N79.
As you use the Windtunnel T-Series, changing between floor types is as easy as turning a knob. The floor type (cleaning mode) knob is located on the floor head portion of the vacuum.
Select the floor type you’d like to clean and proceed on with your vacuuming. Each of the five options offers a different height level, allowing you to make the adjustment for floor type as needed.
Users have the option of rotating between five cleaning modes with the Hoover Windtunnel
The retractable cord is one of the neatest features associated with the Hoover Windtunnel. Users have the option of puling out a few feet of cord or all of it.
Either way, the rewind system allows you to push a button and have the cord wrap itself back up inside of the vacuum.
Therefore, there is no messy cord wrap on the vacuum and no need to completely unravel the cord every time you need to use the vacuum cleaner.
Maneuverability
Maneuvering the Hoover Windtunnel upright vacuum is simple, but there are a few flaws. Pushing and pulling the unit initially was easy, but there came a time where the finer debris started to stick to the wheels, which made pushing / pulling a touch more difficult.
Weight: 15.6 pounds
Power: 25′ cord
Hose: 8′ max length
Turning: 45°
By no means is the vacuum impossible to push or pull with debris on the wheels, but it adds a certain level of extra effort that is not initially required to maneuver the vacuum cleaner.
With regard to turning radius, the vacuum is able to swivel from side to side fairly well.
That said, it does require a bit of force from the user. The heavier weight of the Windtunnel makes maneuvering turns a bit tougher than some other uprights we have tested.
RELATED – Wanting an upright vacuum that maneuvers with ease? Check out the Shark Rotator or the Bissell Pet Hair Eraser.
Being a corded unit, users can feel limited with regard to maneuverability as well. Yet, the 25′ cord that comes with this Hoover vacuum is a nice plus as compared to a smaller cord used by some other corded units.
Maintenance
The following table indicates the frequency at which you will likely want to replace the various parts and components of the vacuum. The following replacement frequencies are what the manufacturer recommends. However, your individual experiences may vary.
Accessory / Part
Replacement Frequency
Replacement Cost
Stretch belt
12 months
Check Price
HEPA filter
6 months
Check Price
Primary filter
6 months
Check Price
Users can expect to spend around $23 a year on maintenance costs for the Hoover Windtunnel T-Series vacuum.
Maintenance is a simple, but important task to keep track of with regard to the Hoover Windtunnel T-Series. The most important areas to pay attention to are the filters and the belt. Two filters keep this vacuuming in proper running condition, in addition to the belt.
A colored label notifies users when maintenance is required – color will go from green to red
Noise
All vacuum cleaner reviews on Modern Castle are put through our standard noise test. For this test, we use a sound meter to measure noise in terms of decibel level approximately 3′ away from the vacuum.
Value
This Hoover Windtunnel vacuum offers a good value overall. There were times when the unit struggled during our cleaning tests, but there were also times when the vacuum exceeded expectations.
When comparing the price to the cleaning performance, I could not expect too much more out of this vacuum.
A 2-year warranty is included with this vacuum, in addition to a 30-day return policy (offered via Amazon).
Maintenance costs are also low on this particular Hoover upright vacuum, which helps raise its value.
RELATED – See more excellent value vacuums in our best cheap robot vacuum guide.
Specifications
Below is a complete list of important specifications and features included on the Hoover Windtunnel T-Series vacuum:
Specifications
Type
Upright
Manufacturer
Hoover
Model
Windtunnel T-Series Rewind
Length (inches)
44
Width (inches)
16
Weight (pounds)
16.5
Floor Type
All (indoor)
Dust Bin Capacity
3 liters
Cordless
No -25′ cord
Bagless
Yes
Returns
Varies by retailer
Warranty
2 years
Price
Check Price
Who Should Buy the Hoover Windtunnel T-Series vacuum?
Hoover Windtunnel T-Series is a low cost upright vacuum that offers five different cleaning height levels and a couple of extra features.
I would recommend the Hoover Windtunnel T-Series if you’re looking for the following features in an upright vacuum:
Floor cleaning options – The Hoover Windtunnel offers five different floor cleaning options. Each of these options are designed to be used on a variety of surfaces. Some of these surfaces include hardwood floor, low pile carpet, and high pile carpet.
Cord rewind system – Instead of having a 25′ cord wrapped up in the back of the vacuum, this unit stores the cord inside of a clear casing. After the cord is pulled out, users can press down on the cord rewind lever to retract the cord back into its storage compartment.
Filter indicator – A colored label sits near the handle of the vacuum and goes from green to red when maintenance on the filter is needed. This is a nice extra for those who need to be reminded on when to change / clean the filter on their vacuum.
Strong performer on carpet – While hardwood floors were not part of the Windtunnel’s strong suit, both low pile and high pile carpet proved to be less of a challenge for this Hoover upright vacuum.
Don’t have hard surfaces – The Hoover Windtunnel left much to be desired on our hardwood floor cleaning tests. If you have hardwood, tile, laminate, or other hard surfaces that you plan on vacuuming I would recommend you choose a different vacuum. See our best vacuums for hardwood floors for more information.
For more information on the Hoover Windtunnel T-Series visit here.
Update Log
August 7, 2018 – Updated the review score as part of our site-wide 1.0 scoring overhaul. Score increased from 89% to 93%.
Design – 92%
Performance – 93%
Quality – 93%
Usability – 92%
Value – 97%
93%
Summary
The Hoover Windtunnel T-Series is an upright vacuum designed to add a degree of convenience to vacuuming. The cord rewind system, colored filter indicator, and five different floor cleaning options all combine for an upright vacuum that could be beneficial for a wide variety of users.
Wind tunnel in Moscow – fly in the attraction of Sokolniki Park, the large wind tunnel Vacuum
Wind tunnel in Moscow – fly in the attraction of Sokolniki Park, the large wind tunnel Vacuum
+7 (495) 260-85-58
Call back
ORDER A FLIGHT
Wind tunnel flight
DARIM
UNFORGETTABLE
EMOTIONS
I want to fly
Discover new facets of freedom
with certificate
for flight
in a wind tunnel
Special rates apply for children from 4 to 14 years old
Buy certificate
Fly on favorable terms!
Night rates for athletes.
Buy time at a discount
Don’t give boring gifts – give impressions!
Vacuum-
best present
those with whom you are ready to be in the 7th heaven with happiness!
Buy a gift
Make your event unforgettable!
We organize a holiday that will be remembered for a long time by both adults and children.
Order a holiday
Book a flight
Our manager will contact you and help place an order
The Vacuum aerodynamic complex is an unforgettable experience and a sea of new emotions. The simulator completely imitates free flight at speeds up to 250 km/h – the effect is like when jumping with a parachute, only in comfortable and safe conditions. The closed wind tunnel allows you to experience the state of free fall in any weather. A comfortable temperature is constantly maintained in the room and the simulator, which is one of the main advantages over the open area.
Looking for where you can fly without leaving the Moscow Ring Road? Come to the best wind tunnel in Moscow!
Quality airflow
Low wind tunnel noise
3 m flight zone diameter and 11 m height
Convenient location
Top instructors
Can fly in any weather 9000 3
If in doubt how many flight minutes to buy, then specify the desired time and date, the number of people in the calculator, and we will recommend a suitable rate for you.
Flight calculator
The price is influenced by several factors: time, age (special fares apply for children from 4 to 14 years old), number of flight participants and day of the week (weekdays/weekends). The more minutes you buy, the more bonuses you get! We give FREE minutes to birthday people!
It’s safe to fly in a wind tunnel
Before the flight, you will be briefed and explained all the subtleties and peculiarities of behavior in the tunnel, so you will feel comfortable from the first minutes of free soaring. In the chamber with you there will always be an instructor who is ready to insure at any second. It will also help to master various movements and tricks in the air.
No risk of injury. Even with a sudden stop of the engines, a gradual decrease in the power of the air flow is ensured – you will gently lower yourself onto the trampoline net.
Interesting information:
# video from cameras in the wind tunnel,
#how is the flight in a wind tunnel,
#training videos,
#how the wind tunnel works
Book a flight
Our manager will contact you and help place an order
Services
ALL SERVICES
Wind tunnel flight
We invite children and adults to experience all the delights of free flight. Spend an active weekend in our complex – arrange an unusual vacation for yourself and your loved ones!
DETAILS
Car Simulator
With our professional Simracer car simulator, the incredible emotions of flying are available not only in the air, but also on the ground! Feel like a sports car pilot!
DETAILS
Organization of a party
An original party in Vacuum will surprise and delight anyone! We can be entrusted with holding an event of any complexity! Flying impressions will be provided to you!
DETAILS
Athletes training
Classes will be conducted by our instructors, each of whom has extensive experience in wind tunnel flying and a considerable number of parachute jumps.
MORE DETAILS
Aeroclub “Vacuum” is also a unique area (area 500 sq.m.) for unforgettable birthdays, children’s holidays, corporate events. On the territory of the complex there is a cozy cafe where you can have a bite to eat and share your impressions.
Your emotions will remain not only in memory, but also in the photo. You can shoot yourself or order professional photo or video shooting.
Wind tunnel flight will be a real adventure for children and adults!
You can always give the opportunity to fly to your friends and relatives
ORDER – FROM 1 500 R
Q&A
ASK A QUESTION
How to dress?
Wear or bring comfortable sportswear that allows you to move freely (T-shirt, light trousers or leggings). The instructor will provide you with a helmet, suitable overalls and, if you didn’t bring, sneakers. He will also give you a set of earplugs and tell you how to use them. You don’t have to worry about hygiene – shoe covers and disposable caps are provided for shoes and a helmet. More about preparation.
What should I bring with me?
Don’t forget to bring your identity document (passport or driver’s license). Of course, you can and should take friends or relatives with you with whom you can share your impressions.
Wind tunnel restrictions?
As with any attraction, the wind tunnel has a number of limitations. Children over 4 years old are allowed to fly. The flight is not recommended for pregnant women, people with cardiovascular diseases and various injuries, as well as people weighing more than 120 kg. People under the influence of alcohol and drugs are not allowed to fly. For the rest there are no barriers! More about contraindications.
How to get to the complex?
We are located on the territory of Sokolniki Park at Bogorodskoye Highway 18, building 2. You can also get to us from the nearest Sokolniki metro station by tram 4p or 25 (to the stop Bolshaya Shiryaevskaya street). View the address of the wind tunnel on the map.
Do you have discounts?
Yes, we provide our clients with exclusive bonuses and free minutes! There are special rates for athletes.
Vacuum wind tunnel – professional training base for athletes
Flying in a large wind tunnel is not only an entertainment attraction, but also an opportunity for athletes to train and develop their skydiving skills. Classes with an instructor in an aero simulator will help you prepare for wind tunnel and parachuting competitions.
The Vacuum team is one of the most titled!
Champions and record holders, multiple gold, silver and bronze medalists of the Russian Championships in the sky and in the wind tunnel, participants of the European Championships work for us.
Ivan Sirenko
instructor
Nikita Emelyanov
instructor
Andrey Panzhukov
director
Evgeny Suvorov
instructor 9 0003
Dmitry Plavutsky
instructor
Alexey Vasilenko
instructor
How to buy a subscription to the wind tunnel on the official website:
Pay minutes
Write-off of money from the deposit is carried out in accordance with the current tariffs. Replenish the deposit
Book a time
Through the website or by phone: +7 (495) 260-85-58 Book
Come fly
You need to arrive at the complex 40 minutes before the flight.
What is important to know?
Gallery
ALL PHOTOS AND VIDEOS
Reviews
MORE REVIEWS
@iyavolkova
A year ago I was shooting others in such a tube, it was so cool and then I had a desire to fly. Yesterday it turned out to fulfill the desire of both my own and my children) The birthday of adult children is really a problem, they all saw, were everywhere and grew out of animation. Our life consists of emotions, give them to yourself)
@vacuumfly thanks, you are cool!
@elenatroy
First of all, flying is cool. Secondly, after a certain flight time, the body gets used to it and relaxes (this is infa for those who have terribly sore muscles). Thirdly, after the air turbine, you can understand whether you will skydive or not. I’ve made a decision – definitely not – I’m quite satisfied with a couple of meters. Fourthly, – the guys from @vacuumfly are great – a modern pipe, in the city, with a delicious cafe, a building in the park, their own photo / video support, panoramic windows. The trainers are amazing! I recommend! I will celebrate my next birthday with you @vacuumfly
@alina_endersenn
Attractions from @bundeet in the wind tunnel – fire!
Leave your review
News
SHOW ALL
We are 5 years old!
Wind tunnel schedule for the New Year holidays
Changes in flight fares
Contacts
Contacts
Geolocation QR code:
Address:
Moscow, Bogorodskoe highway, property 18, building 9 (Sokolniki park)
Phone:
+7 (495) 260-85-58
Working hours:
from 10:00 to 24:00, seven days a week
Vacuum Wind Tunnel | it’s… What is a Vacuum Wind Tunnel?
InterpretationTranslation
Vacuum wind tunnel
Vacuum wind tunnel
is a wind tunnel operating at low pressures. The working gas enters from a cylinder or atmosphere through a pressure regulator, a heater and a nozzle into the working part surrounded by a vacuum chamber, where the aircraft model with its supporting devices and measuring equipment is located. Sometimes a cylindrical diffuser is installed behind the working part. Pumping out of gas from V. and. so up to a pressure of 1-10 / -2 Pa (10 / -2 – 10 / -4 mm Hg. Art.) is produced by a vacuum system, usually consisting of mechanical (forevacuum) and steam-oil pumps installed in series. Great prospects are opened by the use in V. a. i.e. cryogenic pumps, which, in comparison with steam-oil and vacuum pumps of other types, consume less power and have smaller dimensions with the same performance. In V. a. That is, with such pumps, both stationary operation with a small gas flow rate and pulsed operation with an operating time of 0.1–5 s and a flow rate increased by a factor of 10 or more can be implemented.
The degree of rarefaction of the gas in the working part is characterized by the Knudsen number Kn. Ordinary V. a. t. work in the region of transient flow regimes (0.25 cm. Rarefied gas dynamics). When rarefied gas flows are obtained with the help of a Laval nozzle, a boundary layer rapidly grows in its expanding part, which prevents the implementation of the regime. This difficulty is circumvented by the use of so-called underexpanded nozzles or diaphragms. A noticeable decrease in the thickness of the boundary layer can be obtained using boundary layer suction.
To obtain gas flows with numbers Kn > 10, installations with a free molecular beam are used, which differ from the actual V. a. that is, the fact that transverse partitions are installed in their working chamber – a separator and a system of collimators – with holes for the passage of the flow. From the gas dispersed in the nozzle, a free molecular beam is released with velocities that are the same in direction and modulus. In this case, most of the gas flowing out of the nozzle is pumped out by one group of pumps up to a pressure of (1-10.
Look no further for a health & fitness smartwatch with all the essentials. And don’t stop moving on your journey—this battery lasts 6+ days.***
Add a 6-month Premium membership for advanced insights & tools to improve your health (regularly {{sell_price}}/mo).†
Add 2-Year Protection Plan with Accidental Damage Coverage for {{sell_price}} per device.
Learn more
Save 67%
Add 1 year of Premium + 2-year Protection Plan◆◆◆
?
You save
Free shipping on orders $50+
45 day money back guarantee on devices and accessories
1 year limited warranty on devices and accessories
Reasons you’ll love Versa 2
Reasons you’ll love Versa 2
Daily Readiness††
Amazon Alexa Built-in*
Sleep Tracking
24/7 Heart Rate Tracking
Smart Experiences
6 Months of Premium†
Amazon Alexa, Spotify, sleep tracking, fitness & health come together to elevate your day*
Experience Versa 2.
Daily Readiness††
Do right by your body
Make the most of your workout routine with a personalized Daily Readiness Score that uses insights from yourbody to guide you toward an activity or recovery day. Only with Premium.††
Amazon Alexa Built-in*
Give voice to your goals
Get a quick weather check before a run, set a timer for your plank, get on-screen answers to your questions and more with Amazon Alexa.*
Sleep Tracking
Sleep better, live better
Build better bedtime habits with sleep tracking and a Sleep Score. Premium members also get a Sleep Score breakdown to better understand it and sessions from Calm, the #1 app for sleep content.⧫⧫
24/7 Heart Rate Tracking
Reveal more about your health and your heart
Versa 2 tracks all-day calorie burn and real-time heart rate zones to give you meaningful insights into your fitness & wellness.
Smart Experiences
Connect to your world
Make purchases with Fitbit Pay™, see call & text notifications on your wrist and control Spotify.**
6 Months of Premium†
Level up your routine
Make smarter choices with powerful, personalized insights & a Daily Readiness Score. Then stay inspired with motivating workouts.⧫⧫⧫
/
Oxygen Saturation (SpO2)
See your average nightly SpO2 level at a glance with this free clock face & view your trends over the past week in the Fitbit app.⧫
6+ Day Battery Life
Track activity, sleep, heart rate and more around the clock with multi-day battery on a single charge.***
Essential Apps
Download hundreds of your favorite apps—everything from a timer and weather to Spotify and Strava.⧫⧫
Irregular Heart Rhythm
Get notified if you show potential signs of atrial fibrillation (AFib) while you’re still or sleeping. ****
Fitbit Pay™
Tap to pay at any retail store or transit station that accepts contactless payments—no phone or wallet necessary.**
Personalized Clock Face
Choose from hundreds of unique designs in the Fitbit app or opt for always-on display mode.***
20 Goal-Based Exercises
Choose from run, bike, swim, yoga and more, then set a goal and get real-time stats.
Real-Time Pace & Distance
Keep an eye on your speed and mileage by connecting to your phone’s GPS.
Fitbit App
Get the tracking, data, motivation and guidance you need to improve all in one place.
Menstrual Health Tracking
Use your watch and the Fitbit® app to log periods, record symptoms, gauge ovulation and discover patterns in your cycle.
Manage Stress
See your daily Stress Management Score in the app and find calm with guided breathing sessions on your wrist.
Google account will be required. See fitbit.com/devices.
*Amazon Alexa not available in all countries, see Fitbit help.
**See bank availability. Quick replies work when your phone is nearby; text replies on Android only. Subscription required for Spotify; app not available in all countries.
***Battery life varies with use and other factors. The SpO2 feature and always-on display mode require more frequent charging.
****Irregular heart rhythm notifications are only available in select countries and with select Fitbit products; not intended for use by people under 22 years old or with known atrial fibrillation. See here for additional details.
⧫Skin temperature variation and the SpO2 clock face are not available in all markets. Skin temperature is only available in the Fitbit app and only displays variation. Significant changes in ambient temperature may negatively impact skin temperature tracking. The SpO2 clock face is not intended to diagnose or treat any medical condition or for any other medical purposes. It is intended to help you manage your well-being and keep track of your information.
⧫⧫⧫Requires Premium Subscription.
†New and returning Premium members only. Must activate membership within 60-days of device activation (requires valid payment method). This membership cannot be gifted. Cancel before membership ends to avoid recurring fees. Content and features may change. See here for more details. T&C apply. 6-month Premium membership available in the Fitbit app after device activation or when checking out on Fitbit.com.
◆◆◆Offer ends December 31, 2023 at 11:59PM PST. Only one Premium membership + 2-year protection plan (the “Bundle”) per customer and for new and returning Premium members only. Bundle may not be gifted. Purchase of the Bundle will exclude you from redeeming the 6-month Premium membership included with your device purchase. Valid payment method required. Cancel before membership ends to avoid recurring fees. T&C apply.
†New and returning Premium members only. Must activate membership within 60-days of device activation (requires valid payment method). This membership cannot be gifted. Cancel before membership ends to avoid recurring fees. Content and features may change. See here for more details. T&C apply. 6-month Premium membership available in the Fitbit app after device activation or when checking out on Fitbit.com.
††Daily Readiness requires a Fitbit Premium membership. Premium content recommendations are not available in all locales and may be in English only.
‡The Health Metrics dashboard and the metrics displayed in the dashboard are not available in all countries. Not intended for medical purposes. This feature is not intended to diagnose or treat any medical condition and should not be relied on for any medical purposes. It is intended to provide information that can help you manage your well-being.
{{/each_upto}}
{{#isCheckoutPage}}
{{/isCheckoutPage}}
{{/if}}
{{PRODUCT_NAME}}
Original Price:
Use the arrows to choose products to compare.
Which product is right for you?
Take the quiz
Advanced health & fitness smartwatch
Advanced health & fitness smartwatch | Shop Fitbit Sense 2
Learn to manage stress & sleep better with our most advanced health & fitness smartwatch.
Add a 6-month Premium membership for advanced insights & tools to improve your health (regularly {{sell_price}}/mo).†
Add 2-Year Protection Plan with Accidental Damage Coverage for {{sell_price}} per device.
Learn more
Save 64%
Add 1 year of Premium + 2-year Protection Plan†††
?
You save
Free shipping on orders $50+
45 day money back guarantee on devices and accessories
1 year limited warranty on devices and accessories
Reasons you’ll love Sense 2
Reasons you’ll love Sense 2
Stress Management
Sleep
Health Metrics***
Heart Health§
Fitness
Google Smarts
Learn to manage stress, sleep better and live healthier.
Meet Sense 2 + Premium
Stress Management
Understand stress, then minimize its effects
Better sleep. Improved mood. More energy. Managing stress with Sense 2 can help you get there. Identify patterns of stress with all-day body-response tracking and smart notifications to remind you to reflect on your emotions. Try new ways of managing stress with guided breathing, exercise, meditations and more.
Sleep
Better understand sleep through science
Sense 2 helps you get the ZZZs of your dreams. Sleep Profile* breaks down your sleep data each month and pinpoints how you can improve your sleep based on 10 key sleep metrics. Check your Sleep Score to learn about the quality of your previous night’s sleep, and get a breakdown of time in light, deep & REM sleep with Premium.
Health Metrics***
Tune in to your body
Sense 2 helps illuminate changes in your wellness. Check your Health Metrics dashboard to see heart rate variability, skin temperature variation, SpO2 and more. You can also use 90 days of health trends to uncover changes to your well-being.***
Heart Health§
Everything starts with heart
Use the ECG app for on-demand atrial fibrillation assessment or turn on irregular heart rhythm notifications to assess your heart while you’re still or sleeping.§ Heart-rate tracking surfaces insights from your sleep, stress, activity and more while high & low heart rate notifications keep a close eye on your heart rate.
Fitness
Work out smarter
Do what you love, just get more out of it. Daily Readiness Score* shows what level of workout your body is ready for, including an Active Zone Minutes goal and Premium workout recommendation. Track 40+ exercise modes and use built-in GPS◆ for real-time pace and distance—even in up to 50 meters of water.
Google Smarts
The apps you love are here
Reach your destinations easier with turn-by-turn directions from Google Maps and make speedy, secure purchases from your wrist with Google Wallet.
/
The big picture of your health
Premium uses data about your body to uncover your unique wellness patterns. It doesn’t stop there: you’ll also receive personalized insights that empower you to make better choices plus access to workout and mindfulness videos.*
Style & comfort
Sense 2 is sleek and slim with raised band attachments that make it more comfortable for all-day wear. The modern design complements styles ranging from funky to formal.
Smart info on the go
Get notifications from your phone, pay for retail items◆◆, use the built-in voice assistant and send quick replies and voice replies right from your wrist.◆◆◆
Battery for 6+ days
Sense 2 tracks all your health & fitness stats for 6+ days without having to stop for a charge. Plus get a full day’s charge in just 12 minutes.◆
Display your way
Choose from hundreds of clock face designs and store up to 5 favorites right on your wrist.
Easily pay hands-free
Pay from your wrist at retail stores or transit stations that accept contactless payments.◆◆
Ask your voice assistant
Use Amazon Alexa Built-in to ask your Fitbit smartwatch questions, set alarms, check the weather and more.††
The app has it all
See your stats, trends and all your progress in one place with the Fitbit app—plus access your Premium membership for personalized guidance.
Menstrual health tracking
Log periods, symptoms and more with menstrual health tracking in the Fitbit app.‡
Shop 24mm attach accessories
Google account will be required. See fitbit.com/devices.
Premium requires a paid membership. Content and features may change.
Accessories sold separately. See here for more information.
*New and returning Premium members only. Must activate membership within 60 days of device activation (requires valid payment). This membership cannot be gifted. Cancel before end of membership to avoid recurring fees. Content and features may change. See here for more details. T&C apply.
***The Health Metrics dashboard and the metrics displayed in the dashboard are not available in all countries. This feature should not be relied on for any medical purposes. It is intended to provide information that can help you manage your well-being.
§ The Fitbit ECG app is only available in select countries and with select devices. Not intended for use by people under 22 years old. See here for additional details.
◆ Battery life varies with use & other factors; GPS may reduce battery life.
◆◆ See bank and transit availability here.
◆◆◆ Available when phone is nearby. Android only.
†† Voice assistant availability and features may vary, see here. Amazon, Alexa and all related marks are trademarks of Amazon.com, Inc. or its affiliates. Alexa is not available in all languages and countries. Alexa features and functionality may vary by location.
†††Offer ends December 31, 2023 at 11:59PM PST. Only one Premium membership + 2-year protection plan (the “Bundle”) per customer and for new and returning Premium members only. Bundle may not be gifted. Purchase of the Bundle will exclude you from redeeming the 6-month Premium membership included with your device purchase. Valid payment method required. Cancel before membership ends to avoid recurring fees. T&C apply.
‡Not intended to be used for contraceptive or other medical purposes. May not accurately predict your menstrual cycles or related information. Intended only to help you monitor and keep track of certain information.
{{/each_upto}}
{{#isCheckoutPage}}
{{/isCheckoutPage}}
{{/if}}
{{PRODUCT_NAME}}
Original Price:
Use the arrows to choose products to compare.
Which product is right for you?
Take the quiz
Top 11 Fitbit smartwatches, bracelets and trackers of 2023
Which Fitbit watches, bracelets and trackers are best for you? Our rating will help you decide by comparing the specs, battery life, and design of each of the best Fitbit devices.
It’s always hard to get started and keep up your workouts, but fitness trackers are the perfect tool to help you get there.
10/20/2022 Update
Added Fitbit Sense 2 model to rating.
Fitbit makes some of the most respected fitness-focused trackers and smartwatches, not to mention backed by a passionate and active user community. Many Fitbit models make our list of the best smartwatches. They are also one of the best smartwatches for Android.
The company’s current range of trackers and watches spans a variety of prices, feature sets and designs to suit every budget, need and taste. Unlike the best Apple Watches, FItbit devices are more affordable and more focused on sports and health tracking.
Whether you just want to track your steps pedometer style, see how well you sleep, monitor your heart rate, or compete against your friends, the Fitbit is a great and affordable accessory. New health features let you take a deeper look at your heart and health, as well as your stress levels and potential illnesses.
Fitbit’s latest smartwatch can even transfer calls right to your wrist and work with Google Assistant voice control.
Owning a Fitbit will motivate you to exercise more and even sleep better at night. We’ve studied every Fitbit ever released, and we’re going to tell you which Fitbit is best for you. We’ve even included some older Fitbit models that have been discontinued but are still available.
1
Fitbit Versa 3
Best Fitbit smartwatch
Heart rate monitor: Yes GPS: Yes Water resistant: 50 meters Screen: OLED touch screen Built-in music: No Mobile payments: Yes Swim tracking: 900 29 Yes Battery life: 6 days
Pros
Larger screen than Versa 2
Great battery life
Built-in GPS
Cons
subscription
Fitbit Versa 3 covers every aspect of a fitness watch, measuring steps, heart rate, distance, calories burned, floors climbed, active minutes, hourly activity and sleep, plus a host of additional health features (such as blood SpO2 readings and oxygen). They have built-in GPS for those who play outdoor sports without a phone.
This Fitbit watch offers on-screen notifications from your phone, silent alerts, cardio levels and other exercise modes like swimming. They have the ability to track women’s health and wellness, and also have controls for music and voice assistants.
You can even receive and answer phone calls from your wrist as the watch has a built-in microphone and speaker. It matches the more expensive Fitbit Sense in all fitness features and most health features. And their screen is just as big and bright.
While Sense has more detailed health apps and sensors like EDA, ECG and skin temperature, and stress management tools, we think they’re overkill for most users, and the Versa 3’s feature set is more than adequate. and with a much better price. High and low heart rate notifications, previously a Sense exclusive feature, are now also part of Versa 3.
These are our favorite Fitbits as they have a great screen and all the fitness features that even the top Fitbit Sense has.
2
Fitbit Inspire 2
Fitbit’s most affordable fitness bracelet impenetrability: 50 meters Display: Greyscale OLED touch screen Built-in music: No Mobile payments: No Swim tracking: Yes Battery life: 10 days
Pros
Affordable
Comfortable, lightweight design
Location search
Cons
No built-in GPS
The Fitbit Inspire 2 fitness feature set covers the basics: steps, calories burned, active zone minutes, distance traveled, heart rate, advanced sleep stages, swim tracking, controlled relaxation breathing, the ability to auto-detect workouts with sufficient accuracy and notifications.
It lacks the built-in GPS found on the Charge 5, Charge 4, Versa 3, and Sense, but will connect to your phone’s GPS if location services are needed to measure pace. Of course, it also doesn’t have an altimeter (so it won’t count the floors you’ve climbed), but other than that, the Inspire 2 is almost as capable as Fitbit’s more expensive trackers.
The heart rate monitor deepens exercise analysis and makes sleep tracking much more difficult, and if activity tracking is what you need, this is what you need. For now, it’s also the only Fitbit with built-in location in case you lose it. It lacks the color screen that the Fitbit Luxe and Tracker-style Fitbit Charge 5 boast, but it’s better value for money.
This is a great price for a lightweight, smart device with a solid feature set. The fitness freak will want something more advanced like the Charge 4, Charge 5, Versa 3 or Sense, but for most of us the Inspire 2 will be all we need. Fitbit Charge 5 0029 50 meters Screen: AMOLED touch screen 0.86 x 0, 58″ Built-in music: No Mobile payments: Yes Swim tracking: Yes ECG monitor: Yes Battery life: 7 days /5 hours with GPS
Pros
Bright , always-on display
GPS quick connect
ECG tracking
Cons
Lack of buttons sometimes
lags 9 0057
Charge 5 is Fitbit’s best all-around activity tracker. Fitbit has handpicked some of the best and brightest features from its latest trackers and smartwatches to create a product that delivers an impressive array of features for the price, not to mention packed in a lightweight and stylish package.
It covers all the main features – tracking steps, distance, calories burned, hourly activity, heart rate, swimming tracking and extended sleep. The Charge 5 also has most of the top-notch exercise features, including Active Zone Minutes. Its built-in GPS means this tracker can compete with more expensive smartwatches, although it can’t receive calls like the Sense and Versa 3.
However, there are a few shortcomings such as inconsistent performance, awkward handling of the device, lack of an altimeter (which was offered on the Charge 4) and a few previously available features that simply weren’t on the Charge 5 at launch when they really should have been.
4
Fitbit Sense 2
Best Fitbit if you’re also looking for a smartwatch 8 Water resistance: 50 meters Screen: 1. 58″ OLED Built-in music: No Mobile payments: Yes Swim tracking: Yes 900 28 Battery life: 6 days/5 hours with GPS
Pros
Stress management with cEDA
User-friendly design
Fitness and health tracking with Fitbit Premium
Cons
900 54
No third party applications
The Fitbit Sense 2 is the company’s premium smartwatch that comes with more advanced health and wellness features than the Versa line. Not only do they have an FDA-approved ECG sensor and blood oxygen readings, the Sense also has the ability to measure electroskin activity and skin temperature. Compared to the original Fitbit Sense, the Sense 2 features an updated design, interface, and EDA sensor, making it the most holistic Fitbit smartwatch ever.
An update to the stress-sensing EDA (Electrodermal Activity) sensor plays a big role in the device’s success: the sensor, now called cEDA (‘c’ stands for continuous), monitors stress levels or overreactions throughout the day, prompting the user to take action. mood monitoring action with Body Response notifications. We were impressed with the Sense 2’s long battery life and attractive design, as well as the sheer number of health tracking options.
As one of the best Fitbits, the best smartwatch, Sense 2 works with both iOS and Android and comes with built-in GPS, a native app store and more. Fitbit is no longer just a step-tracking brand: Fitbit devices like the Sense 2 show what it means to look at your health in a holistic way.
5
Fitbit Luxe
Fitbit’s trendiest wristband
Heart rate monitor: Yes GPS: No Water resistant: 50 meters Screen: AMOLED color touchscreen Built-in music: No Mobile payments: No Tracker Swimming: Yes Battery life: 5 days
Pros
Lightweight, attractive design
Color touchscreen
Great for basic fitness and sleep tracking
Cons
No GPS
No contactless payments
Stylish Fitbit Luxe watches are inspired by jewelry and are built not only for performance but also for looks.
There’s even a special Luxe series designed by jewelry brand Gorjana, featuring a Parker Link bracelet in soft gold stainless steel and a waterproof classic Peony silicone strap. Luxe also offers a wide range of optional straps.
However, this isn’t exactly a Fitbit watch, but rather a tracker that doesn’t differ in style from function as it includes a heart rate monitor and all supported fitness features such as active zone minutes, as well as 20 exercise modes, from riding cycling to Pilates.
The
Luxe is a tracker, not a full-fledged smartwatch, and is closer to the entry-level Inspire 2 than the more capable Charge 5. For example, it doesn’t have built-in GPS like the Charge 4 and 5, although you can connect it to GPS phone.
It also lacks an altimeter for counting floors climbed, but it does at least show smartphone notifications such as caller name and messages.
It also features life-saving features including stress management, guided breathing sessions and access to health metrics such as breathing rate, heart rate variability (HRV), resting heart rate (RHR), skin temperature and oxygen saturation (SpO2) .
Think of the Luxe as the Inspire 2 Deluxe Edition with the same features, but with a thinner stainless steel body and color screen.
Heart rate monitor: Yes GPS: Yes Water resistance: 50 meters Screen: 1.58 inch OLED Built-in music: No Mobile payments: Yes Tracking swimming: Yes Battery life: 6 days/5 hours with GPS
Pros
Best fitness and health features
GPS
Wrist Ringers
Cons
Premium subscription required for some features
The Fitbit Sense watch sits at the top of the list due to its sheer number of features and stands out especially for its advanced health tracking and higher price.
These include: an electrodermal activity (EDA) sensor that can measure the intensity of emotions (important for managing stress), an electrocardiogram (ECG) app to evaluate your heart for abnormal heart rhythms, and a skin temperature sensor that can be used to indicate heart conditions (onset of fever or illness).
If advanced health features aren’t a big deal, Versa 3 might be a less expensive option, but Sense still has most of those features. The
Sense boasts all the fitness features and smart apps found on other Fitbits (and is more accurate with gyroscope swim tracking) and is Fitbit’s standout smartwatch for health measurement and analysis, although some indications require a Fitbit subscription premium.
7
Fitbit Ace 3
Best Fitbit tracker for kids
Heart rate monitor: Yes GPS: No Waterproof: up to 50 meters Screen: OLED touch screen Built-in music: No Mobile payments: No Swim tracking: No Battery life: 8 days
Pros
Cheerful, children’s colors
Great parental controls
Sleep tracking for kids
Cons
Monochrome screen
Heart monitor missing 90 057
Fewer features than others
Fitbit Ace 3 is designed specifically for young children . This is an inexpensive, albeit basic, activity tracker. It lacks most of the more advanced health measurements you’ll find on expensive Fitbits, but it’s enough to motivate a family to exercise.
Until recently, children under 13 were not allowed to have a personal Fitbit account. The minimum age is now 6 if you use the Fitbit Ace 3, which measures steps and active time, as well as basic sleep monitoring.
Special family account features mean kids (and parents) can keep track of their activity stats with secure views for kids and parents; where they can see their progress, participate in challenges and earn badges.
Ace 3 is for exercise, not weight loss – Fitbit hides the calorie counter so kids don’t get hung up on their weight.
Older kids might prefer the Fitbit, which does more, like measures heart rate. The Fitbit Inspire 2 may lack the silicone case found on the Ace 3, but it offers a great range of features including exercise modes, cardio levels, sleep assessment, guided breathing, and we recommend it for older kids.
8
Fitbit Charge 4
Old but not useless tracker
Heart rate monitor: Yes GPS: Yes Waterproof: 50 meters Screen: 1.57″ OLED touchscreen screen Built-in music: No Mobile payments: Yes Swim tracking: Yes Battery life: 7 days/5 hours with GPS
Pros 900 03
Built-in GPS
Accurate fitness tracking
Mobile payments
Cons
Monochrome screen
No built-in memory for music
Old model
Not only does the Fitbit Charge 4 have built-in GPS — a first for Fitbit fitness trackers — but also a metric called Active Zone Minutes that gives you the best indicator of your overall health.
The Fitbit Charge 4 also has Fitbit Pay so you can use it as a contactless payment device. And for those using Spotify, the Charge 4 has controls for that music service, though you still can’t download music to the device itself.
Charge 4 is comfortable to wear and its GPS is accurate. It also measures sleep quite well and, thanks to the SPO2 sensor, can warn you if you’re at risk for conditions like sleep apnea. Charge 4 will last up to 7 days, but when using GPS, this time is reduced to five hours.
9
Fitbit Versa 2
Still a great Fitbit smartwatch
Heart rate monitor: Yes GPS: No Waterproof : 50 meters Screen: 1.34″ color 300 x 300 touchscreen Built-in music: Yes Mobile payments: Yes Swim tracking: Yes Battery life: 4 days
Pros
Good battery life
Colorful screen
Screen workouts
Cons
900 06 No built-in GPS
Old model
Versa 2 is an old Fitbit smartwatch that continues to be a great fitness smartwatch. They have almost all the features of the Versa 3 but don’t have built-in GPS; although they can connect to your phone’s GPS.
Versa 3 claims more accurate heart rate measurements, which may draw newcomers to the latest model, but probably not existing Versa 2 users. Versa 3. They also lack the ability to take calls on the wrist, which is another advantage of the Versa 3.
If you find the Versa 2 at a great price, we still rate it as a great fitness smartwatch; not as good as the Versa 3, but just a couple of features behind. 9Fitbit Charge 3 range: 50 meters Screen: 1.57″ OLED touchscreen -Screen Built-in music: No Mobile payments: Yes Swim tracking: Yes Battery life: 7 days
Pros
9 0054
SpO2 sensor
Waterproof
Nice design
Cons
No built-in GPS
The
Fitbit Charge 3 was previously our top pick as the best Fitbit, but it has been supplanted by the Fitbit Charge 4 which has GPS and several other features. But that doesn’t mean the Charge 3 isn’t a good device anymore, and it’s gotten a hell of a lot cheaper since the Fitbit Charge 5 was released.
grayscale touchscreen displaying heart rate, distance traveled and smartphone notifications if paired. The Charge 3 is also swim-proof and can track your pool laps. 9The 0003
Charge 3 comes in three sizes so it fits most wrists (Fitbit has a size chart). In addition, the Charge 3 strap is detachable, and Fitbit and a number of third-party manufacturers make straps in a variety of colors, patterns, and materials. The Fitbit Charge 3 also has an SpO2 sensor that will be used to diagnose sleep disturbances and weekly battery life. A smartphone is required to connect to GPS, but it’s still a good Fitbit for the money – as long as it’s on sale.
11
Fitbit Aria Air
Best Fitbit scales
Functions: weight, BMI calculation (BMI) Memory: Yes Synchronization with smartphone: Yes Communication protocol: Bluetooth Material platforms: Glass Units: kg/lb Battery type: AAA
Pros
Syncs with Fitbit app
Cons
Other scales have more readings
If you don’t care about body fat percentage and other weight and body stats, and just want your weight to automatically sync with the Fitbit app, then the Fitbit Aria Air is scales for you, which will save a lot of money. You also get your body mass index (BMI), but nothing else.
If you want to dig deeper and control your body fat percentage and a host of other metrics like water percentage, muscle and bone mass, check out our ranking of the best smart scales.
How to choose the best Fitbit watch, tracker, bracelet
The benefits of more exercise cannot be overestimated. Regular walks reduce the risk of a heart attack or stroke by 31%. A study of 650,000 people found that just 11 minutes of activity a day after age 40 increased life expectancy by 1.8 years. Activity for an hour or more a day increases life expectancy by 4.2 years.
Exercise strengthens bones, strengthens the immune system, reduces the risk of diabetes and certain types of cancer (such as breast cancer), improves mood, and prevents aging. There is probably not a single organ in the body that does not benefit from exercise.
A healthy heart in young and middle age reduces the risk of dementia later in life, according to a study by the University of Oxford.
And it’s not just about exercise: A 30-minute walk can prevent the buildup of stress throughout the day, as aerobic exercise helps control levels of the stress hormone cortisol.
10,000 steps per day is the standard recommended goal, although this has no scientific basis. What’s really more important is how many minutes you’re active per day (experts recommend at least 150 minutes a week), and all Fitbit watches and trackers measure this fitness metric, as well as your step count. This is especially important if you’re training on a bike, where steps don’t count.
A more sophisticated active zone minute measurement is currently available for later Fitbit models including Sense, Versa 3, Charge 4, Charge 5, Inspire 2 and Luxe, but you will also find it on older Fitbit models such as Versa and Versa 2 as Fitbit OS updated them to support the new metric.
Fitbit with 24-hour heart rate monitor (Inspire HR, Inspire 2, Luxe, Charge 4, Charge 5, Ionic, Versa Lite, Versa 2, Versa 3, and Sense) have heart rate zones, cardio training level, and guided breathing.
They also show advanced data on sleep stages, including the duration of light, deep and REM sleep, as well as give it an estimate. Those without HR (Ace 3, Ace 2, Inspire 1) offer easier sleep tracking.
Another big news is that Google bought Fitbit in early 2021.
Best watch for swimming
Best smartwatch for running and sports
Best smartwatch for Wear OS
Best smartwatch for Android
The best Samsung smart watches
The best Garmin smart watches
The best fitness trackers
The best headphones for running and sports
The best action cameras
Fitbit introduced smart watches Sense 2, Versa 4 and fitness tracker Inspire 3
3DNews Technologies and IT market. News wearable electronics Fitbit introduced the smart watch Sense 2, V…
The most interesting in the reviews
08/24/2022 [19:57],
Vladimir Mironenko
Fitbit has officially unveiled the smart watch Sense 2, Versa 4 and fitness tracker Inspire 3, the upcoming announcement of which was previously reported by Internet sources. The Fitbit Sense 2 and Versa 4 models are thinner and lighter than their predecessors, respectively, the Sense and Versa 3, released in 2020. The design of the new products is also slightly different – in particular, Versa 4 has a physical control button that is absent from its predecessor.
Image Source: Fitbit
The Sense 2 and Versa 4 smartwatches provide continuous heart rate monitoring combined with activity, stress and sleep tracking with up to six days of battery life. Also, the owners of these wearable devices will be able to use the Google Wallet payment system. The new models will soon be connected to Google Maps, allowing their owner to see turn-by-turn directions on their wrist.
Fitbit Sense 2
The Sense 2 features a Continuous Electrodermal Skin Activity (GSR) sensor similar to that of the Charge 5. The new sensor measures sweat gland activity associated with emotional arousal, providing continuous all-day stress monitoring and warning user about exceeding the level of stress in excess of acceptable standards.
Fitbit Versa 4
Fitbit also introduced several new exercise modes, bringing the total to 40, including high-intensity interval training (HIIT), weightlifting and dance.
The Inspire 3 fitness tracker also received a number of updates. It uses a color OLED display instead of monochrome LEDs and adds a blood oxygen saturation (SpO2) sensor. Despite the switch to a more power-hungry display, the Inspire 3’s battery life remained at 10 days. According to the company, this period will be reduced to three days with the Always-on Display (AOD) feature activated. Sense 2 and Versa 4 have battery life of up to six days, and three days with AOD enabled.
Fitbit Inspire 3
All three are available for pre-order starting today and come with a six-month trial of Fitbit Premium. The Sense 2 is $299.95, the Versa 4 is $229.95 and the Inspire 3 is $99.95.
Source:
If you notice an error, select it with the mouse and press CTRL+ENTER.

 1 in
1 in
 1 in
1 in

 1A input charger to maximize charging efficiency
 4V 600mA*2
 com
com This has been the standard in GoPro’s product line since 2014. It features durable construction designed to withstand the vigorous activities and sporting events you record with your GoPro camera and charges while connected to the camera through a USB port. This battery is also used in the 360-degree GoPro Fusion camera. The Digital Hero 5 (2006) uses two AAA batteries.
  2K 30 mode and 60 minutes in 3K 60 mode. The GoPro Hero7 Black battery lasts for 45 to 90 minutes. The Silver and White versions of this model have a built-in battery that lasts for 106 to 146 minutes. The Hero6 battery lasts for 70 to 110 minutes depending on shooting resolution. The Hero5 battery lasts for about two hours. The Hero5 Session battery lasts for about one hour and 35 minutes. The GoPro Hero4 ranges from one hour and 20 minutes to one hour and 45 minutes depending on the model. Keep in mind that performance varies depending on conditions, settings, age of the battery, and other factors.
 Keyboard, mouse and monitor are extra. (Image credit: Paul Reiffer)
 (Image credit: Paul Reiffer)


.jpg) 99
99 Shooting with ultra-high-resolution Phase One cameras, his work is used commercially by interior designers and clients ranging from National Geographic to British Airways, Marriott, Land Rover and many more.
 As part of our review process, we assess performance, budget, and every last spec from CPU to connectivity. We’ve also reviewed the best laptops for photographers and the best photo editing monitor to help you find the best setup for every project.
  5-inch predecessor externally, touting a fresh new face that comes in several different colors. But they also come with fresh new specs, thanks to Apple’s new M1 chip that makes it much more powerful than the previous Intel iMacs. That means they’re more than equipped to handle video and photo editing without slowing down the creative workflow.
  Specs-wise, this model sports some massive improvements while also upgrading its webcam and microphones for a felicitous update.
  7 x 19.7 x 3.6 cm
 Lenovo ThinkCentre M900


 This is a seriously powerful all-in-one with cutting-edge tech, and a choice of powerful Intel Xeon W processors, bags of RAM and hefty graphical processing power.
  After all, the 8th-generation chips and Radeon RX 560 graphics are aging at this point.
  3 x 25.6 x 8 inches (51.6 x 65.0 x 20.3cm)
 HP Pavilion Wave


 Ideally, choose a computer offering a minimum of 16GB RAM and 1TB SSD storage for best results.
 .jpeg)


 55
55
 org/ListItem”>
 You can also rotate the photo left and right by 90 degrees or incremental degrees, or rotate the image by 180 degrees.
  org/ListItem”>

 Don’t worry if you don’t want to apply any filters – you always have the option “Original “.

 Then select Red Eye or Spot Correction .
  org/ListItem”>


 There are tools in this sense, but they are very limited, and it seems that this area has been somewhat neglected.


 4 – f/2 range.
 4. The lens feels very solid in hands and it has a far better feel to it than the Nikon 50mm f/1.4G, which feels and handles plasticky in comparison. At 815 grams, the lens is a beast! And it had better be, with its complex optical design featuring 13 elements in 8 groups, 3 low-dispersion (SLD) elements and an aspherical lens element. Almost three times heavier than the Nikon 50mm f/1.4G and only 155 grams lighter than the Zeiss Otus 55mm f/1.4, it definitely lets itself know when mounted on a camera. It will surely make a lightweight DSLR front-heavy, although it does balance out quite well on pro-level DSLRs. Built like a tank with an all-metal exterior and a metal mount, it feels like a Zeiss-class lens that will last a lifetime.
 The LH830-02 petal-shaped plastic hood is pretty large and does a nice job in both protecting the front element and reducing ghosting / flare. If you like using manual focus or shooting video, you will find the focus ring to be large and very smooth. Similar to all modern Nikkor lenses, the focus ring gives a bit more resistance when you get to minimum focus distance and infinity marks, and rotates past those. From my quick measurements, the distance scale seems pretty accurate and is marked for both feet and meters on top of the lens. The small plate with the letter “A” shows that the lens belongs to the “Art” category of lenses that I mentioned earlier in the review. Right next to the “Made in Japan” text on the side of the lens, there is a switch that can be used to switch from Autofocus to Manual Focus.
 This means that you have to watch out for dust between the lens and the camera mount or it will easily make it into the camera and potentially even into the lens. As I explained in my “what to do with dust inside lenses” article, it is quite normal for lenses to suck air in and out when focusing, so I recommend to try to keep the rear metal mount area clean at all times.
 In almost every situation, they want to create great portraits of family members and kids, or take killer detail shots of their cooking. In these cases, their desire to create an image with a shallow depth of field, where focus quickly fades to a blurred background, is what motivates their search. I whole-heartedly recommend that anyone with a SLR should purchase a 50mm lens. It’s a bokeh gateway drug with its ability to create pleasing out of focus backgrounds for anyone at every budget.
 8 is a budget lens at $125.99 and comes with some noticeable compromises in quality.
 The 50mm 1.4 handles these things very well, with a manageable vignette that I find compliments many portraits. When correcting for (minor) lens distortion in Lightroom, I often leave the vignette correction off, embracing its vignetting ability to help drive focus on the image I created.
 Not just for portraits, a fast 50mm can work as an optimal “detail” lens: versatile in capturing bouquets, dinner placing, all allowing focus to be drawn to the subject while beautifully blurring out the background.
 8 either.
 In both cases, “life expectancy” should not be embarrassing: in fact, why try to improve something that works well even without alterations? Of course, this does not mean that the manufacturer will not release updated versions. We will attempt a direct comparison of the two heroes of today’s review. First, let’s take a closer look at the specifications.
  45 m
45 m 
 Bayonet fittings are carefully polished. On the Canon EF 50mm f/1.2L USM, this provides dust and moisture resistance when used with eligible Canon cameras.
 At the edge, there is some dispersion at open apertures – the lenses also practically do not differ in this. The distortion is almost imperceptible, although you can detect some tendency to barrel formation on the Canon EF 50mm f/1.4 USM and padding on the Canon EF 50mm f/1.2L USM.
  In situations with complex and mixed lighting patterns, the white balance was adjusted manually. In some cases, in the interests of the composition, they resorted to cropping the frame.
  2 and f / 1.4 is critically small, and getting into the right point, especially when shooting close-ups, is very difficult.
  4 USM. These are, apparently, the features of the ABB camera, and not the optics.
  8
8  6. The Canon EF 50mm F1.4 USM has a more pronounced vignette at comparable aperture ratios (at f/1.4-f/4). Moreover, its edge darkening is not fully corrected by the profile application.
 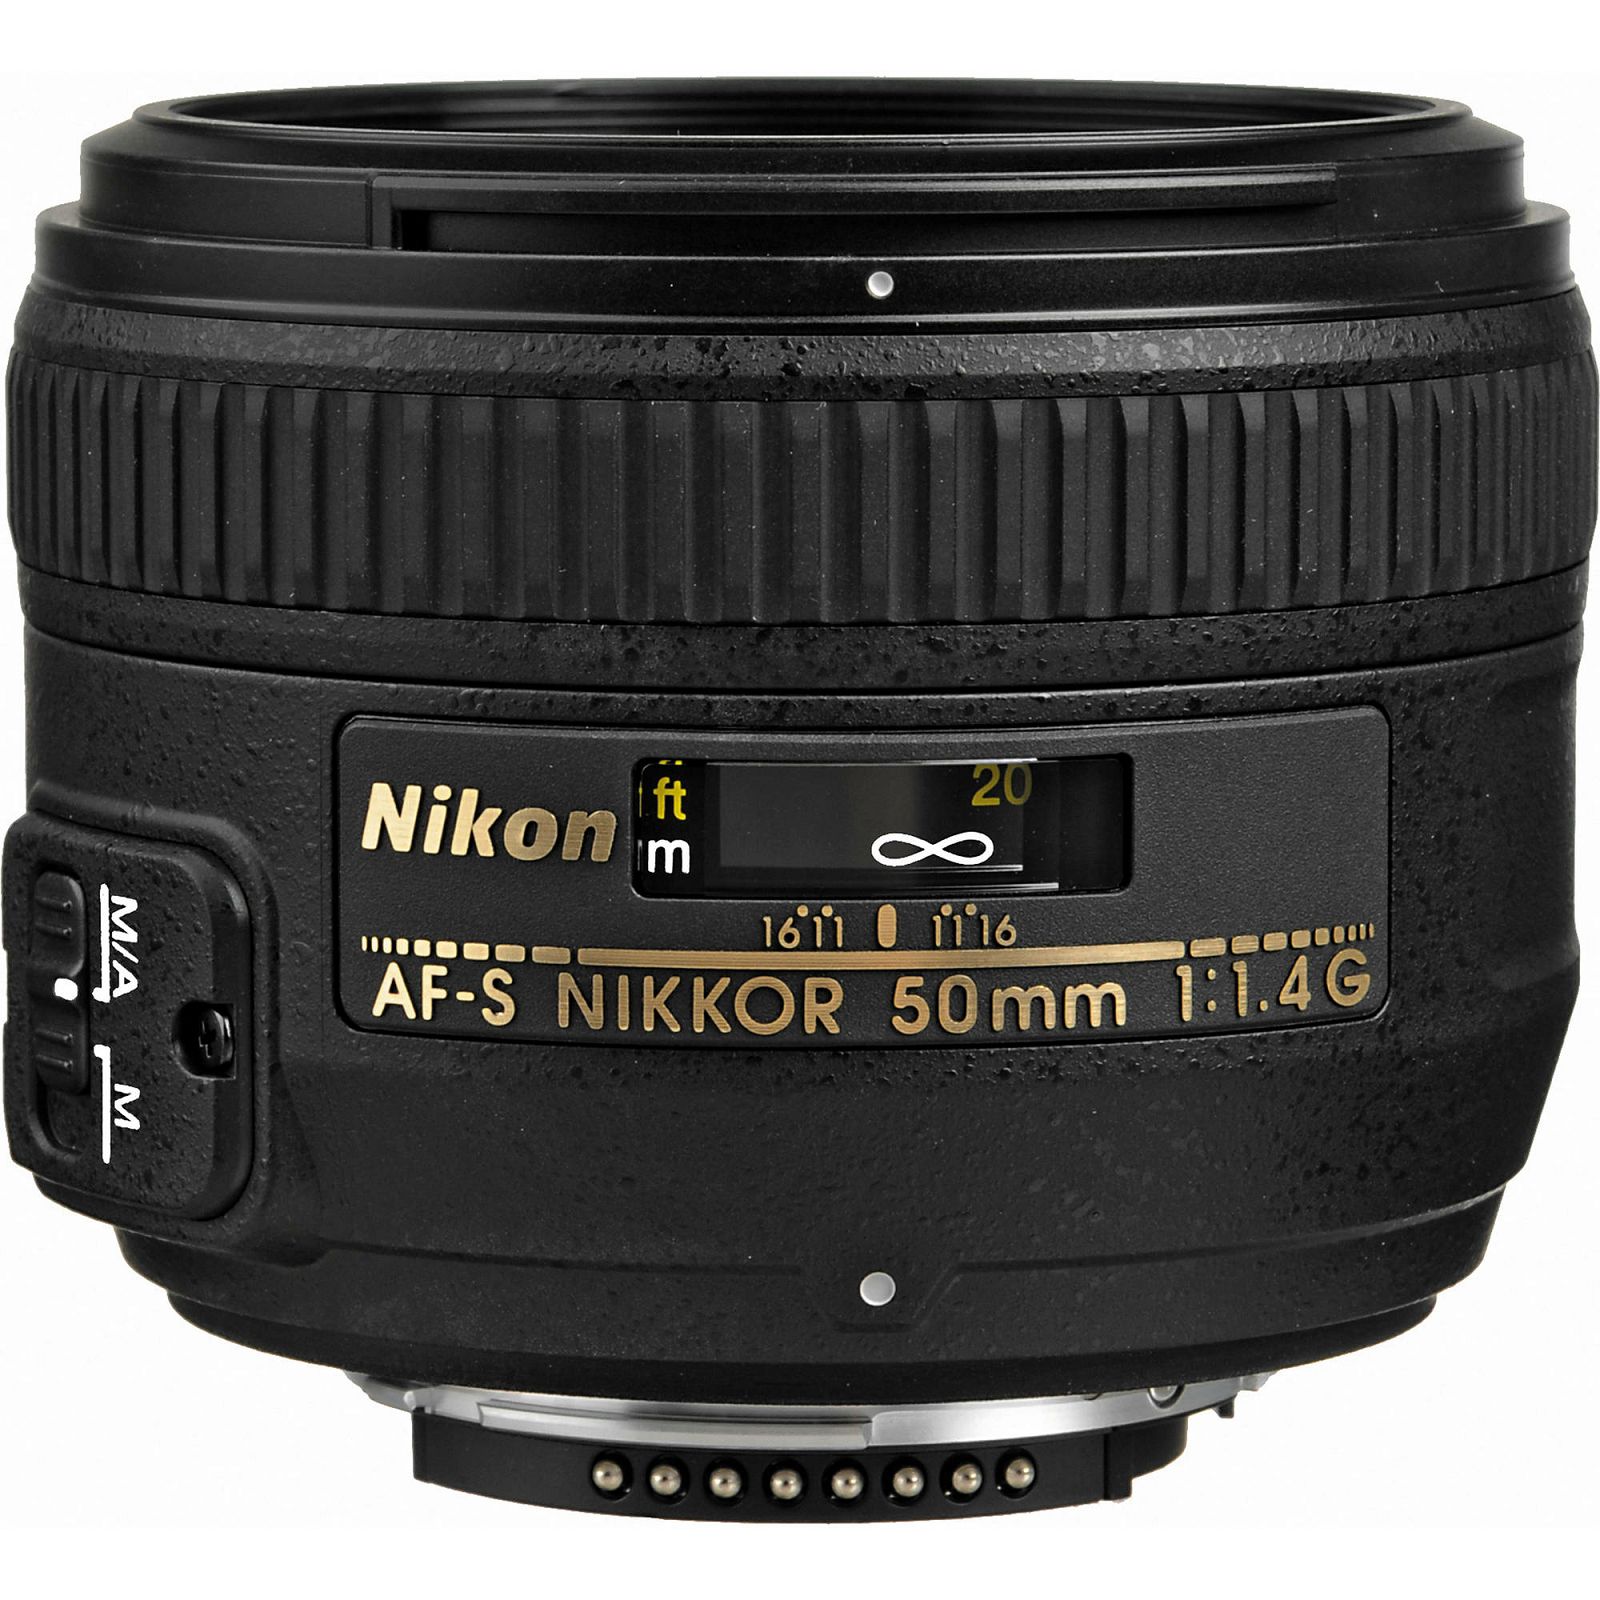 4; 1/320s; ISO 100
 2L USM. ABB variations reflect the specifics of the camera, not the optics.
 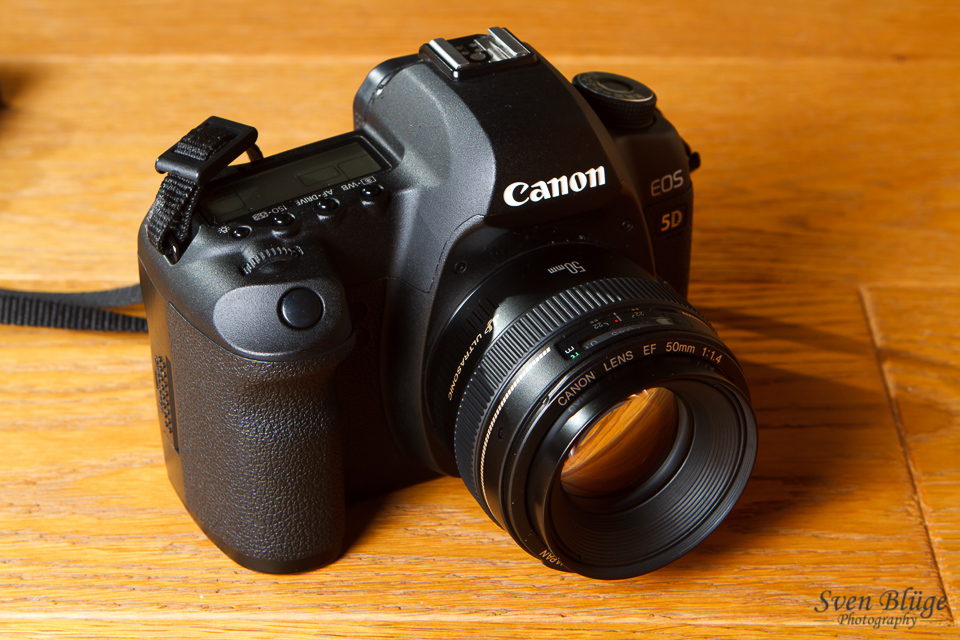 8
8 
 4 USM
4 USM  05m shorter minimum focus distance?
  4 USM
4 USM  ..Sigma 50mm F1,4 DG HSM Art für SIGMA SD/DP Kameras für SIGMA SA Mount 90 020


 Rounded lobes, often found only on more expensive lenses, enhance the appearance of out-of-focus objects. This allows you to achieve better, softer bokeh in your photos.
  This is important in bright conditions where a wider aperture can cause your shot to be overexposed. Another benefit is that with a smaller aperture you get a greater depth of field and can keep the entire image in focus.
 Tested with Nikon D7000 or Canon 7D. Source: DxOMark.
 The monster truck rebuilds into an off-road buggy. Includes digital Instructions PLUS for the off-road buggy. Pull back and release to send the truck speeding. Monster Jam® fans will love the authentic details. Off-road buggy features the same cool pull-back function. The play goes on with this fun-filled set. When kids are ready for a new challenge, the model rebuilds into an off-road buggy.
 86 lbs
 1,21
1,21 
 Instructions for the off-road buggy are available online.
 7L / 5.6cm
 5 Liftarm, Thin 1 x 2
 5, 4 – 4 Thick 1 x 7
 5 Degrees
 4 x 20, 30.4mm D. x 20mm without Pinholes with Reinforced Rim
 Additional information about the goods can be found in several ways:
  After, from the presented list, you need to select the desired lot.
  In order for the automation to recognize your request, you need to enter the same thing, but in English – “BMW e65 hub”.
  Petersburg
 15 billion. Youtube
 468 Minutes
 However, Billboard may receive a commission on orders placed through its retail links, and the retailer may receive certain auditable data for accounting purposes.
 The triple-disc collection retails for $24.99 and up, and features nearly eight hours fully restored, archival footage with Dolby Atmos sound.
 The film also shows footage of The Beatles’ legendary rooftop concert at London’s Saville Row. The performances marked their last live show as a group.
 The program allows you to recover files of any type. The utility performs a full scan of damaged disks and saves as much information as possible. In the process of recovering Recovery Toolbox for CD Free uses a large number of different algorithms, which greatly improves the amount and quality of recovered data.
  and so on.
  Repairing CD/DVD discs occurs by copying and repairing files from a damaged optical disc to a folder on your hard drive.
  We will introduce you some useful tips that can help you recover all data or deleted files easily and effectively.
  Apply a thin layer of Vaseline toothpaste to the CD or DVD. Then wipe the disc inside and out with a clean soft cloth. After that, check again if your CD or DVD is available.
  Connect the device that contains the backup files from the CD or DVD to your computer. Then follow the next step to perform DVD data recovery on Windows computer. If you are on a Mac, you will need to download Recoverit Data Recovery for Mac and follow similar steps.
 They are; red, purple, pink, orange, light blue, and lastly, green.

 Or they can simply restart the game and change the settings.
 Auto clickers may use to increase the clicking speed but can’t speed up and click the targets with accuracy.
 Aim Booster is that it asks you to show your JavaScript on.
 You’ll need the proper
 In the event of a false double-click slipping, the problem lies in the microswitch of the button. If the mouse is budget, then the most logical thing would be to replace it with a new one, for example, buy it in our store, but if the mouse is gaming and is of value to you, it can be repaired. The microswitch can be ordered in China, or we will replace it in our technical center and your mouse will be like new!
  Pay special attention to the legs along the edges of the bottom of the mouse.
  Make sure that the holes inside the wheel are clean, free of damage and dirt. Clean the wheel and sensors if contaminated with alcohol and blow with air. Assemble the mouse in reverse order.
 I made the project the way I would like to see the modern Internet, where there is no clickbait, garbage and advertising, when you can not be afraid to go to some page and download viruses, when you don’t know where the real “download” button is and where is the malicious link .
  Today we’ll talk about checking the mouse – what online services and programs can help with this and what exactly they determine.
  Not the most accurate change parameter, since the accuracy is affected by the human factor, but it can also come in handy.
  You can determine the number of clicks for the allotted interval and the average number of clicks per second.
 It’s incredibly compact at just over 17 x 17cm across and just over 3cm thick, so it fit right underneath my monitor after I plugged everything into the plentiful ports on offer.
  1 port.
 Still, while the Cinebench score indicated a decent multi-core score for its ability to handle Cinema 4D (slightly below £800-ish laptops on the market today), the Geekbench score felt disappointing for a desktop computer. With six cores and 12 threads, you’d expect this machine to perform better, but even adding a second and third app running contiguously with Photoshop or a video editor, I noticed the processing speed slowing, so unfortunately, this won’t be a creative pro’s go-to machine, unless they go for the highest-spec version of the newer G9 model. And even then, you’ll have hit a price bracket with more powerful options than that available.
 Both worked perfectly well, but still feel like the budget gear they are. This has been upgraded to the much nicer HP 655 wireless keyboard and mouse combo for inclusion with the G9 version.
 HP makes good-quality computers and laptops, and there is certainly nothing wrong with the EliteDesk 800 G6 Mini for general office work, but if you need something that demands graphic grunt and capacity for several creative apps running simultaneously, you can get better equipment for those needs, for not much more.
  He loves putting things to the test and seeing if they’re all hyped up to be, to make sure people are getting what they’re promised. Still can’t get his wifi-only printer to connect to his computer.
  1 with Bing 64-bit
 However, the fun thing about these mini desktops for enthusiasts is that they’re dead simple to open and upgrade, and if you’re willing to spend just a bit more money it’s easy to tweak them to better suit your needs.
 jpg 1080, https://cdn.arstechnica.net/wp-content/uploads/2015/02/IMG_0892.jpg 2560″ data-sub-html=”#caption-611963″>
 net/wp-content/uploads/2015/02/IMG_0884-150×150.jpg” data-src=”https://cdn.arstechnica.net/wp-content/uploads/2015/02/IMG_0884.jpg” data-responsive=”https://cdn.arstechnica.net/wp-content/uploads/2015/02/IMG_0884-980×653.jpg 1080, https://cdn.arstechnica.net/wp-content/uploads/2015/02/IMG_0884.jpg 2560″ data-sub-html=”#caption-611953″>

 jpg 1080, https://cdn.arstechnica.net/wp-content/uploads/2015/02/IMG_0882.jpg 2560″ data-sub-html=”#caption-611951″>

 There’s a good reason for that larger footprint, but we’ll get to that later.
 The sole difference between the Celeron 2957U and the 2955U referenced in that piece is support for Intel’s Quick Sync video encoding and decoding feature.
 9GHz Core i3-4025U and a 1TB 2.5-inch 5400RPM drive. Both come with 4GB of RAM. Power consumption in the Core i3 box was broadly comparable to the Haswell NUC we reviewed, with a few watts added to accommodate the spinning hard drive.
 Having faster storage along with a better CPU makes the Stream Mini feel faster than the Stream 11 just about all the time, but 2GB is still a tight bottleneck once you get to multi-tab Web browsing and general multitasking.
 McAfee is here, easily uninstalled in favor of Windows Defender if you don’t care for it. A 25GB Dropbox offer, various HP support and documentation apps, a handful of Start screen apps and website shortcuts, and an Office demo round out the list. The Stream Mini includes a 200GB-for-two-years OneDrive offer, but no free Office 365 subscription.
 Even low-end Haswell GPUs are capable of very basic gaming, and the addition of Quick Sync makes them all fairly appealing HTPC candidates. The Pavilion is a decent desktop replacement, and the Stream is a good TV streaming box or kiosk PC.
 ua…inshi stats
  Such systems have excellent scalability, functionality and, of course, performance – and you will see this on the example of three HP desktops.
  1 Gen1 Type-A
  So, the HP EliteDesk 705 G4 is equipped with an 8-core Ryzen 7 PRO 2700X chip and 32 GB of RAM at once. Naturally, this system unit will be noticeably more productive than its “colleagues”, since the ProDesk 405 G4 Desktop Mini has a 2-core Athlon PRO 200GE and 8 GB of RAM, and the Desktop Pro A G2 has Ryzen 3 PRO 2200G and 8 GB of RAM. All computers use fast solid-state drives – this is very cool, because almost all operations related to accessing SSD cells will be performed as quickly as possible. All PCs were also running Windows 10 Professional, which HP strongly recommends. Specifically, Windows security technologies such as Device Guard, Credential Guard, TPM 2.0, and VBS are supported.
  Remarkably, Intel does not have such technology. The AMD Secure Boot feature provides a secure boot process for your computer and prevents threats from infiltrating critical software.

 Its thickness is only 3.4 cm, and the weight does not exceed 1.3 kg. This computer comes with a VESA mount that allows you to mount it behind a monitor and an external power supply. For clarity, we photographed the HP ProDesk 405 G4 Desktop Mini along with a 6-inch smartphone. Of course, the use of such a PC will allow you to save working space at the workplace as much as possible.
  HP EliteDesk 705 G4 can be installed both in horizontal and vertical positions – for this, a special stand is included with the computer. The abbreviation SFF in the name of the HP EliteDesk 705 G4 stands for Small Form Factor. Case dimensions are 9,5x27x29.6 cm, and its weight is slightly more than 4.5 kg. On sale you can find a larger version of the HP EliteDesk 705 G4.
  Its weight is 4.32 kg, and its dimensions are 13.6×26.18×31 cm. On the front panel of the system unit there is a 3.5 mm headset jack and four USB 3.1 Gen1 A-type connectors at once. At the back, the test model found an audio output and audio input, HDMI 2.0, an Ethernet port, a VGA output, and four USB 2.0 A-type ports.
  All components of the systems are selected and configured so that the devices work stably, do not heat up too much, do not make noise and do not get clogged with dust. So, desktops use single-fan cooling. Fans have additional shrouds, they better “expel” the heated air outside the case, and their correct location can significantly reduce the suction of dust into the computer.
  As a rule, computers will not face such a load in everyday life. This means that if the HP ProDesk 405 G4 Desktop Mini, HP EliteDesk 705 G4 SFF and HP Desktop Pro A G2 pass the test in Prime95, they will work perfectly in 100% of other applications.
  However, the system does not overheat, the maximum temperature of the chip was 82 degrees Celsius, and its frequency varied from 3.5 to 3.8 GHz when all cores were loaded. With such a load, the HP EliteDesk 705 G4 SFF worked noticeably noisier – the measuring device recorded 44.9dBA. It should be noted here that HP desktop fans emit low-frequency noise – it is much easier to perceive by our ears.
  Let’s say the ProDesk 405 G4 Desktop Mini is great for office tasks that involve email, web browsing and Microsoft Office class applications. But the HP EliteDesk 705 G4 SFF, along with the 8-core Ryzen 7 PRO 2700X and 32 GB of RAM, is capable of handling the most complex tasks related to graphics rendering, video encoding and processing large amounts of data. HP Desktop Pro A G2 is, in turn, a compromise between the other two systems. This fact is well reflected in the screenshots of the PCMark 10 program – a comprehensive benchmark that studies the efficiency of a computer in various everyday tasks.
  3 . Testing rendering speed using the renderer of the same name. Measures the build speed of the standard BTR scene used to measure performance.
  Testing the speed of a popular chess engine.
  5-inch hard drive as an additional drive.
 00
00 00
00 00
00 99
99 99
99 99
99 99
99 99
99 Find an office
  ru
ru  This statement does not apply to OSAGO insurance for legal entities and individual entrepreneurs.
  5t
5t  0 l., Convertible
  2 l., SUV


 The Windtunnel includes variable height adjustment, so it can be used on different carpet heights or services. If you’re vacuuming mostly on carpet and don’t mind the noise, the Hoover Windtunnel is an inexpensive upright that can meet many needs.Check Price


 Our tests utilize the following procedure:
 Rice, kitty litter, and cereal all reached levels of 98% or higher.
 Pushing and pulling the unit initially was easy, but there came a time where the finer debris started to stick to the wheels, which made pushing / pulling a touch more difficult.


 Spend an active weekend in our complex – arrange an unusual vacation for yourself and your loved ones!

 Classes with an instructor in an aero simulator will help you prepare for wind tunnel and parachuting competitions.
 The trainers are amazing! I recommend! I will celebrate my next birthday with you @vacuumfly
  The working gas enters from a cylinder or atmosphere through a pressure regulator, a heater and a nozzle into the working part surrounded by a vacuum chamber, where the aircraft model with its supporting devices and measuring equipment is located. Sometimes a cylindrical diffuser is installed behind the working part. Pumping out of gas from V. and. so up to a pressure of 1-10 / -2 Pa (10 / -2 – 10 / -4 mm Hg. Art.) is produced by a vacuum system, usually consisting of mechanical (forevacuum) and steam-oil pumps installed in series. Great prospects are opened by the use in V. a. i.e. cryogenic pumps, which, in comparison with steam-oil and vacuum pumps of other types, consume less power and have smaller dimensions with the same performance. In V. a. That is, with such pumps, both stationary operation with a small gas flow rate and pulsed operation with an operating time of 0.1–5 s and a flow rate increased by a factor of 10 or more can be implemented.
 Ordinary V. a. t. work in the region of transient flow regimes (0.25 cm. Rarefied gas dynamics). When rarefied gas flows are obtained with the help of a Laval nozzle, a boundary layer rapidly grows in its expanding part, which prevents the implementation of the regime. This difficulty is circumvented by the use of so-called underexpanded nozzles or diaphragms. A noticeable decrease in the thickness of the boundary layer can be obtained using boundary layer suction.

 ****
****

 This membership cannot be gifted. Cancel before membership ends to avoid recurring fees. Content and features may change. See here for more details. T&C apply. 6-month Premium membership available in the Fitbit app after device activation or when checking out on Fitbit.com.

 You can also use 90 days of health trends to uncover changes to your well-being.***

 Content and features may change. See here for more details. T&C apply.
 Only one Premium membership + 2-year protection plan (the “Bundle”) per customer and for new and returning Premium members only. Bundle may not be gifted. Purchase of the Bundle will exclude you from redeeming the 6-month Premium membership included with your device purchase. Valid payment method required. Cancel before membership ends to avoid recurring fees. T&C apply.
 Unlike the best Apple Watches, FItbit devices are more affordable and more focused on sports and health tracking.
  They have built-in GPS for those who play outdoor sports without a phone.
  Of course, it also doesn’t have an altimeter (so it won’t count the floors you’ve climbed), but other than that, the Inspire 2 is almost as capable as Fitbit’s more expensive trackers.
  Fitbit has handpicked some of the best and brightest features from its latest trackers and smartwatches to create a product that delivers an impressive array of features for the price, not to mention packed in a lightweight and stylish package.
  58″ OLED
  mood monitoring action with Body Response notifications. We were impressed with the Sense 2’s long battery life and attractive design, as well as the sheer number of health tracking options.


 This is an inexpensive, albeit basic, activity tracker. It lacks most of the more advanced health measurements you’ll find on expensive Fitbits, but it’s enough to motivate a family to exercise.
 And for those using Spotify, the Charge 4 has controls for that music service, though you still can’t download music to the device itself.
  They have almost all the features of the Versa 3 but don’t have built-in GPS; although they can connect to your phone’s GPS.
  But that doesn’t mean the Charge 3 isn’t a good device anymore, and it’s gotten a hell of a lot cheaper since the Fitbit Charge 5 was released.
  You also get your body mass index (BMI), but nothing else.
/cdn.vox-cdn.com/uploads/chorus_asset/file/9361161/vpavic_170925_2023_0048.jpg)

