tonifica – Translation into English – examples Spanish
Premium
History
Favourites
Advertising
No ads with Premium
Conjugate this verb form
Suggestions:
tonificar
tonifica la piel
These examples may contain rude words based on your search.
These examples may contain colloquial words based on your search.
tones
tone
toning
invigorates
tonifies
toned
strengthens
invigorate
tonify
tightens
invigorating
Suggestions
tonifica la piel
305
Este completo tratamiento tonifica y reafirma la piel y mejora la circulación.
This complete treatment tones and firms the skin and improves circulation.
Su fórmula rica en nutrientes tonifica, revitaliza y estimula los sentidos.
Its nutrient rich formula tones, revitalizes and stimulates the senses.
Reafirma, tonifica e ilumina la piel apagada con este intenso tratamiento.
Firm, tone and brighten dull skin with this intensive treatment.
Es una fórmula que refresca, calma la piel mientras tonifica y suaviza.
A soothing and refreshing formula that helps to tone and refine the skin.
Antiséptico general, estimula la digestión, tonifica, ayuda a la recuperación física.
General antiseptic, stimulates digestion, toning, helps physical recovery.
Esta técnica de rejuvenecimiento facial permite una máxima hidratación y tonifica tu piel.
This technique of facial rejuvenation allows maximum hydration and toning your skin.
El yoga tonifica, fortalece y estira los músculos de nuestro cuerpo.
Yoga tones, strengthens and stretches the muscles of our body.
Tal medicamento ayuda a fortalecer la inmunidad, alivia y tonifica.
Such a drug helps to strengthen immunity, soothes and tones.
Con valiosas sustancias nutritivas e hidratantes, tonifica y suaviza la piel irritada.
With valuable nutrients and moisturizers, tones and soothes irritated skin.
Refresca, tonifica y vitaliza la piel del rostro después del afeitado.
Refreshes, tones and revitalizes the face skin after shaving.
El aroma del café reduce el estrés, refresca y tonifica.
The aroma of coffee reduces stress, refreshes and tones.
El laurel tonifica e hidrata el cabello dándole un brillo único.
Laurel tones and moisturizes the hair giving it a unique sheen.
El ejercicio físico vigoroso tonifica el cuerpo, destacando sus habilidades naturales.
Vigorous physical exercise tones the body, bringing out its natural abilities.
Limpia y tonifica tu piel a la vez, sin secarla demasiado.
It cleanses and tones your skin in one action, without over-drying.
Remineraliza, revitaliza y tonifica al cuerpo con los minerales del mar.
It remineralizes, revitalizes and tones the body with ocean minerals.
Jugo de limón, el cual tiene propiedades astringentes y tonifica el rostro.
Lemon juice, which has astringent properties and tones your face.
Refirma, tonifica y alisa la apariencia del área de ojos.
Tightens, tones and smooths the look of the eye area.
Esta forma de tratamiento reduce la celulitis y tonifica el cuerpo.
This form of treatment reduces the cellulite and tones the body.
También tonifica la tez y reduce la creación de arrugas.
It also tones the complexion & reduces creation of wrinkles.
Reconstruye, refuerza y tonifica de forma instantánea la fibra capilar.
It instantly reconstructs, reinforces and tones the hair fiber.
Possibly inappropriate content
Examples are used only to help you translate the word or expression searched in various contexts. They are not selected or validated by us and can contain inappropriate terms or ideas. Please report examples to be edited or not to be displayed. Rude or colloquial translations are usually marked in red or orange.
Register to see more examples
It’s simple and it’s free
Register
Connect
No results found for this meaning.
tonifica la piel
305
More features with our free app
Voice and photo translation, offline features, synonyms, conjugation, learning games
Results: 1549. Exact: 1549. Elapsed time: 95 ms.
Documents
Corporate solutions
Conjugation
Synonyms
Grammar Check
Help & about
Word index: 1-300, 301-600, 601-900
Expression index: 1-400, 401-800, 801-1200
Phrase index: 1-400, 401-800, 801-1200
Tonifica’t – Gyms DiR
What is Tonifica’t?
Tonifica’t is a strength training workout that includes warm-up, toning and stretching exercises.
Focussed on improving muscle tone and physical condition, this dynamic and intense session combines functional exercises performed using a variety of apparatus, including BOSU balance trainers, Xertubes, dumbbells, steps and gliding discs, exercising and integrating different parts of the body.
Tonifica’t is ideal for:
Increasing strength and muscular resistance
Toning muscle and eliminating body fat
Strengthening muscles to prevent injury in other sports.
TONIFICA’T: THE IDEAL DiR ACTIVITY TO IMPROVE MUSCLE TONE
Tonifica’t focuses on improving muscle tone and physical condition. It is one of the best classes if you want quick results. Do you want to give Tonifica’t a try?
REQUEST A FREE SESSION
SELECT TIME
MORNING
AFTERNOON
NIGHT
SELECT CENTRE
DiR CastillejosDiR MaragallDiagonal DiRDiR GràciaDiR CampusDiR HispàDiR ClarisDiR EixampleDiR TarragonaTres Torres DiRYogaOne Diego de LeónYogaOne El PratYogaOne Ciutat de la JustíciaYogaOne MoncloaYogaOne Sant BoiYogaOne Hospitalet CentreDiR Golf Costa DauradaBDiR PutxetBDiR LleidaDiR Av. MadridYogaOne Nuevos MinisteriosDiR Metasports PolinyàYogaOne LleidaBDiR Sant QuirzeBDiR ParetsBDiR FigueresYogaOne AuditorioYogaOne MirafloresYogaOne ReusBDiR VilanovaYogaOne Puerta de ToledoYogaOne ArrosadiaYogaOne HispanoamericaYogaOne Arturo SoriaYogaOne SuryaYogaOne SerranoSant Cugat DiRYogaOne LavapiesYogaOne Pep VenturaYogaOne CerdanyolaYogaOne Playa de San JuanYogaOne PacificoDiR Esportiu RocafortDiR Fontanals Golf ClubYogaOne AlcorcónYogaOne Las TablasBDiR MallorcaYogaOne San Sebastián de los ReyesBDIR MONTESAYogaOne El PerchelYogaOne SalamancaYogaOne VelázquezDiR ClaretUp&Down DiRTuset DiRYogaOne VerdiBDiR GranadosYogaOne SabadellYogaOne TarragonaBDiR AlcudiaTots ClubsYogaOne MarinaYogaOne Pl.MolinaYogaOne Sagrada FamiliaYogaOne SarriàYogaOne Sant CugatYogaOne Les CortsYogaOne TerrassaBDiR MaresmeYogaOne La MilagrosaBDiR LessepsYogaOne Aragó-ClotYogaOne Aragó-EixampleYogaOne VicBDiR SabadellYogaOne SantsYogaOne MataróYogaOne BornYogaOne GranollersYogaOne RubíBDiR CalvetYogaOne Sant AndreuJambox EixampleYogaOne CornellàYogaOne EspluguesYogaOne GironaYogaOne GavàDiR Paradise MataróYogaOne Santa ColomaYogaOne Nou BarrisBDiR LlúriaDiR Gimbe ManresaYogaOne VilanovaYogaOne PoblenouYogaOne MandriYOGA TESTBDiR MandriYogaOne TusetDiRebelBDiR BorboDiRBootcamp
In DiR there are many more activities for you, try changing the search parameters
Tonic – tint for hair.
About Tonic
Tonic hair tint products are high quality and effectiveness, time-tested and affordable for everyone
hit the shelves for the first time.
And immediately fell in love with everyone!
For more than 20 years, Tonika has been creating unique shades and giving bright images. She has earned the trust of women throughout Russia, as well as in the CIS countries. And it keeps getting better and better!
Tonic today:
#1 brand in Russia among hair tinting products*; Product with a unique composition based on natural and technological components; A wide range of shades, from natural to ultra trendy; Convenient tint matching system based on bottle color.
Want to brighten up your look? Or emphasize the natural shade? Are you looking for the perfect blonde? Or do you need to tint gray hair?
Tonika can do everything! And will help in everything:
• Find your perfect shade: natural, bright or pastel; • Emphasize the natural beauty of your hair; • Tinted gray hair; • Refresh hair color in between color treatments.
Tonic created to give your hair beauty!
How does Tonic work?
Do you want toning without harm to your hair? You are on the right track!
Tonic does not have an aggressive effect and gently tones the hair. Coloring pigments Tonics work on the surface of the hair: they do not penetrate into the depths and do not affect the structure of the hair.
Step 1 Choose a shade All tonic shades are divided into groups according to hair types. Each type has its own bottle color:
Gray bottle – for toning bleached and blond hair. Green bottle – for blond, dark blond, dark and brown hair. Blue bottle – for completely gray hair. Gray bottle with a bright label – for bright and creative coloring.
And you can choose the perfect shade for your hair type in the “Pick Tonic” section on the official website.
Step 2 Getting ready to dye • Read the instructions on the package or on the website by clicking on the QR code on the label. • Do an allergy test 24 hours before toning. • Before toning, make a test strand: this will help you find the optimal exposure time for the best result. • Wear gloves and protect your clothes by throwing a towel around your shoulders that you don’t mind or put on an old T-shirt. • If dye comes into contact with a bathtub, sink, or other light-colored surface, clean it with a sanitary ware cleaner as soon as possible.
Step 3 Caring for hair after toning • After coloring, rinse thoroughly with warm water. • Rinse off until the water is clear or almost clear. • To keep hair smooth and shiny, apply your favorite hair conditioner or conditioner.
Only 3 steps to flawless hair color…
1. Selected shade. All shades of Tonic have different pigmentation. For example, the brightest shades of Tonic from the Colorevolution collection are highly resistant and can stay on the hair for up to 2-3 months.
2. Initial hair color and structure. With smooth hair, the pigment will be washed out faster and more evenly. On porous hair, the color is richer, but it can lie down and wash out unevenly.
3. Method of application according to instructions and exposure time. Sometimes an extra couple of minutes can play a cruel joke.
4. Hair care after toning. To prolong the durability of the color, choose products for colored hair (shampoo, balm, mask). But, if your hair requires special care for recovery, give preference to it and increase the frequency of use of tinting products. Choose the frequency of application of Tonic tint balms individually, as soon as you understand that your favorite shade has begun to fade and lose intensity.
Original hair color + toning = ?
When choosing a tinting agent from Tonic, first of all, consider the original shade of the hair.
Tonic does not have brightening properties – it works on the surface of the hair. Therefore, the dark blond original hair color will not become an ash blond or hot pink with the help of Tonic.
A chart that will help you understand how the shade of Tonic will look on your hair:
Natural or dyed with any dye
Tonic interacts with both the natural pigment of the hair and with the remnants of the previous product, which affects the final shade.
Start at the roots. At the ends, the color can be more intense – because the hair is always more porous at the ends than at the roots.
On highly porous and damaged hair, the shade may lie unevenly. Therefore, if you have porous or damaged hair, do a hair restoration procedure: before toning, wash your hair with shampoo and apply a restoring mask or balm. Then you can start toning.
Smooth or porous, dry, damaged
Blondes vary in tone and lightening. When choosing a pigment, consider the initial shade of the blond and the UGT of the hair – the level of tone depth.
Blonde, blond, bleached
Gray hair is not blond. Unlike blonde, gray hair is almost devoid of pigment and therefore requires a tint with a higher concentration of pigments. Tonika has a line of shades designed specifically for gray hair. It has a higher concentration of pigments.
Important: products of the gray hair line are not suitable for toning bleached hair and blond, as an unpredictable shade may result.
Gray hair is not blonde
How to wash off Tonic?
There is no specific way to quickly wash off Tonic. Hair is individual, and dyed hair is even more so.
You can resort to magic, but the surest way is to stop using the Tonic.
If these are shades of blond or natural, after 4-6 washes the original color should return. If this is Colorevolution, it is better to contact a specialist and individually select the option to get out of a bright color with minimal impact on the hair without harming the hair.
Match Tonic to your hair color
Shade Collections
Bleached
For bleached and blonde hair
Dark Blonde
Light Blond
90 002 Dark Blonde
Chestnut Brown
Black
Natural Hair
For gray hair
For bright coloring
what it is, what it is for, how to choose and how to use it
Contents
What is facial tonic
What tonics are for
Facial Toner Composition
Best Facial Toner Review
How to use facial toner
How to choose an effective facial toner?
Is it possible to make a tonic with your own hands?
Popular questions on the topic
What is facial tonic
It would seem that everyone knows what facial tonic is – a transparent or translucent liquid in which active ingredients are dissolved to moisturize, refresh and cleanse the skin. Sometimes the solution has a color: pink indicates a calming effect, blue indicates a refreshing quality, and green indicates the ability to solve skin problems.
“Tonic is an intermediate step between cleansing and care, which may also contain active cleansing ingredients. Its function is to complete the cleansing phase after the cleansing milk or gel.”
Which tonic you need, our test will tell you.
Getty Images
Pass the test
Back to index
Why do we need tonics
As you know, there are three main stages in skin care: cleansing, toning, moisturizing. But, according to the confessions of beauty users, the second stage is often neglected (laziness, lack of time, lack of awareness – underline the necessary), considering the tonic an optional remedy. And they are very wrong. The fact is that this tool performs several important functions at once. Why do you need a facial tonic?
1
Completes the skin cleansing process. Even if you carefully removed makeup with milk or micellar water, and then washed with foam, then on a cotton pad moistened with tonic, you will most likely still find traces of impurities. This means that it is the tonic that completes the cleansing process after the stages of make-up removal and washing.
2
Restores pH balance.
“Some cleansers, as well as hard tap water, can temporarily disrupt the acid-base balance of the skin, which, in turn, weakens its protective functions and reduces the ability to withstand aggressive environmental factors. The tonic quickly brings the pH level back to normal.
3
Prepares the skin for the application of serum and cream. Tonic is a kind of conductor that allows the active ingredients in the serum and cream to act more effectively on the skin.
4
Refreshes the skin. Dull complexion, lack of blush, dry areas of the skin, even enlarged pores and inflammation – if the tonic does not solve globally, then minimizes all these problems. To get evidence, conduct a two-week experiment on the regular use of the tonic, or better, extend the test to 28 days – this is the period the body and skin in particular need to form new “habits”.
Toning was included in the daily skin care ritual for a reason. To make sure that the tonic is really so necessary, conduct an experiment: use it for at least two weeks and after their expiration you will notice that the skin has become fresher and cleaner, and the complexion is even.
Back to the top
Types of tonics
The main rule when choosing a tonic is to focus on your skin type, otherwise this product will not fulfill its task or will not do it effectively enough. In order for the tonic to work one hundred percent, you must carefully read the label before buying, and then follow the tips for using it. Using a well-chosen tonic, you will increase the effectiveness of your creams (day and night) at times, because the skin will better perceive their active ingredients.
Moisturizing
The formulas include powerful moisturizing ingredients:
climatic conditions (a sharp temperature drop, hot or, conversely, frosty weather).
Soothing
These tonics are addressed to capricious, reactive skin, which is easy to “pirate”. In this situation, products with a delicate action and a soft texture, sometimes slightly oily, may be suitable. In the composition, look for ingredients with a calming effect, such as extracts of chamomile, cornflower or rose.
Exfoliating
Tonics with exfoliating action are useful for problem skin, which is characterized by slow cell renewal, which becomes one of the causes of clogged pores, blackheads and other imperfections. Tonics with acids (salicylic, glycolic) and other active ingredients will help keep the situation under control.
Mattifying
Toner for oily skin is enriched with mattifying ingredients: zinc and/or absorbents (mineral perlite, charcoal, clay). Their goal is to tame oily sheen, as well as cleanse the skin of excess sebum, thus helping to reduce oily sheen, and at the same time blackheads.
Anti-aging
The main needs of aging and fading skin are to increase its elasticity, density and softness. This is facilitated by tonics with hyaluronic and glycolic acids, plus a special massage during application.
Pay attention to products containing antioxidants (vitamins C and E, polyphenols), especially if you live in a metropolis, often experience stress and sleep little. Antioxidants in the composition of the tonic will help fight the negative effects of the environment and delay the development of external signs of skin aging. For aging skin, tonics with oils, squalane, ceramides, components that soften the skin and prevent its dehydration are also suitable.
Back to the top
Composition of facial tonics
The composition varies depending on the purpose and tasks to be solved. Below are the main components that are most often found in formulas.
Aloe. Aloe juice and extract are almost universal: they soothe, soften, moisturize and restore the skin.
Allantoin. Effective for skin healing and regeneration. Allantoin relieves inflammation, irritation, tightens pores and softens the skin.
Hyaluronic acid. A powerful moisturizing ingredient that prevents moisture from evaporating to smooth the skin.
Glycerin. The most widely used moisturizer. Glycerin promotes the penetration of moisture into the deeper layers of the skin and helps to retain it.
Glycolic acid. Purifies, exfoliates, softens and brightens the skin, helping to reduce the depth of wrinkles.
Salicylic acid. Exfoliates, eliminates dead cells, regulates the sebaceous glands.
Alcohol. Typically present in low concentrations to stabilize the formula. Simple alcohols (alcohol denat) in the composition of tonics provide an antibacterial effect and better penetration of the active ingredients into the skin.
Thermal water. Water from thermal springs, located, for example, in the French cities of Vichy and La Roche-Posay, is a storehouse of minerals and trace elements that are beneficial for the skin. The special composition helps to normalize the water balance of the skin, neutralizes the negative effects of free radicals, improves the protective properties of the skin, soothes it.
Zinc. Indispensable for oily and problematic skin: relieves inflammation, controls oily sheen, reduces blackheads.
Calendula extract. Relieves irritation, soothes, has a bactericidal and anti-inflammatory effect.
Rose extract. Has a wide spectrum of action: rejuvenates, moisturizes, softens, fights dangerous bacteria and even tightens pores.
Chamomile extract. Soothes sensitive and irritated skin, provides protection and anti-inflammatory effect.
Hamamelis extract. Constricts blood vessels, reduces the secretion of sebaceous glands, is a powerful antioxidant.
Back to TOC
Review of the best face toners
If you still have not decided on the choice of tonic, we offer several options for different skin types – from delicate, sensitive to problematic, acne-prone.
Moisturizing toner for normal to dry skin Tonique Douceur, Lancôme
Moisturizes, visibly smoothes the skin, gives it radiance. Contains elderberry extracts, suitable for any skin, including sensitive.
Absolute Softness Cleansing Toner for dry and sensitive skin, L’Oréal Paris
Softens, tones, soothes, regenerates and provides comfort to the skin. In the composition – extracts of French rose and jasmine.
Garnier Basic Care Aloe Tonic Hyaluronic
Formulated with 96% ingredients of natural origin, enriched with aloe vera and hyaluronic acid, it moisturizes the skin, leaving it feeling clean and fresh.
Pureté Thermal Perfecting Cleansing Toner for Sensitive Skin, Vichy
Gently removes residual impurities and make-up with signature thermal water and vitamin E. for oily skin , Garnier
Tonic with extracts of burdock, calendula flowers and allantoin is suitable for normal and oily skin, helps reduce irritation, visibly soothes, and at the same time perfectly removes impurities.
Pore-reducing lotion for deep cleansing of problem skin Normaderm, Vichy
Toner with a small amount of exfoliating acids helps eliminate oily shine, reduce black spots and narrow pores.
“Basic Care” facial tonic, refreshing, vitamin, for normal and combination skin, Garnier
Enriched with grape extract, this tonic refreshes and tones the skin well, has a moisturizing effect.
Hyaluron Expert Replenishing Moisturizing Facial Toner, L’Oréal Paris
Due to the content of hyaluronic acid, the tonic has a pronounced moisturizing effect.
Moisturizing toner for normal and combination skin Biosource, Biotherm
Perfectly copes with its task: cleanses, refreshes, tones.
Return to the Table of Contents
How to use facial tonic
It is advisable to use tonic twice a day, after cleansing and before applying serum and cream. When applying, avoid the area around the eyes, unless the annotation states that the product is approved for use in this area. There are at least two ways to apply tonic, and the choice of the right one depends on personal preferences.
This is the most common method and is suitable for all skin types. Apply a few drops to the disc and wipe the skin from the center of the face to the periphery, avoiding pressure:
from the center of the forehead to the temples, one smoothing movement on each side;
from the wings of the nose to the ears;
from the center of the chin to the ears;
from the space between the eyebrows to the tip of the nose.
Don’t forget about the skin of the neck and décolleté – here the cotton pad should move from the bottom up, towards the chin.
Cloth
Ideal for sensitive skin. Saturate a cloth with tonic (you can use 2-3 layers of pharmaceutical gauze) and put it on your face like a mask. Press lightly with palms, leave for a few seconds. Such tonic masks are very popular in Asia.
Do I need to rinse off the tonic? No. As you remember, it increases the effectiveness of the active ingredients in the products that you apply after toning.
Back to index
How to choose an effective facial tonic?
Facial tonic, like care, must be chosen taking into account several factors:
Skin type – it should be guided first of all, as well as when choosing a day cream. Tonic prepares the skin for subsequent care, the quality of this preparation determines how effective your day or night cream will be. If you regularly use a tonic that is not suitable for your skin type, you can achieve the exact opposite effect, instead of moisture – dryness, instead of cleanliness and freshness – greasiness and a feeling of a film on the face. If you’re not sure what type of skin you have, take our test.
For combination skin , use two toners – mattifying for the T-zone, moisturizing or refreshing for the U-zone.
Weather and seasons – depending on external circumstances, the skin can behave differently. Adapt care according to external and internal conditions, listen to your skin: in the heat, it can enjoy a tonic with a refreshing effect, and in winter – with moisturizing and softening. Important: in pursuit of a mattifying effect, you should not use tonics for problem skin, if it is not one – they can degrease the skin too much and cause the opposite effect.
Additional effect . All tonics complete the cleansing process, but almost each of them has individual characteristics and tasks: soothe, refresh, soften, etc. Choose what suits your needs at a given time.
Fragrance . How to choose a facial tonic? Smell it, don’t blind buy. User satisfaction is an important part of beauty care, and the scent of a product can play a decisive role in product selection. You should not buy a product, even if it suits you in all other respects, if you are not satisfied with the smell. Most likely, you will not use such a tonic or turn care into an unpleasant duty.
Back to index
Can you make your own tonic?
Easy DIY facial toner. Of course, in terms of cosmetic properties, it will be inferior to the product from the manufacturer. However, you can try, especially since the recipe is extremely simple.
A soothing tonic can be prepared by infusing chamomile and calendula flowers (2 teaspoons per glass of water).
Cucumber lotion is prepared by mixing cucumber juice with mineral water.
Lemon exfoliating and skin whitening lotion is made from sliced lemon and a glass of cold water (at least 5 hours).
To obtain rose water, rose petals are poured with boiling water and infused for 12 hours in a warm place.
Back to index
Popular questions on the topic
A few more frequently asked questions about tonics.
Is it possible to replace the tonic with thermal or mineral water?
If you have to choose between doing nothing after washing your face or rinsing your face with thermal/mineral water, it’s definitely better to do the latter. But this is not an alternative to tonic, for example, for oily skin, because a tonic designed specifically for it can have a matting effect or help control acne.
How often can/should I apply toner?
It makes sense to do this after every wash, every contact with water. Not only in the morning and evening, but also, for example, if you are making a mask: after washing it off, also wipe your face with tonic.
What is the difference between toners for different skin types?
Different skin types have different acid-base balance, and the tonics recommended for a particular skin type are adapted to it. The composition is also different. For example, for oily skin, thorough cleansing and antibacterial care are extremely important, so a toner may contain drying and cleansing alcohol, salicylic acid and other components for oily skin, while a tonic for dry skin will give a more softening and moisturizing effect.
Vizio’s $349.99 M51a-H6 soundbar impressed us by offering a high-quality 5.1-channel surround sound experience in an affordable package. Its follow-up, the $329.99 M-Series M51ax-J6, costs a bit less and changes very little—it still comes with a subwoofer and dedicated rear satellites with support for the Dolby Atmos and DTS:X standards. We wish it had a better visual control panel, but that doesn’t change the fact that this soundbar products strong cinematic audio for the price, earning it our Editors’ Choice award for affordable surround sound systems.
Basic, But Functional
The main soundbar is a narrow, rectangular black speaker with rounded corners that measures 36.0 by 2.2 by 3.5 inches (HWD). The top, back, and bottom are matte black plastic and square rubber pads sit on the bottom for stability. On the front and sides, black grille cloth covers three front-firing 1.6-by-3.5-inch full-range drivers and three 0. 8-inch tweeters. The top panel of the soundbar has five buttons for power, input, Bluetooth pairing, and volume up and down.
The back of the soundbar features two recesses for connections. The left recess includes a power cable connector, as well as 3.5mm ports for aux and aux VA (the latter of which is a 3.5mm input specifically for voice assistant devices with a matching output). The right recess houses an HDMI input, an HDMI output for eARC and video pass-through from the input to the TV, an optical audio input, and a USB port.
The rear satellites look like miniature versions of the main soundbar; each measures 5.7 by 2.2 by 3.5 inches. They feature the same black plastic material on the top, bottom, and back, plus the same black grille cloth coverings on the front and sides. The back of each satellite has a square recess with an RCA port for connecting to the wireless subwoofer, along with a screw mount for attaching it to a stand. The satellites don’t have clear labels that indicate which is the left or right, but the colors of the RCA ports (white or blue) match those of the same connections on the subwoofer (blue for left and white for right).
Similar Products
4.5
Outstanding
JBL Bar 1300X
4.0
Excellent
Klipsch Cinema 600
4.0
Excellent
Roku Streambar Pro
4.0
Excellent
Sonos Arc
4.0
Excellent
Polk Audio MagniFi Mini AX
4.0
Excellent
Samsung HW-Q990B 11.1.4-Channel Soundbar
4.0
Excellent
Sonos Beam (Gen 2)
4.0
Excellent
TCL Alto R1 Roku TV Wireless Soundbar
The subwoofer measures 9.9 by 8.3 by 8.3 inches; it features a 5-inch downward-firing driver and an open, rear-facing bass port. The back also has a power cable connection, RCA ports for the satellites, and a power button.
Vizio bundles a thin black remote in the package. Power, input, and Bluetooth buttons flank the circular navigation pad, while a volume rocker, mute button, and settings buttons are below. A monochrome alphanumeric LCD sits near the top of the remote; it lets you view the active input and navigate different soundbar settings one line at a time.
Unfortunately, the soundbar doesn’t offer an on-screen or other visual interface (despite its ability to connect to a TV over HDMI with eARC), so you need to rely on the remote’s single-line text display to make any adjustments. On the bright side, the soundbar has voice prompts to go with your button presses on the remote, so you can at least know when it registers your commands.
Music and Movie Audio Performance
As mentioned, the Vizio M51ax-J6 supports the Dolby Atmos and DTS:X technologies. Like you might expect from a speaker system with a separate subwoofer, the M51ax-J6 produces an impressive amount of bass. It handled our bass test track, The Knife’s “Silent Shout,” at maximum, ear-ringing volumes without distortion, while the subwoofer provided a good sense of thump. The soundbar itself puts out a surprising chunk of the bass response, which leaves the subwoofer to create the palpable vibrations.
Music with less deep bass, like Yes’ “Roundabout,” reveals the M51ax-J6’s overall audio balance in its Music EQ mode. It strongly favors bass and mids, with a bit of a drop-off in treble response. The opening acoustic guitar plucks get plenty of lower-frequency resonance, but there isn’t quite enough high-end finesse to bring out all the texture in the strings. When the track properly kicks in, the bassline stands out with the guitar strums and hi-hat poking through the mix, leaving the vocals to settle a bit in the background. You can probably massage a more balanced sound by playing with the bass and treble levels of the soundbar, but, out of the box, it leans low.
Captain America: The Winter Soldier sounds full and detailed through the M51ax-J6, and the film’s Dolby Atmos audio comes through properly. Directional imaging is accurate across the soundbar and satellites. That said, the soundbar’s imaging from the front is a bit limited because the three forward-facing driver sit across a space of only 36 inches. Wider soundbars with angled drivers, like the Sonos Arc, project a much bigger sound with wider left-right panning. The Arc costs twice as much, however, and can’t provide the same surround experience because it lacks rear satellites.
Regardless of the surround effect, the explosions of airships crashing get plenty of low-end response, both with rumble from the subwoofer and the slightly higher, punchier bass from the soundbar. Dialogue between Captain America and Bucky sounds clear against the backdrop of action and the swelling soundtrack.
Zack Snyder’s Justice League also sounds loud and theatrical, with a surround sound field that satisfyingly encompasses the listener. Punches sound meaty and impactful, while the slash of swords and shrill whirring effects sharply punctuate the mix. In The Flash’s introductory scene, both Rose Betts’ lovely vocals and the simple piano backing in her cover of “Song of the Siren” come across with balance and fullness. Again, the soundbar isn’t quite capable enough of eliciting the most subtle high-frequency details in her voice, but the sound is still very pleasant.
5.1 Channels on a Budget
Vizio’s M51ax-J6 soundbar is an affordable and worthwhile option for 5.1-channel home theater sound with support for Dolby Atmos. It doesn’t have quite the high-frequency finesse as pricier alternatives, but with its rumbling bass and strong presentation of vocals, it’s ideal for watching movies and TV shows. If you want to spend even less money and don’t need a subwoofer, the Roku Streambar Pro ($179.99) offers strong sound and all of the media streaming functions of a Roku media hub. And if you want to go all out, the JBL Bar 9.1 ($999.95) incorporates upward-firing drivers for more directional dound. For an affordable 5.1 system, however, it’s hard to do better than the M51ax-J6, earning it our Editors’ Choice award.
Vizio M-Series 5.1 Sound Bar (M51ax-J6)
4.0
Editors’ Choice
Pros
Well priced for a system with a subwoofer and rear satellites
Good surround imaging with Dolby Atmos and DTS:X support
Powerful bass
Cons
Treble isn’t quite as crisp as it could be
Small visual control panel on the remote
The Bottom Line
The affordable Vizio M-Series 5. 1 Sound Bar (M51ax-J6) combines a subwoofer and two rear satellites to produce powerful audio for movies and music.
Like What You’re Reading?
Sign up for Lab Report to get the latest reviews and top product advice delivered right to your inbox.
This newsletter may contain advertising, deals, or affiliate links. Subscribing to a newsletter indicates your consent to our Terms of Use and Privacy Policy. You may unsubscribe from the newsletters at any time.
Thanks for signing up!
Your subscription has been confirmed. Keep an eye on your inbox!
Sign up for other newsletters
Good Sound At A Solid Price
Vizio
By Eric Abent/Updated: Feb. 25, 2022 5:17 pm EST
EDITORS’ RATING : 9 / 10
Pros
Good sound overall
Different layout options if you don’t want surround sound
Fairly affordable as surround sound systems go
Cons
Wireless connection is prone to interference if placed near a router
I don’t think it’s controversial to say that watching movies at home can be something of a nightmare when it comes to audio. Back when I was using only my TV speakers, it always seemed like the audio balance was very off – scenes that were primarily dialogue would be whisper quiet while action scenes would be blaringly loud. So, I set out to fix that issue by getting myself a soundbar, which did help quite a bit but didn’t solve it entirely. The quest to fix this issue permanently seems to lie with multi-speaker/surround sound setups, so I was hopeful that Vizio’s new M-Series 5.1 Home Theater Soundbar would do the trick.
Before we dive into the review, I should start by saying that I’m what I’d call a practical audio guy, not an obsessive. We’ll chalk that up to my childhood: I’d go over to my aunt and uncle’s house and be under strict instructions not to touch three of the four remotes that controlled my uncle’s home theater setup. Fear of irreversibly screwing up this delicate audio balance in my childhood has led to me to being an adult that values simplicity in their audio devices, and while there were some hiccups in the setup process for the M-Series, getting everything up and running wasn’t quite as arduous as I was worried it would be.
The M-Series Home Theater System, as the name suggests, comes with four different items: a soundbar, a subwoofer, and two surround speakers that are supposed to sit behind where viewers are seated. The subwoofer, meanwhile, is supposed to sit to the side of a chair or couch and it connects wirelessly to the soundbar. The two surround speakers connect via extremely long cables to the back of the subwoofer.
Not only can the M-Series 5.1 be used in a surround sound configuration with all four of its parts, but for smaller spaces it can be used in a front-facing configuration that puts the subwoofer to the side of the TV and has the surround speakers bookending the soundbar. It can also be used in a dual stereo configuration that mirrors the surround arrangement, only in this mode all of the audio gets sent to each speaker, rather than just bits and pieces being sent to the surround speakers. So, you have some options depending on the sound you want and your willingness to run cables.
From a design standpoint, I really like the look of Vizio’s system. Everything is boring, unassuming shades of gray and black and that’s exactly what it needs to be in order to blend into the environment. Both the sound bar and the subwoofer are smaller than I expected, but they still pump out sound despite their smaller size. Nothing feels overly large or bulky, which is another win for those of us living in small spaces.
The sound bar has a few different connectivity options. Around the back, you’ll find two different 3.5mm AUX IN ports for connecting external devices, though one of these is reserved only for voice assistant devices. The soundbar also has one HDMI In port, one HDMI out (eARC) port, USB In (which only supports WAV and MP3 file playback), and digital optical audio in. The sound bar also supports Bluetooth connections, so if your phone doesn’t have a 3.5mm jack – as so few do these days – you can stream music instead of making a direct connection.
In the box, you’ve got everything you need to connect the soundbar to your TV through all of those different connection methods listed above, and you’ve also got wall mounting hardware as well. No matter how you want to use the M-Series system, Vizio has you covered with the accessories and cables that come in the box, which is always nice to see.
First time setup was a pretty straightforward process, but it wasn’t without a few hitches. To start, the M-Series 5.1 system user manual (which is very detailed and useful, so thumbs up there) prompts you to pick your connection type and hook up the soundbar to the TV; I chose HDMI eARC. From there, you need to plug in the soundbar, then connect the surround speakers to the back of your subwoofer using their color-coded ports, before plugging in the subwoofer itself. Once they’re both plugged in, the soundbar and subwoofer should automatically sync – they did for me – and the soundbar will search for active connections, managing to detect my HDMI eARC connection after a few moments.
This might be the first time in my life where audio hardware setup properly on the first try, but all was not perfect in my new surround sound wonderland. As I started watching the freshly-released Lord of the Rings 4K remasters, I noticed that the sound bar and surround speakers were emitting a popping noise every few seconds.
As Frodo and Sam set out from the Shire and began their adventure, I was trying to figure out how to get rid of this popping noise. I first made sure that all the cables were connected securely, and then, thinking that it was an issue with the wireless connection, I tried moving the subwoofer closer to the soundbar. None of that helped, so I did what every clueless person does at some point during the troubleshooting process and I started randomly changing the soundbar’s settings with no clear idea of how this would help fix the popping issue. Surprise – that didn’t work.
After a few factory resets and subsequent trips through the setup process, nothing was fixing the problem. As it turns out, I was close to the solution when I was changing the distance between the soundbar and the subwoofer, as the issue was indeed with the wireless connection. The subwoofer was placed too close to my wireless router, which is in my living room right next to my TV because I rent and that’s the only place I have a coaxial hookup. Vizio told me that moving the subwoofer at least six feet away from my router – previously the router was right in between the soundbar and subwoofer, about three feet from both – should solve the issue.
About a year ago I made the awesome/silly decision to buy a sectional couch that fills most of my living room, so I was limited on options when it came to getting this subwoofer six feet away from my router. I found a suitable spot, though, and voila – my popping issues were solved. Honestly, wireless interference should have been my first guess, but regardless, it’s important to keep in mind that you need a suitable amount of space between the subwoofer and your WiFi router, or else you’re going to experience popping noises that ruin your experience.
If your router is in another room, then you’re good to go, but if you live in a small space like an apartment or a studio, the placement of your router is something to consider before buying this kit. There’s no option to hardware the two components if wireless isn’t working out. Thankfully, being in a small space without a ton of layout options doesn’t pose more of an issue besides considering your router and subwoofer placement. While Vizio’s setup diagrams show the two surround speakers placed directly behind the seating area, I don’t have any room behind my couch as it’s up against the wall. So, instead of putting the speakers behind my couch, I simply stuck them in the corners of the living room opposite the soundbar and the surround sound effect still worked just fine.
The M-Series 5.1 system uses both Dolby Atmos and DTS X, and I have to say, it sounds pretty incredible. For probably the first time in my life I could hear Ian McKellen clearly as he whispered through Gandalf’s lines, and the battle scenes in Lord of the Rings really had a lot of power behind them.
Another caveat about apartments: this system can obviously get loud, and there were certain points through my Lord of the Rings trilogy watchthrough that the subwoofer was quite literally shaking my walls. You might want to give the system a pass if you live in a complex where you share a wall with someone else, but you can also adjust treble, bass, mids, and even your surround sound and subwoofer balance using the remote that comes packed with this system. The remote comes with a built-in display that tells you what you’re adjusting, and a column of LED lights on the soundbar itself will show you the level of whatever setting you’re changing.
I really like the remote, but I think part of that is down to what I was using before I hooked up this Vizio system. My daily driver soundbar is a JBL Link Bar that uses Android TV, and I really despise that laggy and cluttered UI. The Vizio system is nice because it allows me to use my TV’s OS, which is simple and responsive, while I manage all of the soundbar’s settings on the remote. It’s kind of like a best of both worlds. So, hey, if you’re in the same boat and you’re sick of Android TV, at least I can say that this Vizio system will give you some relief from that.
All in all, I’m walking away impressed by this system. At $449.99, it seems like it falls in the mid-range in terms of pricing, and I think the sound quality is good for the price you pay. The fact that Vizio seems to regularly discount it to $349.99 makes it even more of a deal: a Sonos Arc, for example, also supports Dolby Atmos but comes in at $799, and that’s without rear speakers or a subwoofer.
Setup was a breeze, which earns the M-Series big points, and if the subwoofer and soundbar ever fall out of sync, re-establishing the connection between them is easy as well. It’s also very easy to balance the levels of the individual components in the package, so even if you can’t match Vizio’s ideal layout, you can still adjust everything to get the right sound for the space you have.
With a relatively small subwoofer and surround speakers, and that fact that you have some options when it comes to the arrangement of your speakers, I think this can also be ideal for small spaces. If you’re only using TV speakers or a soundbar in your audio set up, this could indeed be a good upgrade that won’t necessarily break the bank – at least not as much as other surround sound systems might.
Recommended
Vizio 5.1.4 Atmos
soundbar review
The top model of the Atmos Vizio soundbar range, with serial number SB46514-F6, is a well-designed system with surprisingly powerful sound for little money. Built-in Chromecast and Bluetooth for streaming pairs with Google Assistant and offers a great option for those looking for an all-in-one TV solution.
Surround sound effects in the 5.1.4 Atmos Vizio system are provided by speakers and satellites built into the top of the soundbar. A wireless ported subwoofer with a 10-inch driver is responsible for low frequencies. Unlike some other all-in-one systems, additional speakers will have to be wired to the subwoofer, which can limit subwoofer placement options.
For connectivity, the soundbar has a 4K and HDR10 compatible HDMI-ARC connector, optical and coaxial digital inputs, analog stereo minijack input and USB-A for playing WAV and MP3 files directly from a flash drive. Connection to the network is carried out via Wi-Fi or via an Ethernet connector.
Initial setup can be done using the display that comes with the remote control and LED indicator on the front of the soundbar. A more convenient setup option is through the SmartCast app, which allows you to select the movie, music and Direct (stereo) EQ modes, as well as adjust the center channel, surround system and subwoofer level. Effects control is not yet available, but the company promises to add this feature in the future through an update. The Vizio app can also be used to switch the input signal and adjust the volume, as well as provide volume equalization and night mode options.
In addition to the wires for connecting the Vizio satellite stand, it also includes a wall mount for the soundbar and speakers. The length of the wires allows you to adjust the surround sound according to the size of the room.
Using the tuned system in various operating modes demonstrated the effects of volumetric immersion in dynamic movie scenes. The song’s guitar sound and vocals had a full, warm quality, a rich tone that was detailed but not sharp. The dialogue in the films was also clear and positioned.
In summary, Vizio’s 5.1.4 soundbar is not the most advanced solution for Atmos technology – the sense of immersion provided by its compact surround/vertical satellites doesn’t quite match what you hear from component systems with in-ceiling speakers for effects. But it’s a great solution for simple Atmos immersion in its price range.
Price $999
Pros
Powerful sound for the price
5.1.4 Atmos
Built-in Chromecast for music streaming
Cons
No wireless speaker support
No DTS:X
Output
Vizio’s 5.1.4 soundbar system delivers powerful, surround sound immersion with built-in Chromecast for moderate price.
VIZIO SB4551-D5 5.1 Channel Soundbar Review
In my opinion, there are two different types of soundbar. The former aims to recreate a high quality home theater experience in a more usable form factor. Whether it’s a passive L/C/R soundbar like GoldenEar’s SuperCinema 3D Array or a powered multi-channel model like Focal’s Dimension, these soundbars are usually more substantial in both size and price. The second is an entry-level soundbar that is sold at your local big box store. This type of soundbar has much more modest goals: to be better than the crappy speakers in a flat-panel TV while taking up as little space as possible.
The new $500 VIZIO SB4551-D5 soundbar falls into the second category. As the top model of the new Slim Series, it takes great care to remain discreet. The powerful 3-channel L/C/R soundbar measures just two inches high and two inches deep and is 45 inches long (designed to pair with TVs 47 inches and larger). It comes with a wireless 8″ subwoofer that’s only three inches deep, so you can hide it against a wall or even lay it flat and tuck it under your sofa.
This is a true 5.1-channel soundbar system as it features two dedicated surround speakers measuring just under 2.5 inches wide, 2.5 inches deep, and 5.5 inches tall. Surround sources are powered by an amplifier inside the subwoofer, which means you must connect them to the subwoofer using the supplied speaker cables. Luckily, VIZIO offers extra long cables, giving you some flexibility in placement for both surround and subwoofer. The SB4551 comes with an IR remote control that has 11 buttons (power, source, menu, volume, mute, etc.) in an intuitive layout and a one-line LCD display that allows you to set various functions .
SB4551-D5 has excellent connectivity. Divided between two recessed panels on the back of the soundbar, you’ll find one auxiliary analog input, one coaxial digital input, and one optical digital input on the right, and one USB port and one HDMI 1.4 input on the left. There is also one HDMI output for sending video to your TV, and it supports an audio return channel for receiving audio return from the TV’s internal sources such as Netflix, HDTV terrestrial, etc.
SB4551 supports Bluetooth wireless audio sources and network audio streaming. There’s an Ethernet port on the back, and Wi-Fi 802.11ac on the panel. Many 2016 VIZIO soundbars support SmartCast, which means they can be controlled using the SmartCast app for iOS and Android. The SmartCast app not only offers control options, but also allows you to link multiple SmartCast audio devices (including VIZIO soundbars and desktop speakers) together for multi-room listening, and you can stream audio content such as iHeartRadio directly from the app to the soundbar.
Yes, and if all that’s not enough, the SB4551 supports Google Cast. Thus, from any iOS/Android mobile device or Chrome browser, you can wirelessly stream audio directly from any popular Google Cast-enabled app such as Pandora, Spotify, Google Play, iHeartRadio, AOL Music, TuneIn Radio, and Plex.
So yes, it’s fair to describe the SB4551 as “feature-laden” for a sub-$500 soundbar. I tested a bit of everything, connecting my Oppo BDP-103 Blu-ray player via HDMI, Hopper DVR via optical digital, Bluetooth streaming from my iPhone 6 and Macbook Pro, and a bit of Pandora’s Google Casting. I connected the SB4551’s ARC-enabled HDMI output to an LG smart TV and had no issues getting audio back from LG’s internal Netflix app.
With the remote control or the SmartCast app, you can adjust many audio settings on the fly. Bass, treble, and level adjustments for center, surround, and subwoofer are available. There’s even a Speaker Level tool that plays audio tones to help match levels between all speakers and the subwoofer if you have an SPL meter. You can enable or disable surround mode and enable DTS TruVolume to reduce volume mismatch between sources. It’s much more intuitive to make these settings in the SmartCast app, where you can see them all on the big screen at once… but the remote does the job, too.
Now let’s talk about sound performance. First, what the SB4551 does well. On their website, VIZIO advertises two main performance metrics: dynamic performance and bass response. VIZIO claims the system can reproduce up to 104 dB. I have not verified this claim, but I can attest that the system has excellent dynamics, which exceeds all expectations from speakers of such a small size. Whether I used it in my closed family room or in a large, wide open living room with movies or music, the SB4551 filled the room with sound.
It also filled the room with deep enough bass for an eight-inch woofer. Many soundbars in this price range use a seven- or even 6.5-inch woofer. In everyone’s favorite subwoofer demo test, the depth charge sequence in the U-571, I heard some of the deeper rumbles. They weren’t super loud and didn’t shake the room like a good 12″ or 15″ subwoofer would, but they did have a distinct bass presence. It’s the same in scenes from Iron Man and The Matrix. I tried the subwoofer in different places, both in the back and front of the room against the wall, and also under the sofa. I felt that the placement under the sofa drew too much attention to itself; but, if you like the whole “tactile transducer” thing, then you might like this placement. Ultimately, I opted for the subwoofer up front, closer to the soundbar, to get the most cohesive experience.
Another positive feature is voice clarity, which is perhaps the most important feature of these inexpensive soundbars designed to replace TV speakers. The SB4551’s dedicated center channel reproduces clear, intelligible dialogue with both male and female voices, and the ability to adjust the center channel level on the fly is a welcome bonus. For the most part, the various high-frequency effects in action movies sounded crisp and accurate without being overly harsh or metallic.
Where does SB4551 compete? Well, its driver and case size should give you a hint. We’re talking about a soundbar and two surround speakers that use two-by-four-inch full-range speakers in a two-inch-deep enclosure, so they can only play very deep and process so much. There just isn’t much meat in the lower-mid range, and the soundbar struggles to reproduce all the complex, bombastic effects in tight action sequences. In scenes from The Matrix and Iron Man, I barely heard a lot of music and background effects, which I know should be more noticeable, and the soundbar itself sounded compressed during the big explosions.
In many of these miniature systems, the crossover is set high enough for the subwoofer to process lower midrange information; but then you run into problems when you ask the subwoofer to handle vocals and other specific effects it wasn’t designed for. Nobody wants to hear voices coming from a subwoofer, especially if you put the subwoofer at the far end of the room. I consider it a plus that I did not hear any vocals coming from the SB4551 sub, so I assume that VIZIO chose a lower crossover point (the company does not specify a crossover frequency) – but as a result, the speakers are asked to go lower than they can actually do.
Obviously, music playback is not a soundbar’s first priority, and when I fed the SB4551 my usual set of AIFF test tunes in official evaluation capacity, it was easy to hear the flaws: lack of openness and air in the high frequencies, lack of meat in the middle and bass notes, which were not particularly distinct or defined. But let me add this: when I stepped away from critical listening and just casually streamed compressed music over Bluetooth or Wi-Fi, I found the SB4551’s performance to be quite acceptable. Good dynamics, clean treble and solid bass paired well together for everyday music streaming, and that’s what this soundbar is likely to be used for. And you can’t discount the convenience of being able to stream music to the SB4551 from virtually any source.
Advantages • SB4551 has good dynamic performance, voice clarity and low frequencies. • The system has a very low profile form factor with a flat subwoofer that is easy to hide. • The SB4551 offers a variety of connectivity options, including HDMI and ARC pass-through for receiving audio from the TV’s internal sources, which is rare at this price point. • Enabling Bluetooth, SmartCast and Google Cast gives you many wireless streaming options.
Weaknesses • The system sounds poor in the mids and cannot reproduce all the intricate details in the tightest action scenes. • The USB port only supports playback of WAV files, which seems like an odd choice. • The surround speakers must be connected to the subwoofer, which means you may still need to run the speaker wire around the room if you want to place the subwoofer closer to the soundbar (where it sounded best in my case). All in all, the environment is so tiny and contributes so little to the overall experience that you might be better off saving $50 and getting the SB4531 3.1 channel system that doesn’t have them. • Because the inputs are split between two connection panels at each end of the soundbar, it’s a little more difficult to route the cords. Plus, the soundbar is so light that it’s easy to accidentally pull it off or off the stand if you don’t secure the cables properly.
Comparison and competition While $500 is certainly a lower price than the dedicated home theater soundbar systems we often review, it still sits at the top end of the “entry level” category. Obviously, there are plenty of soundbar/subwoofer options priced around $500 from companies like Bose, Yamaha, Polk, Zvox, Samsung, LG, and more. However, many of these options are two-channel soundbars that lack the dedicated center channel and separate surround speakers you get with the VIZIO SB4551. Most of them have Bluetooth, but lack HDMI inputs and video pass-through.
The $500 Yamaha YSP-1600 is a 5.1-channel soundbar, but all five channels are housed in the soundbar, and the bar uses Yamaha’s digital sound projector technology to simulate a surround sound field. The $500 ZVOX SoundBar SB400 is a three-channel soundbar with three two-inch drivers and a four-inch woofer. Polk offers the $500 MagniFi 3.1-channel soundbar, or you can upgrade to $700 Omni SB1 Plus 3.1-channel system with DTS Play-Fi technology. You can add a wireless environment via Play-Fi, but you will need to purchase it separately.
Another option worth considering at this price point is a pair of active bookshelf speakers or a 2.1-channel desktop system from companies like Klipsch, Polk or Audioengine.
Select Condition / Edition / Storage Capacity
For Availability
Save $25 Off Any Pre-Owned PS4 or XB1 Console
DEAL
from
$184.99
Was
$259.99
Save
$75.00
Select Condition / Edition / Storage Capacity
For Availability
Save $25 Off Any Pre-Owned PS4 or XB1 Console
DEAL
$224.99
Was
$249.99
Save
$25.00
Select Condition / Edition / Storage Capacity
For Availability
Save $25 Off Any Pre-Owned PS4 or XB1 Console
DEAL
$174.99
Was
$209.99
Save
$35.00
Select Condition / Edition / Storage Capacity
For Availability
Save $25 Off Any Pre-Owned PS4 or XB1 Console
DEAL
$224.99
Was
$249.99
Save
$25.00
Select Condition / Edition / Storage Capacity
For Availability
Save $25 Off Any Pre-Owned PS4 or XB1 Console
DEAL
$164.99
Was
$219.99
Save
$55.00
Select Condition / Edition / Storage Capacity
For Availability
Save $25 Off Any Pre-Owned PS4 or XB1 Console
DEAL
$184. 99
Was
$259.99
Save
$75.00
Select Condition / Edition / Storage Capacity
For Availability
Save $25 Off Any Pre-Owned PS4 or XB1 Console
DEAL
$164.99
Was
$219.99
Save
$55.00
Select Condition / Edition / Storage Capacity
For Availability
Save $25 Off Any Pre-Owned PS4 or XB1 Console
DEAL
$164.99
Was
$219.99
Save
$55.00
Select Condition / Edition / Storage Capacity
For Availability
Save $25 Off Any Pre-Owned PS4 or XB1 Console
DEAL
$224.99
Was
$249.99
Save
$25.00
Select Condition / Edition / Storage Capacity
For Availability
Save $25 Off Any Pre-Owned PS4 or XB1 Console
DEAL
$174.99
Was
$199.99
Save
$25.00
Select Condition / Edition / Storage Capacity
For Availability
Save $25 Off Any Pre-Owned PS4 or XB1 Console
DEAL
$224.99
Was
$289.99
Save
$65.00
Select Condition / Edition / Storage Capacity
For Availability
Save $25 Off Any Pre-Owned PS4 or XB1 Console
DEAL
$224. 99
Was
$249.99
Save
$25.00
Select Condition / Edition / Storage Capacity
For Availability
Save $25 Off Any Pre-Owned PS4 or XB1 Console
DEAL
$164.99
Was
$189.99
Save
$25.00
Select Condition / Edition / Storage Capacity
For Availability
Save $25 Off Any Pre-Owned PS4 or XB1 Console
DEAL
$184.99
Was
$209.99
Save
$25.00
Select Condition / Edition / Storage Capacity
For Availability
Save $25 Off Any Pre-Owned PS4 or XB1 Console
DEAL
$224.99
Was
$249.99
Save
$25.00
Select Condition / Edition / Storage Capacity
For Availability
Save $25 Off Any Pre-Owned PS4 or XB1 Console
DEAL
$224.99
Was
$249.99
Save
$25.00
Select Condition / Edition / Storage Capacity
For Availability
Save $25 Off Any Pre-Owned PS4 or XB1 Console
DEAL
$174.99
Was
$199.99
Save
$25.00
Select Condition / Edition / Storage Capacity
For Availability
Save $25 Off Any Pre-Owned PS4 or XB1 Console
DEAL
$164. 99
Was
$219.99
Save
$55.00
Select Condition / Edition / Storage Capacity
For Availability
Save $25 Off Any Pre-Owned PS4 or XB1 Console
DEAL
$224.99
Was
$249.99
Save
$25.00
Select Condition / Edition / Storage Capacity
For Availability
Save $25 Off Any Pre-Owned PS4 or XB1 Console
DEAL
Buy PlayStation VR2 Now | PlayStation®
You have no items added in your cart.
PRE-ORDER
EXCLUSIVE
DEAL
EXCLUSIVE DEAL
PS5 COMPATIBLE
ALMOST GONE
EXCLUSIVE
COMING SOON
PlayStation®VR2
$
549
.
99
$
549
.
99
Currently Unavailable
Coming Soon
Low stock
Currently Unavailable
PRE-ORDER
EXCLUSIVE
DEAL
EXCLUSIVE DEAL
PS5 COMPATIBLE
ALMOST GONE
EXCLUSIVE
COMING SOON
PlayStation®VR2 Horizon Call of the Mountain™ Bundle
$
599
.
99
$
599
.
99
Currently Unavailable
Coming Soon
Low stock
Currently Unavailable
PRE-ORDER
EXCLUSIVE
DEAL
EXCLUSIVE DEAL
PS5 COMPATIBLE
ALMOST GONE
EXCLUSIVE
COMING SOON
PlayStation VR2 Sense™ Controller Charging Station
$
49
.
99
$
49
.
99
Currently Unavailable
Coming Soon
Low stock
Currently Unavailable
Your browser does not support HTML5 video.
Available Now
PlayStation VR2
Your browser does not support HTML5 video.
The next generation of virtual reality gaming
PRE-ORDER
EXCLUSIVE
DEAL
EXCLUSIVE DEAL
PS5 COMPATIBLE
ALMOST GONE
EXCLUSIVE
COMING SOON
PlayStation®VR2
Experience new sensations with stunning 4K HDR visuals1, ground-breaking new controllers and genre-defining games, all made possible by the power of PS5™.
Climb to new heights
PRE-ORDER
EXCLUSIVE
DEAL
EXCLUSIVE DEAL
PS5 COMPATIBLE
ALMOST GONE
EXCLUSIVE
COMING SOON
PlayStation®VR2 Horizon Call of the Mountain™ Bundle
Experience new sensations with stunning 4K HDR visuals1, ground-breaking new controllers and genre-defining games, all made possible by the power of PS5™.
Click. Charge. Play.
PRE-ORDER
EXCLUSIVE
DEAL
EXCLUSIVE DEAL
PS5 COMPATIBLE
ALMOST GONE
EXCLUSIVE
COMING SOON
PlayStation VR2 Sense™ Controller Charging Station
Interact with virtual worlds in amazing new ways with haptic feedback, adaptive triggers, precision tracking and finger touch detection1 – all integrated into a unique ergonomic design.
Feel a New Real™
Interact in new and lifelike ways
Eye tracking
Interact in new and lifelike ways, as the PS VR2 headset detects the motion of your eyes, allowing for heightened emotional response and enhanced expression when meeting fellow players online.
Feel subtle, responsive headset vibrations
Headset feedback
Feel subtle, responsive headset vibrations at key moments during gameplay. Created by a single built-in motor, these vibrations add an intelligent tactile element to the sensory immersion experienced as you play.
Interact with virtual worlds
PlayStation VR2 Sense controllers
Interact with virtual worlds in amazing new ways with haptic feedback, adaptive triggers, precision tracking and finger touch detection – all integrated into a unique ergonomic design.
Deeper details
4K HDR
Experience deeper details with two 2000×2040 OLED displays that deliver incredible 4K HDR visuals at up to 120fps, for 4x the resolution of the original PlayStation®VR.
The Dark Pictures: Switchback VR
Shop Digital
No Man’s Sky
Shop Digital
Resident Evil Village
Shop Digital
The Light Brigade
Shop Digital
Cities VR
Shop Digital
Pistol Whip
Shop Digital
After The Fall
Shop Digital
Crossfire: Sierra Squad
Shop Digital
PRE-ORDER
EXCLUSIVE
DEAL
EXCLUSIVE DEAL
PS5 COMPATIBLE
ALMOST GONE
EXCLUSIVE
COMING SOON
PlayStation®5 console required
PlayStation VR2 is only compatible with a PS5 or PS5 Digital Edition console.
eufy Home Security Review and System Prices (2023) – Forbes Home
We earn a commission from partner links on Forbes Home. Commissions do not affect our editors’ opinions or evaluations.
eufy is owned by Chinese-based company Anker and they’re known for their home product technology devices. Many homeowners are surprised to find out that eufy offers home security, since they’re most known for vacuums. However, eufy ranks on our list of best home security companies and has excellent customer ratings.
Although they have a smaller home security product line than their competitors, eufy products are designed for easy installation and operation. All home security products are returnable for 30 days, no matter the reason, making it an excellent choice for homeowners who aren’t sure about this home security system yet.
Like many DIY home security companies, eufy’s professional monitoring services are somewhat limited. Still, their premium plan won’t cost more than $9. 99 per month, which is highly affordable for most people.
Nonetheless, all of eufy’s products are designed to work best with their smartphone app and include the option for self-monitoring, which eliminates contracts and membership fees.
Overall, eufy is an excellent choice for homeowners looking for low-cost professional monitoring services and devices with built-in storage solutions or cloud storage options.
Pros
No contracts
Low-cost professional monitoring services
Built-in video storage solutions
Cons
Limited product selection
No professional installation services
Limited monitoring capabilities
Buy Now
On Amazon
At a Glance
eufy is owned by Chinese-based company Anker that has other brands like Soundcore and Nebula. Initially a vacuum company, eufy has been making home security products for over three years now. The company’s first camera, the eufyCam 2 Pro, was released in 2018. The eufyCam 2 Pro was praised for its solid video quality and battery life but criticized for its lack of smart home integration and limited software features.
Since then, both have improved image quality and usability and remain an excellent choice for home security enthusiasts who need to keep an eye on their pets or want to see what’s happening outside of their house while they’re away.
Despite having a smaller selection of home security products, eufy products are designed for easy installation and operation. They offer different camera styles, alarm systems and smart locks for a comprehensive home security setup.
Featured Partners
Advertisement
THIS IS AN ADVERTISEMENT AND NOT EDITORIAL CONTENT. Please note that we do receive compensation for any products you buy or sign up to via this advertisement, and that compensation impacts the ranking and placement of any offers listed herein. We do not present information about every offer available. The information and savings numbers depicted above are for demonstration purposes only, and your results may vary.
1
Vivint
1
Vivint
Learn More
On Vivint’s Website
2
Link Interactive
2
Link Interactive
Learn More
On Link Interactive’s Website
3
Xfinity
3
Xfinity
Learn More
On Xfinity’s Website
Fine Print
All eufy’s products come with a 30-day money-back guarantee. Products also come with a limited warranty for up to 18 months, depending on the model. All warranties start counting on the date of purchase, not when the product is registered. And if your system gets stolen, eufy will replace the missing equipment for free—no questions asked.
Plan Pricing
As a DIY solution, eufy cameras offer a free self-monitoring option. eufy cameras with built-in storage give you up to three months of storage.
You can monitor everything yourself through the eufy security app available on iOS and Android. This means you’ll receive an alert whenever one of the sensors detects motion at a door or window opens.
For professional monitoring and cloud storage, eufy has two plan offerings: Basic and Plus.
24/7 Advanced Security Monitoring
X
24/7 Emergency Dispatch
X
Up to 20% Home Insurance Discount
X
Works with Sensor/Camera
X
Custom Monitoring Services
X
False Alarm Forgiveness
X
X
The Highest Response
X
X
Tap for Dispatch
X
X
Practice Mode
X
X
eufy’s home security cameras prices range from $99 for the eufyCam 2C to $159. 99 for the eufyCam E model. However, eufy offers bundled savings for packages like the HomeBase and four cameras package costs $469.99, saving you close to $150 for the system.
Installation
As a DIY home security solution, eufy doesn’t offer professional installation services. Their smart home support hub includes tutorials, manuals and support videos to help with the installation.
Add-Ons and Upgrades
With eufy, you get the option to choose from its Alarm Systems Kit or Cameras kit or build your own home security system a la carte.
Popular add-ons that integrate with the Home Security Kit include:
eufyCam 2C Pro Add-on Camera (2 Cam Pack)
$259. 98
Video Doorbell Dual Add-on Unit
$199.99
eufyCam 2 Pro Add-on Camera (2 Cam Pack)
$299.98
Video Doorbell Dual Add-on Unit +S40 (2 packs)
$599.97
eufyCam 2C Add-on Camera (2 Cam Pack )
$239.98
eufyCam 2C Pro Add-on Camera (1 Cam Pack )
$129.99
eufyCam 2 Pro Add-on Camera
$169.99
eufyCam 2 Add-on Camera
$129.99
Add-on Baby Camera Unit
$89.99
Video Doorbell Dual Add-on Unit + Smart Lock
$399.98
eufyCam 2C Pro Add-on Camera (3 Cam Pack)
$389.97
eufyCam 2C Add-on Camera (3 Cam Pack)
$359. 97
eufyCam 2 Pro Add-on Camera (3 Cam Pack)
$449.97
Video Doorbell 2K (Battery-Powered) Add-on Unit
$124.99
eufyCam 2C Add-on Camera (1 Cam Pack)
$119.99
In addition, you can also subscribe to video cloud storage. There are four service plans for cloud storage; these are the prices per camera:
Basic $2.99/monthly ($29.99/yearly): Subscription service per camera, rolling 30 days of video history.
Premier $9.99/monthly ($99.99/yearly): Subscription service for up to 10 cameras, rolling 30 days of video history.
After 30 days, new videos overwrite the storage.
Video Storage
Some eufy products offer up to three months of local video storage on the HomeBase, while some require an SD card for storage sold separately. However, recently, eufy introduced cloud storage solutions for most of its cameras.
For customers using cloud storage, eufy specifies that:
Videos and data are protected by military-grade encryption
All videos are stored on AWS cloud servers
Videos can only be played through the eufySecurity app
eufyCam/eufyCam E
On HomeBase
Yes
eufyCam 2/2C/2 Pro/2C Pro
On HomeBase
Yes
SoloCams (E20, E40, L20, L40, S40)
On SoloCam
No
Video Doorbell (Wired)
On Doorbell
No
Video Doorbell 2K (Battery-Powered)
On HomeBase
No
Video Doorbell 1080p (Battery-Powered)
On Wi-Fi Chime, need SD card
Yes
Video Doorbell Slim
On Wi-Fi Chime, need SD card
Yes
Video Doorbell Dual (Battery-Powered)
On HomeBase
No
Video Doorbell Dual (Wired)
On Wi-Fi Chime, need SD card
No
Floodlight Cam 1080p
On Floodlight
Yes
Floodlight Cam 2K
On Floodlight
Yes
Floodlight Cam E 2K
On Floodlight
Yes
Floodlight Cam 2 Pro
On Floodlight
Yes
Indoor Cams (Solo Indoor Cams)
On IndoorCam, need SD Card
Yes
Outdoor Cams (Solo Outdoor Cams)
On OutdoorCam, need SD Card
Yes
Smart Locks
On Smart lock
No
5-Piece Alarm System
On HomeBase
No
4G Starlight Camera
On Camera
No
Smartphone Controls and Smart Home Integration
The eufy home security system seamlessly integrates with other eufy products, from their cameras to their appliances and smart home devices. The Wi-Fi Smart Lock and Video Doorbell are the only products that can be integrated right now.
Right now, only the eufy cameras work with Alexa and Google Assistant; the alarm kit does not.
In fact, one of the only downsides to eufy’s home security system is its lack of smart home integrations. However, the company says they’re trying to find ways to make their products more smart home friendly.
Featured Partners
Advertisement
THIS IS AN ADVERTISEMENT AND NOT EDITORIAL CONTENT. Please note that we do receive compensation for any products you buy or sign up to via this advertisement, and that compensation impacts the ranking and placement of any offers listed herein. We do not present information about every offer available. The information and savings numbers depicted above are for demonstration purposes only, and your results may vary.
1
Vivint
1
Vivint
Learn More
On Vivint’s Website
2
Link Interactive
2
Link Interactive
Learn More
On Link Interactive’s Website
3
Xfinity
3
Xfinity
Learn More
On Xfinity’s Website
How eufy Home Security Stacks Up
Here’s how eufy home security system stacks up against major competitors in the space:
eufy
Great
No
$4. 99/month
Buy Now
On Amazon
Xfinity
Great
No
$10/month
Learn More
On Xfinity’s Website
Wyze
Okay
No
$0/month
Buy Now
On Amazon
Is eufy the Right Home Security Company for You?
In the end, eufy is an excellent option for those who want to keep their home security without breaking the bank with no monthly fees and a lower cost of ownership. It’s a perfect choice for those who already own some eufy products like their video doorbells or cameras. eufy is also an excellent choice for homeowners who don’t care about self-monitoring their security cameras and skipping the professional monitoring to keep pricing at bay.
However, eufy’s security cameras are on the higher end as far as pricing. So, this might not be the right company for you if you’re looking for a budget-friendly home security system.
Furthermore, if you’re looking for a home security system that also connects to your smart home devices and provides home automation solutions, there are other options in the market with greater capabilities than eufy’s.
Frequently Asked Questions (FAQs)
Is eufy a good home security system?
eufy is a good security system, compared to competitors, for someone looking for affordable prices and self-monitoring only. However, if you’re looking for 24/7 professional monitoring, eufy might not be the best choice.
How much does eufy cost per month?
eufy has the option of $0 per month with self-monitoring. However, for cloud video storage, the Basic Plan goes for $9.99 per month or $29.99 per year per camera. The Premier Plan costs $9.99 per month or $99.99 per year for up to 10 cameras.
Does eufy require a subscription?
No, eufy home security systems don’t need a subscription for monitoring.
Your Home. Your Decisions. Our Support.
Get expert advice on your home, design tips, how much to pay for pros and hiring experts, delivered to you daily.
{{ newsletterState.emailErrorMsg }}
Thanks & Welcome to the Forbes Home Improvement Community!
{{ newsletterState.emailErrorMsg }}
I agree to receive the Forbes Home newsletter via e-mail. Please see our Privacy Policy for more information and details on how to opt out.
Eufy Cameras Review | SafeWise
Eufy Cameras Review | SafeWise
skip to main content
Search for:
We tested these cameras for a few days to see how they stand up to the competition.
EufyCam 2C
4.1
1080p resolution
Works outdoors
Bright spotlight
View on Amazon
Read Review
Eufy SoloCam E40
4.25
1920p resolution
Works outdoors
No hub required
View on Amazon
Read Review
Eufy Solo IndoorCam C24
4. 3
1920p resolution
Affordable
Up to 128 GB storage
View on Amazon
Read Review
Eufy Video Doorbell 2K
4.15
1920p resolution
Local storage option
Wired or wireless
View on Amazon
Read Review
Eufy Floodlight Cam 2
4.05
1920p resolution
Works outdoors
Bright floodlights
View on Amazon
Read Review
By
John Carlsen
Senior Staff Writer, Security & Smart Home
May 31, 2023
Eufy prioritizes customer privacy with local video storage and robust security practices. But it’s also one of the best ways to get a 2K security camera without paying too much.
We think the 1080p EufyCam 2C is the best balance of features and price for most folks because it’s a versatile and flexible alternative to the Arlo Essential Spotlight. But it’s not a heart-stopping value like the Eufy Solo IndoorCam C24, which sports a higher resolution and similar performance for $100 less (if you don’t mind a power cable).
These cameras are the jewels of Eufy’s huge selection of cameras, but there’s a lot to like about the other offerings.
Which is the best Eufy camera?
EufyCam 2C
: Top pick
Eufy Solo IndoorCam C24
: Budget pick
Eufy Video Doorbell 2K
: Doorbell pick
Eufy SoloCam E40
: Beginner pick
Eufy Floodlight Cam 2
: Floodlight pick
Eufy security camera pros and cons
Pros
More 2K video options than other brands
Built-in video storage on most cameras
Strong emphasis on privacy
Affordable cloud plans
Cons
No cloud storage on some models
Compare Eufy security cameras
Product
Best for
Price
Resolution
Power source
Local storage
Learn more
Read review
EufyCam 2C
Top pick
$139. 99
1080p
Battery, solar
16 GB on HomeBase
View on Amazon
Read Review
Eufy SoloCam E40
Beginner pick
$129.99
1920p
Battery
8 GB built-in
View on Amazon
Read Review
Eufy Solo IndoorCam C24
Budget pick
$42.99
1920p
Wired
MicroSD slot
View on Amazon
Read Review
Eufy Video Doorbell 2K
Doorbell pick
$199.99
1920p
Battery, hardwired
16 GB on HomeBase
View on Amazon
Read Review
Eufy Floodlight Cam 2
Floodlight pick
$219.99
1920p
Hardwired
4 GB built-in
View on Amazon
Read Review
Amazon.com list price as of post date. Read full disclaimer.
EufyCam 3
We recently tested the EufyCam 3 (about $550), Eufy’s latest flagship camera. Its powerful 4K video, built-in solar panels, and expandable storage make it one of our new favorite Eufy security cameras. We’re not quite sure where it fits compared to the other Eufy cameras on this page but we plan to update this review with more information soon.
Learn more in our full EufyCam 3 Review.
What to expect with Eufy security cameras
Eufy offers one of the broadest ranges of security cameras on the market. This puts it in a prime position to compete with Arlo and Nest cameras on the high end, Ring Stick Up Cam and Reolink cameras in the mid-priced arena, and YI and Wyze cameras for budget dominance. We like that there’s something for everyone, but let’s dig into what makes Eufy a practical alternative to these popular brands.
Similarities and differences
At first glance, the top cameras in this review have distinctive features that help them fill specific security roles around the house, but they share many features too. Still, you can find slight variations among cameras that look similar—like the EufyCam 2C and EufyCam 2. Here are key features you can expect in Eufy security cameras.
Similarities
Privacy-first policies: One of Eufy’s biggest advantages over the competition is a focus on protecting your privacy. This is why all Eufy IP camera models come with some form of local storage to keep your data off the internet. Likewise, Eufy cameras, apps, and cloud servers follow strict encryption protocols when connecting to the internet. We’re also fans of the app requiring two-factor authentication when logging in on a new device.
2K video resolution: Practically every Eufy camera comes in 1920p (also called 2K) and 1080p versions. Surprisingly, the 2K video resolution isn’t much more expensive than 1080p. This narrow pricing gap—especially on Solo and SoloCam models—means that it’s worth choosing 2K over 1080p every time. Though upgrading to 2K on EufyCam models isn’t as good of a deal since you often pay for multi-camera kits—an extra camera tends to negate some savings.
Eufy app: The Eufy app is your gateway to setting up and controlling your Eufy camera. You can watch footage live or view any recordings that happened while you were driving home from vacation. You can also use the app’s two-way audio to talk with people through the camera like an intercom.
AI detection
The app also uses AI to detect people, faces, pets, and babies crying to make it easier to sort through video recordings and notifications. The type of AI detection depends on the camera, with face detection and baby crying showing up on EufyCam and Solo models.
Local storage: All Eufy cameras can store video without using the internet or a cloud storage plan. The storage medium depends on the model with products using one of three methods: built-in storage (SoloCam), microSD card (Solo IndoorCam), or HomeBase camera hub (EufyCam).
Voice assistant: Each Eufy security camera works with the Amazon Alexa and Google Assistant smart home platforms. You can ask for a live feed on a smart display, which is great for family members without smartphones. While we like this for quick checks on a camera, the Eufy app is a better interface.
Differences
Power source: Eufy has a healthy mix of wired and battery-powered security cameras. While most wired cameras are indoor models, outdoor cameras like the Floodlight Cam 2, Solo OutdoorCam, and Video Doorbell also have wired connections. The battery-powered cameras gear towards outdoor use—lasting 4–12 months depending on the model. There’s even a handy solar panel accessory to extend the battery life even further. Lastly, the SoloCam S40 has an integrated solar panel on top.
Weatherproofing: Eufy’s battery-powered cameras all come with IP65 or the more robust IP67 weatherproofing that helps them withstand rain, snow, heat, and cold temperatures. Among wired cameras, the Floodlight Cam and Solo OutdoorCam boast similar resistances to adverse weather.
Spotlights: You can find bright spotlights on the EufyCam 2C, SoloCam S40, SoloCam L20, Solo OutdoorCam, and Floodlight Cam. These are great for capturing color video at night, which offers a bit more detail than the infrared night vision common to all Eufy cameras. We also like that you can light a path and surprise potential intruders into a hasty retreat.
Apple HomeKit support: HomeKit allows some Eufy cameras to work with Siri and the Apple Home app. The functionality is similar to what you can do with Alexa and Google. Only a small selection of Eufy cameras work with Apple HomeKit and the Apple Home app: Solo IndoorCam C24, Solo IndoorCam P24, and EufyCam models using the HomeBase 2 hub (2, 2 Pro, 2C, and 2C Pro).
HomeKit Secure Video
EufyCam cameras with the HomeBase 2 hub also work with HomeKit Secure Video to add more features such as pet and vehicle detection, cloud storage via iCloud, and activity zones in the Apple Home app.
Compare Eufy cloud storage plans
Eufy plan
Monthly plan cost
Annual plan cost
Number of cameras
Video history
Basic
$2.99
/mo
$29.99
/yr
1
30 days
Premier
$9.99
/mo
$99.99
/yr
Up to 10
30 days
Info current as of post date. Offers and availability may vary by location and are subject to change.
Because all Eufy cameras include local storage, its cloud plans are an optional perk for folks wanting a backup on a secure cloud server. Cloud storage isn’t available on all Eufy cameras, with the most notable absence being the SoloCam models. You can sign up for a Eufy cloud plan using the Eufy Security app and your online customer account.
Eufy security camera reviews
1. EufyCam 2C: Top pick
Top pick
EufyCam 2C
4.1
$139.99
1080p resolution
Indoor/outdoor
Affordable multi-packs
View on Amazon
Amazon.com list price as of post date. Read full disclaimer.
The EufyCam 2C offers more flexibility for its price than more expensive Eufy cameras. Its battery and built-in spotlight are ideal for indoor and outdoor settings. The luminous spotlight gives you colorful videos at night instead of the bland monotones of typical infrared night vision.
It comes with a HomeBase 2 base station that handles storage, internet, and smart home protocols like Apple HomeKit. This extends battery life beyond what a purely Wi-Fi camera like Eufy SoloCam can do—six months instead of four.
While the 1080p resolution doesn’t match the detail of Eufy’s 2K models, it cuts the overall price. You can buy multi-packs with up to four cameras, which cuts the per-camera price as low as $105. This competes well against multi-camera kits from Arlo, which doesn’t discount additional cameras as deeply.
We generally dislike the required upsell of base stations, but Eufy’s base station adds very little to the overall price. In total, it adds about $20 to the one-camera starter kit and doesn’t affect the price of multi-camera kits.
Overall, EufyCam 2C is the best 1080p camera from this brand because it’s so versatile indoors and outdoors. We think it’s a step above the Arlo Essential Spotlight, its closest rival, because it doesn’t require a cloud storage subscription.
EufyCam 2C Pro
You can upgrade to the EufyCam 2C Pro for about $10–$40 more per camera. It’s not much different than the original 2C, but it comes with the 2K video quality we love in other Eufy models.
2. Eufy SoloCam E40: Beginner pick
Beginner pick
Eufy SoloCam E40
4.25
$129.99
1920p resolution
Indoor/outdoor
No hub required
View on Amazon
Amazon.com list price as of post date. Read full disclaimer.
The Eufy SoloCam E40 differs from Eufy’s other battery-powered cameras by skipping the HomeBase hub. Instead, it connects directly to your home Wi-Fi network like a smartphone would. This makes it easier to set up and a little cheaper than the brand’s other wireless 2K cameras.
But the shift to a direct Wi-Fi connection brings disadvantages. This camera doesn’t have expandable local storage or work with cloud storage so you need to rely on the 8 GB internal storage for everything. Wi-Fi also uses a lot of juice, so the camera’s four-month battery life is the lowest from this brand.
Overall, we think the Eufy SoloCam E40 is a great place to start if you want to try out Eufy’s wireless cameras without a hub. But it’s not as robust as EufyCam models. If you want a better option for the same price, we recommend checking out the Reolink Argus 3 Pro.
3. Eufy Solo IndoorCam C24: Budget pick
Budget pick
Eufy Solo IndoorCam C24
4.3
$42.99
1920p resolution
Indoor only
Local storage up to 128 GB
View on Amazon
Amazon.com list price as of post date. Read full disclaimer.
The Eufy Solo IndoorCam C24 is one of the best values for an indoor security camera you can find anywhere. It’s the most affordable HomeKit-compatible camera and one of few 2K cameras for around $40. We also like that it supports local storage on a microSD card up to 128 GB. With a behemoth card like that, there’s more storage capacity than other Eufy cameras.
Sadly, it doesn’t come with a microSD card, but you can buy the maximum capacity—a 128 GB microSD card—for less than $20. Still, having that much storage on an indoor security camera for about $60 is a remarkable deal compared to monthly cloud storage fees. Based on Eufy’s estimates, 128 GB yields over a year of recordings.
Overall, the Eufy Solo IndoorCam C24 is a good option for folks wanting high-resolution video indoors. While we like the HomeKit support, this Eufy camera can’t top our favorite budget security camera pick, the Wyze Cam v3.
Video: Eufy Solo IndoorCam C24 Review
Play Video
Subscribe to our YouTube channel and learn how to protect your home, loved ones, and belongings.
Recent name change
This camera was formerly the Eufy Indoor Cam 2K, which could be easy to mistake for other indoor cameras from the brand. While Eufy Solo IndoorCam C24 doesn’t roll off the tongue as easily, it’s way easier for googling the specific product.
4. Eufy Video Doorbell 2K: Doorbell pick
Doorbell pick
Eufy Video Doorbell 2K
4.15
$199.99
1920p resolution
Outdoor only
Local storage
View on Amazon
Amazon.com list price as of post date. Read full disclaimer.
The Eufy Video Doorbell 2K has one of the highest resolutions we’ve seen in a doorbell camera. Although other brands like Arlo and Reolink embrace 2K video on more cameras each year, Eufy is one of the first to add it on a doorbell. The extra detail is great for porch pirate wanted posters on social media.
Another reason we like the Eufy Video Doorbell 2K is its inclusion of local storage via the HomeBase 2. If you thought that 2K was rare on video doorbells, local storage is almost unheard of. A large part of competitor’s business models is requiring subscriptions to store doorbell footage. Eufy bypasses this, making it cheaper to maintain and a better solution for off-grid homes.
This is a doorbell camera, but the battery power means you can install it anywhere. This is great for putting the doorbell outside doors without existing wiring. Still, we like that you can use doorbell wiring with this camera—it’s the only Eufy doorbell that supports both wired and battery installations.
Overall, we think that the Eufy Video Doorbell 2K is the best video doorbell for local storage. While it produces better video than Arlo and Ring, it’s not as affordable.
Check out our take on all the Eufy doorbells.
5. Eufy Floodlight Cam 2: Floodlight pick
Floodlight pick
Eufy Floodlight Cam 2
4.05
$219.99
1920p resolution
Outdoor only
Bright floodlights
View on Amazon
Amazon. com list price as of post date. Read full disclaimer.
The Eufy Floodlight Cam 2 offers brighter nighttime lighting than Eufy’s battery-powered spotlight cameras. While those models are suitable for temporary lighting, the Floodlight Cam 2’s dual LED lights produce a whopping 2,500 lumens. This is enough to illuminate a wide swath of lawn for parties and gardening after sunset.
Installing this floodlight camera is more complex than charging a battery or plugging in a power cord—it’s more like installing a new light fixture. You need to mount this light on a junction box and hardwire it. While the electrical work is relatively easy, it might be too much trouble for some folks.
Overall, we like the Eufy Floodlight Cam 2 for outdoor locations where extra nighttime lighting is necessary. While the Ring Floodlight Cam Wired is a good alternative, Eufy’s 2K video resolution is hard to beat.
Eufy Floodlight Cam 2 Pro
We love that the new Eufy Floodlight Cam 2 Pro (about $300) includes pan-tilt functionality and ultra-customizable LED floodlights, but it’s an expensive investment. Learn why we think it’s worth the price in our full Eufy Floodlight Cam 2 Pro review.
More Eufy cameras we considered
Product
Price
Resolution
Power source
Local storage
Learn more
Eufy Solo IndoorCam P24
$54.99
1920p
Wired
MicroSD slot
View on Amazon
Eufy Video Doorbell
$99.99
1080p
Battery
MicroSD slot on Chime
View on Amazon
EufyCam 2 Pro
$369.99
1920p
Battery, solar
16 GB on HomeBase
View on Amazon
Eufy Solo OutdoorCam C24
$99.99
1920p
Wired
MicroSD slot
View on Amazon
Eufy SoloCam S40
$199. 99
1920p
Solar, battery
8 GB built-in
View on Amazon
Amazon.com list price as of post date. Read full disclaimer.
Eufy Solo IndoorCam P24: Eufy’s best pan-tilt camera gives you remote control over where the camera points. This is great for looking in different spots around the room. It offers similar performance to the Eufy Solo IndoorCam C24.
Eufy Video Doorbell: This 1080p doorbell offers expandable microSD storage on its chime accessory. It’s a more affordable way to get local storage on a video doorbell than Eufy’s 2K model.
EufyCam 2 Pro: This is Eufy’s most expensive camera, with double the battery life of the 2C—up to 12 months. Unlike the 2C, it doesn’t have a built-in spotlight color video at night. It’s too expensive for our tastes, but it’s a good example of what Eufy’s cameras can achieve.
Eufy Solo OutdoorCam C24: This camera isn’t as affordable as other Eufy Solo models but offers a wired power that doesn’t require charging a battery every few months.
Eufy SoloCam S40: This solar security camera is one of Eufy’s newest products, but it’s hard to ignore. While most solar cameras use a solar panel accessory, it’s a built-in feature of the S40. We’re excited to see how it performs since it might be a game-changer that’s easier to install than other solar security cameras.
Some Eufy cameras available through Cove
The battery-powered Eufy Video Doorbell and the solar-powered Eufy SoloCam S40 are also available through Cove Home Security. If you’re in the market for a full home security system, take advantage of Cove’s frequent sales to snag these cameras at a discount.
Final word
Eufy cams are not our first choice in most cases, but they’re often our second choice. They offer reliability, excellent video quality, multiple power options, affordable options, and smart home compatibility. In terms of features, they don’t burn as brightly as Wyze, Ring, and Arlo, but sometimes it’s perfectly fine to nail the basics.
EufyCam 2C: affordable battery-powered camera with local storage and Apple HomeKit support
Eufy Solo IndoorCam C24: cheap 2K camera that supports a spacious 128 GB microSD card
Eufy Video Doorbell 2K: local storage and 2K video quality—rarities among smart doorbells
Eufy SoloCam E40: easy setup process that doesn’t involve a base station
Eufy Floodlight Cam 2: a brighter yard and color video at night
Eufy is a spin-off brand from Anker specializing in smart home devices like vacuums, lighting, and home security systems. You may know Anker from its popular chargers, cables, power banks, and computer accessories.
Eufy security cameras hold their own compared with dominant brands like Arlo, Ring, Nest, Reolink, and Wyze. Eufy excels in terms of local storage, customer privacy, and video resolution.
Eufy is generally a more affordable option than Arlo for 2K video, but it costs more than comparable Ring and Wyze cameras. We think it’s an excellent alternative to these popular brands, especially for local video storage. Still, it doesn’t offer as many innovative features as Arlo and pales in comparison to Ring and Wyze’s smart home ecosystems.
How we reviewed Eufy security cameras
Before comparing Eufy’s cameras, we narrowed down among the brand’s 27 camera models. Eufy currently sells six baby monitor models, but they don’t use a mobile app or work with smart home devices, so we didn’t consider them for this review. Then we skipped all but the most notable 1080p cameras in favor of Eufy’s 2K options. Ultimately, we settled on highlighting 10 cameras that best represent the brand as a whole.
We leveraged our years of experience with security cameras while researching for this review. We scoured customer reviews, support articles, product pages, and other online reviews to find out what makes Eufy unique. Check out our full testing methodology to see how we rank and review products.
Eufy security issue
Eufy finally addressed a November 2022 security issue in an article from The Verge. The company explained why the Eufy web portal wasn’t encrypting live video streams and stated the issue has since been fixed. It’s also updating every Eufy camera’s encryption protocols to further improve security.
Based on this response—and Eufy’s commitment to more transparency and cooperation with independent security researchers—we’re leaving our scoring as-is unless further issues arise.
Related articles on SafeWise
EufyCam 3 Review
Eufy Dual Cam Video Doorbell Review
Eufy Floodlight Cam 2 Pro Review
Eufy Home Security Review
Eufy Smart Lock Review
Best Home Security Cameras
Best Wireless Security Cameras
Disclaimers
Product prices and availability are accurate as of the date/time indicated and are subject to change. Any price and availability information displayed on Amazon at the time of purchase will apply to the purchase of this product. Safewise.com utilizes paid Amazon links.
Certain content that appears on this site comes from Amazon. This content is provided “as is” and is subject to change or removal at any time.
†Google, Google Nest, Google Assistant, and other related marks are trademarks of Google LLC.
Written by
John Carlsen
John is a technology journalist specializing in smart home devices, security cameras, and home security systems. He has over nine years of experience researching, testing, and reviewing the latest tech—he was the Smart Home Editor for Top Ten Reviews and wrote for ASecureLife before joining SafeWise as a Staff Writer in 2020.
John holds a Bachelor’s degree in Communications, Journalism emphasis from Utah Valley University. In his spare time, he enjoys hiking, photography, cooking, and starting countless DIY projects he has yet to complete.
Read More
Recent Articles
05/30/2023
The Best Home Alarm Systems in the UK
Find the right alarm system to protect your UK home. SafeWise recommends security systems for…
05/30/2023
Best Pet-Friendly Home Security Systems
The best pet-friendly home security systems keep your furry friends happy and safe with advanced…
About Contact Press Blog Deals
Home Security Internet Security Home Safety Family Safety Senior Safety
Car Safety Smart Home Emergency Prep Pet Safety Personal Safety
Stay Safe!
Subscribe to SafeWise for updates on safety news, product releases, and deals!
By signing up, you agree to our Terms and Conditions and Privacy Policy | Cookies Settings
Back To Top
“Have you seen Ovechkin’s beautiful goal?”. NHL Day Review – Hockey News
Alexander Ovechkin returned to Washington after injury and scored the 44th goal of the season. Semyon Varlamov became the first star of the day in the NHL. Vladimir Tarasenko can score 40 goals in a championship. These and other topics are in the review of the day from Pavel Lysenkov.
“Malkin caught up with Ovechkin in the scorer race.” How it was (VIDEO)
MATCH OF THE DAY
Washington – Buffalo – 6:1 (1:1, 3:0, 2:0)
Glencross, Beagle, OVECHKIN, Like, J. Ward, Johansson – Larsson
B : Ovechkin (1 +1; 0, 0, 8, 18.29)
Kuznetsov (0+0; 0, 0, 0, 11.57)
Alexander Ovechkin missed only one match due to a lower body injury and returned to the squad “Washington”.
It was reported that the decision on Ovechkin would be made at the morning rehearsal. Alexander reported that he almost did not feel pain. He went to the match with “Buffalo” (6:1) and scored the 44th goal of the season. It happened in the 30th minute when the hosts were on the power play and Ovechkin landed a great wrist shot from the face-off circle.
In total, Ovechkin scored 69 (44+25) points in 66 games this season.
Islanders forward John Tavares scored 3 (1+2) points in the game with Florida and overtook Alexander Ovechkin in the list of the league’s top scorers.
Tavares now has 70 points and Ovechkin has 69.
It should be noted that the Islanders still lost, and the Panthers were defended by Dan Ellis, who played only 8 games over the past two seasons and took his first victory. The fact is that the main Florida goalkeepers – Roberto Luongo and Dan Ellis – left the squad due to injuries.
RUSH OF THE DAY
Columbus – Colorado – 0:4 (0:3, 0:0, 0:1)
Iginla, Landeskog, Duchenne, Tangway
K-s : to Bobrovsky (21-20; 95.2%, 40.00)
Anisimov (0+0; 0, 0, 2, 18.00)
Tyutin (0+0; 0, 0, 2, 22.01)
K-up : to Varlamov (44-44; 100%, 59.51)
In the duel of Russian goalkeepers, Semyon Varlamov outplayed Sergei Bobrovsky.
Varlamov was recognized as the first star of the day in the NHL. He made 44 saves, and in general this is the fifth Varley cracker this season. In total, during his career, Varlamov held a match to zero 18 times, and this happened three times against Columbus. It is also interesting that Varlamov plays without substitutions at all – this is his 21st consecutive match for Colorado.
Bobrovsky entered the ice from the second period – the match was started by his substitute Curtis McKellini, who conceded 3 goals after 12 shots.
Recall that Varlamov and Bobrovsky can play for the Russian team at the World Championships in the Czech Republic – their teams are not yet included in the playoff zone.
Vladimir Tarasenko scored 2 (1+1) points and became the first star of the match against Toronto.
The Russian scored his goal 15 seconds before the end of the first period, when he burst into the “leaves” zone on the right flank and delivered an excellent wrist shot.
This is Tarasenko’s 32nd goal this season, and he has four more weeks to reach the classic standard of 40 league goals.
St. Louis are on a roll now with 7 points in their five-game road streak.
MALKIN OF THE DAY
Los Angeles – Pittsburgh – 0:1 OT (0:0, 0:0, 0:0, 0:1)
Hornquist 900 05
R : Malkin ( 0+0; 0, 0, 3, 20.43)
Evgeni Malkin didn’t score, but his Pittsburgh managed a hard-fought victory in Los Angeles.
Malkin made 3 shots on goal, but the hosts goalkeeper Jonathan Quick played well. It is also interesting that Pittsburgh repeated the season’s anti-record – 18 shots per game. However, many of them looked dangerous.
Patrick Hornqvist scored the winning goal when Tyler Toffoli lost the puck at his own net. Unfortunately, Evgeni Malkin interrupted the seven-match scorer streak. But he still has a chance to win the Art Ross Trophy.
KUCHEROV DAY
Tampa Bay – Dallas – 5:4 (2:1, 0:2, 3:1)
Strolman, KUCHEROV, Killor n, Hedman, B. Boyle – Seguin ( 2), Fiddler (2)
TB : to Vasilevsky (35-31; 88.6%, 60.00)
Kucherov (1+0; 0, 0, 2, 15.28)
Namestnikov (0+0; 0, 0, 0, 12.50) lost – the Russian was able to win his 6th victory of the season. In total, Vasilevsky played 12 matches in this championship. Tampa’s first goaltender is Ben Bishop.
In the 16th minute, Nikita Kucherov scored for the hosts when he received a pass from Palat in a counterattack and accurately threw it on the move. This is already the 25th goal of the ex-forward of CSKA. In general, “Tampa” managed to set a club record, winning the 26th home win in a season.
Tyler Seguin returned to Dallas after a right knee sprain.
One of the league’s top scorers was injured in a match against Florida when Dmitry Kulikov used an unsuccessful power hold against him. Because of this, Seguin missed 10 matches.
Now Seguin scored a double by the 24th minute and was eventually recognized as the second star of the fight. However, this did not help Dallas.
“Same story… We can talk all we want, but we don’t have the right to give away victories like we did with Tampa. This is our responsibility and no apologies are accepted,” Seguin said.
VIDEO OF THE DAY
Terrible moment – Alexis Boward came to hockey for the first time, she got good seats at the glass.
SEE THE VIDEO AT THE LINK
And it must have happened that this glass fell out – right on her!
The result is a bandaged head.
And it’s good that the children didn’t sit there!
PHOTO OF THE DAY
A statue of Luc Robitaille was erected in Los Angeles. And then Luke Robitaille himself came to her.
JOKE OF THE DAY
NHL stars try to name four houses at Hogwarts Academy.
Are you crazy? Such a question! What are you, Harry Potter fans here?
“No chance,” Justin Williams said. And I agree with him.
General Reading Room offers gardeners an online overview “Through the Pages of My Beautiful Garden Magazine of Past Years”
“My Beautiful Garden” is the Russian edition of the most popular ornamental gardening magazine in Europe for amateur gardeners and owners cottages and country houses. In each of the issues of the magazine of past years, you can find up-to-date information and answers to all your gardening questions. Magazine “My beautiful garden” is a professional and friendly adviser for those who strive to live in harmony with nature.
There are many interesting sections in the magazine. The most popular is Ornamental Garden . So, a special issue of the magazine No. 1 for 2014 is devoted to pruning plants. Interest in this topic is quite understandable. After all, every gardener knows that there will be no beautiful garden without pruning. There will also be no rich harvest of fruits and berries. The magazine will cover the pruning of the main garden trees and shrubs in detail and with illustrations. It also provides expert advice and a pruning calendar.
The topic of pruning appears every year in almost every issue of the magazine “My Beautiful Garden” . Gardeners can learn about the features of spring pruning of roses from an article in magazine No. 4 for 2017 (p. 12-14). The method of pruning depends on the group to which the roses belong. The article describes in detail the pruning technique (“royal haircut”) of standard (mini-trees), climbing, ground-blood, park and hybrid tea roses. Section “Gardener’s Workshop” of the same magazine describes the pruning of a flower loved by many gardeners – hydrangeas (p. 33).
In section Garden Design , you can learn how to make and install arbors, supports for climbing plants, and even invent unusual garden furniture. The article “Furniture Fantasies” in the magazine “My Beautiful Garden” No. 11 for 2017 (pp. 40-43) will convince you that creative furniture with your own hands is spectacular and simple. The illustrations of the article clearly prove this: creative garden chairs made of tin barrels, sofas made of pallets, a swing made of driftwood, and an old chair decorated using decoupage technique. Category “In addition” presents photos from the sites of the winners of the photo contest in the nomination “Gift for your favorite garden” (pp. 54-55), which eloquently testify that everyone can create country furniture and comfort on the site.
Section Gardening Workshop contains a lot of useful information about diseases and pests in the garden, as well as methods for treating and controlling them. For each month, important moments in gardening and horticulture are prescribed. The main theme of magazine No. 10 for 2017 is autumn worries. It identifies the main work that needs to be done in October in the garden and vegetable garden. The article “Harvest Festival” (pp. 24-30) reveals the secrets of reliable harvest storage. In Siberia, where it is cold and snowy most of the year, vast folk experience has been accumulated in the careful collection and reliable preservation of the crop. True, times and living conditions are changing, new storable varieties of vegetables and fruits appear, and also original methods and modern technologies for their processing, so each generation of gardeners has to learn the secrets of storage again. Today, many gardeners use drying and drying vegetables. You can dry and dry vegetables in the summer just in the sun, and in the fall in an oven or a special dryer. Delicious chips made from tomatoes and other vegetables can be enjoyed all winter long.
One of the main themes of My Beautiful Garden is garden planning and decoration, landscaping and garden styles. Three articles in the magazine No. 1 for 2018 are devoted to them. If you want to admire the beauty of a properly designed winter garden, we recommend that you read the article “According to the canons of the season” (pp. 10-13). Those who like to be in trend will be interested in the article “Metal with character” (pp. 38-41). An article titled “One garden – two ideas” will tell you how to turn the front garden into the main aesthetic accent of the site “(pp. 18-21). All articles are written by professional landscape designers who will teach you how to create indescribable beauty on one square meter, how to beautifully decorate a fence or building facade, place a lawn or combine flower beds.
New Year and Christmas are approaching – the most beloved holidays of all. Every year, issue #12 of the magazine features articles on original holiday home and garden decoration. You will learn how to quickly and beautifully make a charming bouquet, New Year’s stars and other compositions from a sprig of coniferous plants by reading the article “Waiting for the New Year” in the magazine “My Beautiful Garden” No. 12 for 2010 (p. 6-10). Another interesting article “Winter’s Tale” (p. 36-37) in the same issue of the magazine is devoted to creating festive flower arrangements for a romantic mood.
The Roomba i3+ and i3 launched in September 2020. It’s a smart robot vacuum with a self-emptying dust bin.
But how’s the cleaning performance, features, and specs? Our i3+ review answers now.
Value-Priced, Self-Emptying Robot
Roomba i3+
The Roomba i3+ takes the advanced capability of the self-emptying dust bin and pairs it with a more affordable robot vacuum, for a value-packed blend of performance, usability, and price. It has digital mapping, smartphone integration, and great cleaning performance. You miss out on the zoned cleaning and physical virtual walls, but these may be pretty minor issues to most users. As expected, it performed fantastic in our cleaning tests, removing 99% (by weight) of all debris we tested it against (4 debris types, 3 floor types). Roomba’s i-series line continues to impress with the recent i3+ addition.Check Price
Pros
Comes with or without the self-emptying dust bin
Fantastic performance. Removed 99% of all debris we tested it against.
Offers significantly lower price point than the Roomba S9+ and i7+
Same suction as the i7+ (10x vs. the Roomba 600 series)
Systematic navigation (cleans in straight lines)
Cons
No keep out zones
No direct room cleaning (ie, you cannot send it to clean a specific room by name)
Table of Contents
Design
Cleaning Tests
Navigation
Roomba i3+ vs. i3
Roomba i3+ vs i7+
Size
Accessories
Features
Usability
Value
Specifications
Summary
The Roomba i3+ and i3 is built on the same framework as Roomba’s other i-series robots.
Roomba i3+ (top down view)
The i3 is also compatible with the self-emptying dust bin, which is arguably the most attractive feature of the i3+.
Roomba i3+ rubber brushroll
The look of the i3+ is also a bit different from other Roombas we’ve seen to date. This is one of the first models to have the look of a textured top face.
Roomba i3+ profile view
Still aluminum, but the outer perimeter material on the i3+ has a bit of a textile look with a smooth center.
Roomba i3+ stealth cord wrap
The “CLEAN” button is located top and center with a while LED ring around it. The ‘Home’ and ‘Spot Clean’ buttons are located to the left and right of the central Clean button.
What does the bottom look like?
The underside of the Roomba i3+ looks similar to Roomba’s new e, i, and S series robots.
Roomba i3+ (under side view)
It uses dual-rubberized brushrolls with a single side spinning brush. There are three navigational wheels, two larger ones for transitioning different floor types and one smaller one for steering or making 360° turns.
Cleaning Performance
To evaluate the cleaning performance, we run a series of tests on three different floor types (hardwoods, low pile and high pile carpet).
Roomba i3+ cleaning carpet
Within those tests we use a mix of different debris types including cereal, rice, kitty litter, and sugar.
Below is the testing data from our i3+ cleaning tests.
Overall
99%
Hardwood
99%
Low Carpet
99%
High Carpet
99%
Overall, the performance was nearly flawless on all floor types. This vacuum navigates in clean straight lines and has among the best suction and cleaning power of any robot vacuum we’ve tested.
Hardwood Floor Cleaning
On hardwood floors, it was basically flawless and cleaned 99% of all debris on the floor.
Roomba i3+ Hardwood Floor Cleaning Tests
Low Pile Carpet Cleaning
On low pile carpet, performance continued to be fantastic. Like hardwood floors, it scored a 99% removal rate (by weight) on low pile carpet.
Roomba i3+ Low Pile Carpet Cleaning Tests
High Pile Carpet Cleaning
High pile carpets were bascially the same story as low pile. The i3+ Roomba 99% of all debris we tested.
Roomba i3+ High Pile Carpet Cleaning Tests
While these numbers may feel a bit like a foregone conclusion, they are not. To date, we’ve tested over 50 different robot vacuums.
Of those 50 only 4 have scored 99% or higher across all 3 floor types. Those 4 being the Roomba i3+, i7+, S9+, and e5.
Roomba’s brushroll, suction power, and overall cleaning system is still a healthy step above most others we’ve tested, especially high pile carpet.
Navigation
The Roomba i3+ navigates and cleans in straight paths.
In our navigation tests, it did a great job at avoiding common obstacles and did not get stuck on any obstacles in our living room / kitchen setup.
You can watch our full navigation test video below:
Roomba i3+ vs.
i3 – What’s the Difference?
The difference between the i3+ and i3 is simple. The i3+ includes the clean base, which offers a self-empty dust bin. The i3 does not, and instead only includes the standard charger.
Roomba i3+ Clean Base
The physical robot on both the i3+ and i3 is exactly the same. As a result, you can purchase the i3 and buy a standalone clean base in the future if you want to add the self empty dust bin.
Roomba i3+ auto dirt disposal slot
So while the i3+ is more convenient with the self-empty dust bin, the cleaning performance, suction, run time, navigation, and other operational characteristics are exactly the same on both the i3+ and i3.
Roomba i3+ vs. i7+ – What’s the Difference?
Roomba i3+
Self-Emptying Yes
Navigation: Systematic Navigation
Suction: 10X Roomba 600 Series
Virtual Wall: No
Zoned Cleaning: No
Check Price
Roomba i7+
Self-Emptying Yes
Navigation: iAdapt 3. 0
Suction: 10X Roomba 600 Series
Virtual Wall: Yes; one
Zoned Cleaning: Yes
Check Price
The differences between Roomba i7+ and Roomba i3+ comes down to just a few small factors—custom cleaning control and virtual walls.
iRobot app making a digital map of the Modern Castle home
The i7 offers more a more customizable cleaning, keep out zones, and the ability to clean specific rooms.
The i3 still has the ability to digitally map floor plans, but it can’t interact with those maps in as many ways as the i7+. This limits the ability to customize cleaning routines, recommendations, and specific room cleaning.
Here’s a complete list of features that the i7 has that the i3 lacks:
Custom cleaning control
Clean zones and keep out zones
Selective room cleaning
Visual navigation
Both have the same suction power, scheduled cleaning, smartphone integration, and the ability to partner with the Braava mops.
Roomba i7+ at docking stationBraava Jet m6
This technology will vacuum the floors and then communicate with the Braava mop to start a mopping cycle after the vacuuming is complete.
RELATED – Read our Braava Jet m6 review here and Roomba i7+ review here.
Size & Dimensions
The Roomba i3+ and i3 is almost the exact same size and weight as the i7. It’s fairly wide compared to other models we’ve tested and a little tall, but still well under 4″.
It’s a nice balance between power, dustbin capacity, and the ability to maneuver under furniture.
How big is the vacuum?
The Roomba i3 is:
13.26″ diameter
3.63″ tall
7.44 lbs
Roomba i3 size
How big is the charging base?
The Roomba i3+ model is available with the standard charging base or with the self-emptying charging base.
When sold with the advanced charging base, the i3 package is called the i3+. You can also buy the Clean Base charger separately.
The Self-Charging Base (
Clean Base)
The self-emptying base is significantly larger than the standard base. Here are the exact dimensions to the Clean Base:
Height: 19″
Depth: 15.1″
Width: 12.2″
Roomba i3+ clean base size
After the Roomba docks into the charging base, the system will suck debris from the dust bin and deposit it into the larger cavity of the charging base.
The Standard Base
If you don’t need the self-emptying dust bin, you can also opt for the standard charging base (shown below).
Roomba standard charger
This base is just large enough to engage with the charging contact pics and provide a sensor beacon for the Roomba to navigate around and find the charger when the cleaning cycle is complete.
Accessories & Parts
The Roomba i3+ includes the following parts and accessories:
Roomba i3 robot vacuum
Charging base (standard base with the i3 or self-emptying Clean Base with the i3+)
Spinning side brush
Filter (x2)
Dirt disposal bags (x2; with the i3+ only)
The parts and accessories included with the i3 is nearly identical to the parts included with the i7+ and S9+ models.
One item that is not included with the i3 is any virtual walls (but you can buy them standalone here), similar to the Roomba e5. This is one area cutback that helps to keep the cost lower.
Here’s a closer look at exactly what you’ll get in addition to the vacuum itself.
Self-Emptying Base (i3+)
Standard Base (i3)
CHARGING BASE | As mentioned above, the i3+ comes with the self-emptying charging base while the i3 comes with the standard charging base.
Roomba i3+ spinning side brush
SPINNING BRUSH | The spinning brush snaps into the edge of the i3 on the underside. The rotating bristles capture dirt and debris along corners and edges.
Roomba i3+ Filter
FILTER | The filter that comes with the i3 is the same filter that comes with the i7 and e5 models. It’s about half the size of older Roomba filters and also more efficient.
Roomba i3+ disposal bag
“CLEAN BASE” DISPOSABLE BAG | The Clean Base charger is designed to hold up to 30 loads of debris from the vacuum. These bags are marked as “disposable”, but I found the quality to be better than expected.
This bag could easily be reused multiple times before needing to be replaced.
When it is time to replace, you can find Clean Base disposable bags here.
Features
There are quite a few really great features on the new Roomba i3+.
Here’s a quick list of some of the best features on the i3+.
Self-Emptying
Of course, one of the best features we’ve got to highlight is the self-emptying dust bin. This feature is about as handy as it sounds.
Roomba i3+ clean base with self empty dust binRoomba i3+ clean base with self empty dust bin
It is the exact same system that is available with the Roomba S9+ and Roomba i7+, although the aesthetics and finishes may be a little different.
Digital Mapping
The Roomba i3+ has Systematic Navigation with enabled digital maps. With this technology, you can view the cleaning path of the Roomba using the smartphone app.
Roomba i3+ Digital Mapping
While you’re able to view those cleaning paths, you cannot interact with them after the fact to create custom cleaning routines, keep out zones, or clean specific rooms.
However, it still cleans in systematic straight lines.
Scheduling
Like many other Roomba, the i3+ offers scheduled cleaning. You can schedule recurring days and times or one-time cleanings in advance.
Setup takes just a few moments using the iRobot app.
Roomba i3+ cleaning schedule setup
NOTE: One thing the i3+ cannot do is allow for Selective Room Cleaning. Meaning you cannot send to to clean a specific room by name as you can with the i7+ and S9+.
Usability
The usability of this vacuum is excellent, namely due to the self empty dust bin and app integration.
Roomba i3+ app
The smart navigation and digital mapping also help the Roomba i3+ to be more self-sufficient. You don’t really need to babysit this model like you would less advanced models.
Recharge & Resume
If it can’t finish the cleaning before the battery runs down, it will recharge mid-cycle and then return to the spot that it left to continue cleaning after the battery is refreshed.
Setup
Setup on all of the newer Roomba models is straightforward.
Here’s the process:
Remove all parts from the box.
Plug charging base into the wall.
Place Roomba on the charging base.
All Roomba come with quite a bit of charge, but it’s still a good idea to fully charge any robot vacuum before using the first time.
By fully charging and fully draining the battery right away, you’re helping it get off on the right foot with regard to battery longevity.
Starting a Cleaning Cycle
To start a cleaning cycle there are a couple of different techniques.
Press clean on the robot itself.
Use the Roomba app to start, pause, or schedule a cleaning.
Use voice control with Amazon Alexa or Google Assistant.
With any of the methods above, you can start a cleaning cycle and the i3+ will get to work.
Roomba i3+ cleaning
It will drive around your home, mapping out each room, and vacuum your floors.
After it has reached max capacity within the dustbin (or it runs out of battery), the i3+ can return to the charging base, empty the debris from the dustbin, charge up if needed, and then return back to where it left off cleaning last.
Using the App
The Roomba app is one of the most intuitive and easy to use robot vacuum apps we’ve tested. After opening the app, users can place the robot in automatic cleaning mode by just clicking the “Clean”.
Roomba i3+ cleaning history
Is the Roomba i3+ a Good Value?
I would say that the Roomba i3+ is one of the best values of any Roomba released to date. It is a self-emptying robot vacuum for significantly less than other models with the same feature.
Roomba i3+ cleaning carpet
Granted, you do give up a few other bells and whistles in order to get the price so low. The features lacking on the i3 includes:
Uses Systematic Navigation instead of iAdapt 3.0 (as the i7+ and S9+ do)
No physical virtual walls, but it is compatible with them (buy standalone walls here)
No keep out zones
For more on Roomba see our full Roomba review series:
Best Roomba
Best Roomba for Pet Hair
Roomba S9+ Review
Roomba i7+ Review
Roomba e5 Review
Roomba 960 Review
Roomba e5 Review
Roomba i3 Specifications
Below you’ll find a complete list of specifications on the Roomba i3+.
Specifications
Roomba i3+
Model
Roomba i3+
Length
13.26″
Width
13.26″
Height
3.63″
Weight
7. 44 lbs.
Floor Type
All (indoor)
Battery
1,800 mAh
Dust Bin Capacity
~0.5 L
Navigation
Systematic Navigation
Imprint Smart Mapping
Yes
Self-Emptying (Advanced Base)
Yes; smart base is included
Washable Dust Bin (on-board)
Yes
Virtual Wall
No, but it is compatible with virtual walls (buy here)
Returns
Yes (usually), Varies by retailer
Warranty
1-Year limited
Price
Check Price
Who Should Buy the Roomba i3+?
If you’re in the market for a self-emptying robot vacuum that won’t break the bank, the i3+ is a solid option.
I would recommend the Roomba i3+ if you:
Want a great value: The Roomba i3+ is a fantastic value if you want the advanced digital mapping, excellent performance, and the self-emptying dust bin. It’s not the least expensive Roomba out there, but it is the best value if you’re specifically looking for these top-of-the-line features.
Want a self-emptying dust bin: The self-emptying dust bin is largely the best feature that separates the i3+ from other more basic models, like the Roomba e5. The Clean Base charger holds up to 30 loads of debris so you don’t have to worry about emptying it often.
Want excellent cleaning performance: The cleaning performance of the i3+ was simply amazing. It removed 99% of all debris (by weight) we tested against across 3 different floor types. In terms of raw cleaning power it just couldn’t get much better than this.
For more information or to buy the Roomba i3+ see here.
Updates
October 5, 2020 – Updated the page with our completed testing data and test photographs. Clarified a number of sections based on our data to provide a more complete and accurate picture of performance, features, and usability.
September 30, 2020 – Initial version of the page was published. Initial version was pre-test format, based on specs, features, and comparative performance to similar models we’ve previously tested. Full testing data and complete review will be available as soon as the robot arrives at our office.
Self-Empty Dust Bin That’s Less Expensive
Design – 99%
Performance – 99%
Quality – 96%
Usability – 100%
Value – 95%
98%
Summary
The Roomba i3+ is a robot vacuum with digital mapping, app control, and a self-empty dust bin. The i3+ is the least expensive model on Roomba’s lineup that also contains a self-empty dust bin. It uses iRobot’s systematic navigation technology to digitally map your home, which allows for serviceable navigation. It misses out on room-named cleaning and keep out zones, a feature you’ll find on the more expensive S9+ and i7+. Nevertheless, the i3+ packs a lot of value into the price point, the most significant of which is the self-emptying dust bin.
Which Self Emptying Robot is Better?
Over the past few weeks, I’ve been testing and writing about self-emptying robot vacuums.
These two brands are pioneers in this industry: Shark and iRobot. And for this article, we’ll be comparing two of the cheaper alternatives – the Shark IQ and Roomba I3+.
These two models are similar but different in many ways, and we’ll be unpacking those below.
A quick overview of the Shark IQ and Roomba I3+
I put all robot vacuums through a rigorous series of tests to check how it performs and holds up. These experiments are designed to spot potential weak points that you wouldn’t see otherwise.
Shark IQ
Airflow: 18.87 CFM
Deep cleaning: 80%
Mopping: No
Auto empty: Yes
Auto empty dustbin capacity: 1.8 liters
Bag capacity: No bag (bagless)
Navigation: Smart Navigation
Map saving: Yes
Number of maps: 1
Containment: Yes
Selective room cleaning: Yes
Recharge & Resume: Yes
Dustbin capacity: approx. 400ml
Water tank: N/A
Side brush: Two
Battery: 2990 mAh Li-ion
Run time: 60 minutes
Noise: 64.8 dB
Roomba I3+
Airflow: 7.27 CFM
Deep Cleaning: 84. 7%
Mopping: No
Auto empty: Yes
Navigation: Smart Navigation
Map saving: Yes
Containment: No
Selective room cleaning: Yes
Recharge & Resume: Yes
Rubber extractors: Yes
Dustbin capacity: 400ml
Side brush: One
Battery: 1800 mAh Li-ion
Run time: 75 minutes
Noise: 64.9 dB
* If you click this link and purchase, we earn a commission at no additional cost to you.
Table of Contents
Airflow tests were done using an anemometer. I rubbed 100 grams of sand on mid-pile carpet for deep cleaning tests, weighed the dustbin empty, then full, and subtracted to get the results.
Noise levels are taken by a sound meter from a few feet away. The results you see are from the highest setting.
Dustbin and auto-empty capacities are taken from manufacturer sites, but for Roomba, it’s just an estimate (based on the eye test) since iRobot doesn’t specify it.
Introduction to the Shark IQ and Roomba I3+
As mentioned earlier, Shark and Roomba are pioneers with auto-empty robot vacuums.
iRobot was the first to introduce it when they launched the I7+. Shark introduced the IQ series afterward as a cheaper alternative to the more premium Roomba options.
Pioneer Budget Auto Empty Robot: Shark IQ
Shark introduced the IQ auto empty robot as a “budget” alternative to the Roomba I7+.
But compared to cheap self-empty options now, the price isn’t considered as such.
However, during the time, it was, and you could say it’s a game-changing product, paving the way to what we have now.
The early Shark IQ options had one fatal flaw – it lacked a floor tracking sensor, making it difficult to create maps.
Often, it took many runs to save the map successfully, and video reviews have confirmed this issue.
Newer variants don’t have this issue, and I have one of the second-generation IQs.
The Shark IQ optical sensor is beside the right wheel assembly (check photo).
It took only a single run to create the map, so make sure to get the variant with the floor tracking sensor to avoid this issue.
The IQ has a bagless self-empty dock with a 1.8-liter capacity – easily the smallest of all self emptying robots I’ve tested.
Depending on your preference, this could be a plus with the cost savings of not purchasing bags.
But there’s exposure to allergens emptying it. If you’re not careful, some debris may spill on this area.
It relies on a top-mounted camera and floor tracking sensor to create the map and track location, similar to the Roomba I6 and S9.
Underneath it has a twin side brush system with single prongs that spins at the slowest pace.
While it doesn’t scatter debris as much as Roomba, it’s much worst at edge cleaning.
Shark says that the IQ has an active anti-tangle system, which I’ve tested, but it only works for shorter five-inch hair.
Shark IQ IR101AE with Self-Empty Base and Wi-Fi
$392.50
BUY NOW FROM AMAZON
We earn a commission if you click this link and make a purchase at no additional cost to you.
06/11/2022 04:45 am GMT
Cheapest Roomba Self Empty Option: Roomba I3+
After launching the Roomba I7+ and S9+, iRobot set its sights on the budget auto empty niche with the I3+.
It’s currently their cheapest self-emptying robot to date.
One feature lacking is the VSLAM (or Visual SLAM).
VSLAM is an algorithm relying on a top-mounted camera and floor tracking sensors to create and save maps.
The lack of a VSLAM means that while the Roomba I3+ can draw maps (thanks to the optical sensor), it cannot save them.
Thus it doesn’t have access to advanced navigational features such as keep-out zones or selective room cleaning.
It functions similarly to the more expensive I6+/I7+ but without containment and zoned cleaning features.
This variant shares the same components as its more expensive sibling, so cleaning results aren’t far off.
We earn a commission if you click this link and make a purchase at no additional cost to you.
06/11/2022 02:35 am GMT
Similarities between the Shark IQ robot and iRobot Roomba I3+
We’ll look at the similarities between these two auto self empty robots in various facets.
1. Shape
Both options utilize a round shape with a minimalist interface.
One difference is that the IQ has a top-mounted camera, and iRobot does not, highlighting the variation with their navigational algorithms.
Another difference is the diameter, with Shark IQ being smaller at 12.8″ versus the I3+’s at 13.34″.
2. Dustbin placement and capacity
The Shark IQ and Roomba I3+ have similar-sized, rear-mounted dustbins at 400 milliliters.
Shark’s dustbin has a wider opening making it easier to clean or empty (should you choose the robot-only option).
The Roomba I3’s dustbin has a narrower opening, making it more challenging to clean or empty.
Since these products have the automatic self-emptying feature, dustbin volume shouldn’t be a deciding factor.
3. Auto Empty Dock
Piggy-backing on the previous point. These robots have a self-emptying base station that empties the robot’s dustbin.
One difference is the disposal system. iRobot has a bagged system, while Shark utilizes a bagless design.
4. Recharge and Resume
These variants have recharge and resume – a feature that instructs the robot to recharge then continue cleaning (where it left off) if it doesn’t finish the cleaning cycle.
Differences between the Shark IQ and Roomba I3+
Now, let’s look at the differences between these robots.
1. Navigational algorithm
The most significant variance internally is the navigational algorithm that each robot utilizes.
Shark relies on VSLAM, which is a more advanced algorithm that offers map saving and containment features.
In comparison, the I3+ relies primarily on gyroscopes and an optical floor sensor to track its location.
Yes, it can draw maps thanks to the floor sensor, but it cannot save them. Therefore it lacks containment and zoned cleaning features present in Shark.
It’s a reason why iRobot could bring the price further down.
2. Brush design and layout
Another difference is the brush design, as this photo shows.
The Roomba I3+ utilizes iRobot’s patented counter-rotating extractors that are among the best at agitation and carpet cleaning performance.
In comparison, Shark uses its own patented design – the self-cleaning brush roll similar to the Vertex cordless with an active anti-tangle system.
Another difference is the number of side brushes. Roomba has a single-side brush, while Shark utilizes two single-pronged side brushes.
3. Battery and Run Time
Run time will vary with these robots. The Shark IQ has a shorter range at 60-minutes versus the Roomba I3+ at 75-minutes, despite having the larger 2990 mAh li-ion battery.
But it’s not a surprise since the IQ has the more powerful motor and airflow of 18.87 CFM versus the I3+’s output of 7.27 CFM.
4. Self Empty Dock Design
These robots use varying self-emptying dock designs.
The Roomba I3+ has a ramp-style design, where the robot sits on a ramp, while the Shark IQ relies on a vertical port.
If you’re familiar with my YT channel and blog, you’ll know that my preference is the former, as the ramp offers better stability.
Vertical ramps don’t have as much since the robot’s outlet port and the dock’s inlet port need a proper alignment for the self-emptying process to work.
These arrows point to the base station’s inlet and robot’s outlet ports. If these don’t line up, debris may spill on the surface, creating a bigger mess.
It’s a non-issue on hard surfaces since it has a solid base. But the alignment issue props up on carpets.
Shark rectifies this issue by offering the SharkMat – an accessory that places the robot on a solid surface to address it.
But it’s an added expense and may not work on thicker pile carpets.
5. Base Station Dirt Capacity and Size
The auto empty dirt volume also varies, with the Roomba I3+ having the larger capacity at 2.5 liters.
Shark’s capacity is a bit smaller – at 1.8 liters and please note it’s a bagless system, so there’s no need to purchase bags regularly.
One plus with the Shark IQ’s self-emptying station is its compactness. Place it beside a Roomba base station, and you can see the size difference.
It has a handle, making it the easiest of all self-emptying robots to move around.
App features
Next, we’ll look at the various app features of these robots, the similarities, and the differences.
Both options don’t have a remote, so users will need to download their respective apps to unlock all the features.
Please note that these apps are only compatible with 2.4G WIFI and not 5G.
Map saving [Shark IQ only]
Thanks to VSLAM, the Shark IQ can save maps.
Unfortunately, it only saves one map level, which defeats the purpose of its base station’s portability.
Containment [Shark IQ only]
Map saving has added benefits and one of which is adding containment zones.
The SharkClean app has access to no-go zones, which are boxed areas off-limits to the robot.
However, it lacks an invisible wall feature, so users cannot block diagonal areas on the map.
None of the VSLAM robots I’ve tested so far have this feature, but the Shark IQ does have a magnetic tape that serves this purpose.
It’s an old-school and cruder approach to a virtual wall, but it can help block doorways.
Evacuate and Resume [Shark IQ only]
The SharkClean app has this feature that tells the robot to base after 30 minutes to empty the dustbin.
It’s a feature I don’t see in other apps and helpful for large or dirty spaces to ensure the dustbin doesn’t overfill.
Cleaning Passes [Roomba I3+ only]
One advantage the Roomba I3+ has over the Shark IQ is thoroughness.
The iRobot app has a provision to do a two-pass run versus the IQ’s default one-pass run.
Add the dirt-detect feature – it beats the IQ easily in this area, despite the latter having the extended run feature, which didn’t work as advertised during tests.
Scheduling
Both robots have a scheduling feature, so consumers can automate the vacuuming task and take advantage of the auto-empty feature.
But only the SharkClean app can schedule multiple runs per day – up to three. One run in the morning, afternoon, and evening.
The Roomba I3+ app can schedule more runs per day.
But with a minimum gap of three hours per run.
iRobot did this (I’m guessing here) because of the short-range to give the robot enough time to recharge.
Navigation Comparison
Technically, both robots have smart navigation, meaning each can track its location in its internal map.
One difference is the algorithm used. Shark IQ has the VSLAM algorithm reliant on a top-mounted camera and a floor tracking sensor for navigation and tracking.
Since it uses a camera, it relies heavily on a light source to function. It moves in straight lines, but I noticed it going in the shortest round from end to end.
Thanks to the gyroscopes and optical floor sensor, the Roomba I3+ moves in neat rows, even without VSLAM.
It actually utilizes a crisscross pattern similar to the Roborock S7+, which provides more thoroughness.
Both are decent at avoiding furniture and not getting wedged on six to eight-legged office chairs, which is an issue with random navigating robots.
Coverage and Efficiency Comparison
Another test I do with these robots is the coverage and efficiency test. The coverage part involves checking how much debris it picks up in a single two-pass cycle.
And the efficiency part checks how long it takes to complete the cycle.
There wasn’t much difference with the results. Both were decent, picking up most of the quaker oats.
Shark was above-average given it only went around once, picking up most debris scattered in the middle portions, but it struggled at the edges.
Roomba I3+, despite its two-pass run, didn’t do much better than the Shark IQ.
One glaring issue is the fast-spinning side brush that scattered debris, but it was better cleaning the edges.
The Shark IQ completed its run in around 18 minutes, while the Roomba I3+ finished at 22:43 minutes.
Please realize that the Shark IQ only has a one-pass cycle, even with the extended run feature turned on, which almost doubles the I3+’s result.
Considering it had a crisscross navigational pattern, the Roomba I3+’s result is decent but not as efficient as the Roborock S7+.
Airflow Comparison
Shark IQ wins this comparison as it has more airflow than the Roomba I3+, even in its lowest power setting.
One thing going for the Roomba I3+ is its counter-rotating extractors, which make up for the airflow disparity.
It’s one of the better carpet cleaning robot vacuums, especially deep-cleaning embedded dirt (more on this below).
Cleaning Performance Comparison
Roomba was better with the overall scores despite the massive disparity in airflow. But that was buoyed by its higher deep cleaning results.
Shark was better with most surface debris tests: hard floor, carpet, and sand on hard floors.
Model
Shark IQ
Roomba I3+
Overall
91.84%
92.39%
Hard Floor
98. 25%
95.3%
Sand on hard floor
97.3%
95.5%
Carpet (Surface Pickup)
96.82%
96.22%
Carpet (Deep Cleaning)
75%
84.7%
These results show the importance of airflow in determining cleaning results. It’s not the end-all-be-all stat, but it’s critical in determining how a robot vacuum will perform.
Which is better on hard floors: Shark IQ or Roomba I3+?
One barometer I use for determining hard floor performance is how much sand it picks up. The Shark IQ picked up a few more percentage points than the Roomba I3+ (97.3% vs. 95.5%).
Here’s a before and after shot for the Shark IQ.
And Roomba I3+.
It picked up more because of the higher airflow, plus the slow spinning side brush that didn’t scatter as much.
Edge Cleaning Comparison
One downside to the slower spinning side brush is its inability to clean edges effectively.
I’ve already pointed this out in the coverage test, but the edge cleaning experiment confirms this.
The Roomba I3+ didn’t pick up everything, but it was better than the Shark IQ.
Hair Wrap Comparison
Shark IQ was much better overall, with shorter five-inch strands.
You could see the active anti-tangle system at work as it picked up nearly everything, only a few strands wrapped on the brush.
Before the Shark IQ review, I was expecting more, honestly. Unfortunately, it stalled during the seven-inch test, and this much was on the brush.
The Roomba I3+ did better with longer 7-inch strands, but the difference wasn’t much.
But with shorter five-inch strands, it only picked up 58%, and here’s how the brush looks after the experiment.
Which is better on carpets, Shark IQ or Roomba I3+?
There wasn’t much difference with surface debris on carpets.
The Shark IQ was slightly better with surface dirt (96.82% vs. 96.22%) but lagged behind the Roomba I3+ at deep cleaning tests (75% vs. 84.7%).
Shark’s higher airflow was a factor with surface debris.
However, Rooba’s extractors were much better with embedded dirt, along with the more thorough navigation and dirt-detect system.
Run Time Comparison
The Roomba I3+ utilizes a smaller 1800 mAh Li-ion battery and yet still runs longer at 75 minutes.
One reason could be the smaller motor that doesn’t require as much current.
Shark IQ has a larger 2990 mAh Li-ion battery, but it only runs a maximum of 60 minutes.
Having the recharge and resume feature does mitigate the short range of these robots.
But if cleaning a larger home is a must, then you’ll have to look at the Yeedi Vac Station that runs for up to 200 minutes.
Noise Comparison
The Shark IQ produced less noise than the Roomba I3+, topping at 64. 8 decibels (versus the I3+’s 64.9 dB) despite having more airflow, which is impressive.
Roomba products tend to be noisy, and the I3+ is no exception.
Maintenance
Part of robot vacuum ownership is maintenance. It’s essential to clean different components to prevent unnecessary wear and tear. I’ll show you which parts to check and replace in specific intervals.
Primary brush: It’s the most abused component of any robot vacuum since it picks up debris. Check and clean once a week to remove dirt and hair accumulated on the roller and axles.
Side brush: Next most abused part is the side brush. Likewise, detach and clean once a week to remove any hair and debris sticking on the arm and base.
Dustbin and filter: Even with the self-empty base, dirt will accumulate inside the dustbin. Fortunately, for these variants, their dustbins are washable, making the process easier. Do this at least once or twice a month. However, the filter isn’t washable, so remove washing. Tap the filter on a solid surface to dislodge dirt and replace once every two or three months.
Drop sensors: These sensors are located underneath the robot. Use a clean, dry microfiber cloth to wipe off any residue dust and contaminant, preventing an error code firing and disabling the robot.
Robot body: Wipe the robot body to remove any fingerprints and smudges at least once a month.
Auto empty station: Keep the ports going into the auto-empty stations clean and free from any obstruction.
Bag and base station dustbin: Replace the Roomba I3+ bag when full. For the Shark IQ, empty the dustbin over a wide trash bin. Clean the Shark IQ base station filter if it’s dirty.
Availability of Parts
Shark and iRobot are two of the more popular robot vacuum options. There will be a plethora of parts available for these brands.
The Roomba I3+ and I6+/I7+ share many components, so these will be in abundant supply on Amazon or the iRobot website.
Shark also has plentiful parts available from major online stores like Amazon or the SharkClean website.
One advantage for iRobot is the availability of internal components such as the side brush motor or wheel module, even on their website.
Product Specifications
Where can I buy these robots?
The Roomba I3+ and Shark IQ are available in online stores like Amazon. Check the links below for more details.
Roomba I3+ on Amazon
Shark IQ Aut Empty on Amazon
Disclosure: I will earn a commission if you purchase through any of the links above, but at no extra cost to you, so it’s a win-win for us!
Which is the better option: Shark IQ Robot or the iRobot Roomba I3+
After testing these robots comprehensively, each option offers compelling reasons to buy.
The Shark IQ is the cheaper alternative with a bagless dock, so there’s no need to purchase bags over its lifespan and save money long term.
In comparison, the Roomba I3+ offers a more thorough vacuuming performance with its crisscross pattern but lags with advanced navigational features.
The absence of VSLAM means it doesn’t have map saving and containment features.
5 Reasons to Choose the Shark IQ Robot
Cheaper alternative: The Shark IQ offers a more affordable option with a self-emptying base.
No bags: Its bagless base station means a reduced cost of ownership since you don’t have to replace bags continually.
Excellent for shorter hair: Shark’s anti-tangle system works well with shorter five-inch strands but may struggle with longer hair.
Compact auto-empty dock: The slender IQ self-empty station with the handle is easy to transport around the home.
Decent at surface debris: The Shark IQ scored higher than the Roomba I3+ with most surface debris tests.
5 Reasons to Choose the Roomba I3+
More thorough cleaning: The crisscross navigational pattern and the dirt-detect sensor make the I3+ more meticulous at vacuuming homes.
Better at deep cleaning: iRobot’s counter-rotating extractors are some of the best at picking up embedded dirt, and the I3+ is no exception.
Less exposure to allergens: Its bagged system is less messy to empty and eliminates exposure to allergens.
Base stability: The ramp-style base station is usable on different surfaces.
Parts availability: iRobot offers a wide range of replacement parts options in case anything breaks. And its modular design only requires a Philips screwdriver to replace.
The Verdict: A Close Call and Will Depend on Budget and Surface
These robots are very close in terms of cleaning performance and navigation.
Neither outperformed the other in any of the tests by a significant margin, so choosing one will boil down to what surface you need to clean and what features to prioritize.
The Shark IQ would be my choice for those who want to spend less and not mind the lack of thoroughness.
If you value thoroughness, you can get around this limitation by scheduling it up to three times per day.
It does well enough on surface debris to warrant consideration but is still decent with embedded dirt.
Some consumers who commented in my video review told me that they prefer the bagless system as it offers better cost savings since there’s no bag to purchase.
The Roomba I3+ is an ideal option for people who want their robot vacuums to pick up embedded stuff on carpet.
Its counter-rotating extractors are fit for this task.
Plus, it has more thorough navigation, meaning it will clean in a crisscross pattern and do extra passes on filthier areas.
Yes, it’s more expensive, but the availability of parts and modular design bodes well for long-term ownership.
iRobot Roomba i3 – review of the
robot vacuum cleaner
iRobot Roomba i3 is a more affordable version of the top i7 model that we met in 2019. The vacuum cleaner is cheaper, has simpler movement algorithms, but still cleans well and is compatible with the Braava M6 robotic floor polisher, as well as the docking station for cleaning the dust container. I will say right away – I liked the vacuum cleaner and after meeting its price does not seem high.
Course EXCEL FOR BUSINESS
Find out how to effectively use Excel in your business to collect, analyze and visualize data.
Learn about the course
Contents
1 Contents
2 iRobot Roomba i3 design and construction
3 Control
4 Vacuum cleaner in operation
900 21
What’s in the box
The vacuum cleaner comes with a compact charging dock, a replaceable HEPA filter for the container and a set of documentation. Spartan set, nothing more. The robotic floor polisher is sold separately, and there is also a Roomba i3+ model on sale, similar to the simple i3, but with a slightly different container and Clean Base automatic cleaning system. You can read more about it in the review of the Roomba i7+ model.
iRobot Roomba i3 design and construction
Describing the appearance of robotic vacuum cleaners is usually pointless. The design challenge for these gadgets is to blend in and be practical enough for a device that will bump into your walls on a regular basis. In terms of design, Roomba i3 fully meets these criteria.
The vacuum cleaner is very similar to the top model i7, but there is a minimum of gloss, it is strictly in the right places. The top panel is made of practical rough plastic with fabric coating imitation. Luckily for the durability parameter, it’s just plastic. Of course, the vacuum cleaner will quickly become covered with scratches, you need to be prepared for this.
The test was no longer a new copy, but during my use, other natural traces of operation appeared on it. If you do not look closely at the case, then scuffs and scratches are invisible.
In terms of layout, everything is very standard for this category of household appliances. Round, flattened shape, bumper with sensors at the front, another sensor at the top, three-button control panel on the top panel, and a dust bin and filter eject button at the back. The bottom is also nothing new – three wheels, a pair of rubber brushes and an additional three-beam brush for cleaning in hard-to-reach places.
DATA ANALYST course.
Become a data analyst from scratch, in total for 4 months!
More about the course
Control
Formally, the vacuum cleaner does not even need an application for a smartphone to work. It is enough to install the charging dock in a place where there will be a free space of about 1 meter on the right and left, charge the battery of the vacuum cleaner and press the cleaning button. After that, the vacuum cleaner itself will begin to scan the room and clean in the free space.
But, if you want to get maximum control over the vacuum cleaner, then you will need the proprietary iRobot Home application (Android, iOS), which has undergone a noticeable redesign and a more convenient interface than at the time of our last acquaintance with the products of this manufacturer.
In the application, you can create different profiles, enable scheduled cleaning and receive notifications when the container is full. The function of automatically starting cleaning at the moment when you leave the apartment seemed very interesting to me. This feature works by tracking the geolocation of your smartphone. You can also set the time interval before your return, at which time iRobot Roomba i3 will finish cleaning.
Roomba i3 can be integrated into a smart home system thanks to IFTTT support. For example, the start or end of cleaning can be tied to the operation of certain sensors. It’s in theory. During testing, I did not have the opportunity to test the operation of this function.
What was a little confusing was the support for the 2.4 GHz Wi-Fi standard, without 5 GHz support. This is not to say that this is a drawback, but the older i7 + model supported 5 GHz.
Vacuum cleaner at work
I’ll say right away that the vacuum cleaner creates a noticeable background noise, according to my measurements, its level was 60-65 dB. This is not harmful to hearing, but the silence is noticeably disturbed. But, on the other hand, the quality of cleaning Roomba i3 fully justifies this.
I really liked the cleaning algorithm, the vacuum cleaner moves around the room in zigzags and does not miss any of the places where it understands that it can pass. And if the possibility of passage is not obvious, at first glance, then the vacuum cleaner will make several accurate attempts to get there, turn around and go further. It can be both openings between a table and a chair, and other hard-to-reach places between furniture and household appliances.
iRobot claims that the i3 uses simpler algorithms than the older Roomba i7. But I don’t have a single complaint about the cleaning quality of the i3 and I didn’t notice any simplification.
The vacuum cleaner cleans really well, which I concluded from the amount of dust and other particles in the container after cleaning. And also in the footprints on the carpet, the trampled pile of which the vacuum cleaner lifted with each passage. Here it is worth saying thanks not only to the great suction power, but also to the rubber rollers, which capture everything that is possible from the surface and do not require additional cleaning. Unlike conventional brush rollers, the hair from which is then still a pleasure to remove.
The container is quite easy to clean from dust, then it can be washed under running water, after removing the HEPA filter, of course. The i3+ model that comes with the auto-cleaning dock uses a slightly different container that matches the shape of the i3, but has a valve to connect to the Clean Base, which cleans it like a regular vacuum cleaner.
Recall that Clean Base removes dust from the robot vacuum cleaner by sucking it out of the container and transferring it to a regular bag, as in a standard vacuum cleaner. And this, in turn, allows you to make the maintenance of the vacuum cleaner more rare.
Battery life varies depending on how dirty the surface is in the room being cleaned. The manufacturer claims the possibility of cleaning up to 150 square meters on a single charge or 75 minutes of operation. But, as I said, the final operating time will depend on the amount of dust, as well as the mode of operation. It can be either a single pass or a double pass.
English Executive Leadership Course.
Leadership is a valuable practice and a special way of thinking.
Sign up for the course
The points show the areas with the highest level of pollution
charge, then continue cleaning from where it left off.
4.5
ITC.UA score
Pros:
cleaning algorithms and quality, convenient and functional control application
Cons:
high noise level in operation, price
Conclusion:
I really liked the iRobot Roomba i3. During testing, the vacuum cleaner cleaned my apartment every day in far from the simplest conditions for several weeks. A lot of dust, a lot of different obstacles on the way, but, if possible, he coped with these tests with honor. Yes, its price is slightly higher than some of its competitors, but given the quality of cleaning, it is completely understandable for me. I did not find any shortcomings in this model related to the quality of cleaning or software algorithms and I can recommend it for purchase. Of course, there are nuances that should be taken into account, but this vacuum cleaner copes with its main function.
Specifications
iRobot Roomba e5 vs iRobot Roomba i3: What is the difference?
Smartfond -Cardiac Enopsis Headphones
41 Ballla
IROBOT ROOMBA E5
44 BALLLA
IROBOT ROMBA I3
€ 429 9000 0094 449
€ 429
Plus EVO
Comparison winner
€ 449
vs
54 facts in comparison
iRobot Roomba e5
iRobot Roomba i3
i3?
Cleans all types of floors?
Has a dirt detection sensor?
0. 3l more dust bag? 0.7l vs 0.4l
Has carpet detection?
15min longer cycle time? 90min vs 75min
Charging time 2h less? 3h vs 5h
1.83x more battery capacity? 3300mAh vs 1800mAh
1.03kg lighter? 3.27kg vs 4.3kg
Can map the interior?
Has a HEPA filter?
5dB higher acoustic noise level? 60dB vs 65dB
Do you have route building?
Self cleaning?
Has voice prompts? iRobot Roomba 692
iRobot Roomba i3
vs
iRobot Roomba 960
900 02 iRobot Roomba e5
vs
iRobot Roomba e6
iRobot Roomba i3
vs
iRobot Roomba e6
iRobot Roomba e5
vs
Xiaomi Mi Robot Vacuum Mop Pro
iRobot Roomba i3
vs
iRobot Roomba 675
iRobot Roomba e5
vs
iRobot Roomba 960 9 0003
iRobot Roomba i3
vs
iRobot Roomba i7 Plus
iRobot Xiaomi Mi Robot Vacuum Mop Pro
iRobot Roomba e5
vs 90 003
Roborock E5
iRobot Roomba i3
vs
Xiaomi Mi Robot
iRobot Roomba e5
vs
iRobot Roomba 675
iRobot Roomba i3 900 03
vs
OKP Life K2
iRobot Roomba e5
vs
iRobot iRobot Roomba i3
vs
iRobot Roomba 698
iRobot Roomba e5
vs
002 iRobot Roomba i3
vs
Roborock S7
Price Comparison
iRobot Roomba e5
Buy Used:
€279
Product
Shop
Price
App-steuerbarer. ..iRobot Roomba e5 (e5154) App-steuerbarer Saugroboter (Staubsauger Roboter) mit Zwei Gummibürsten für alle Böden, Ideal bei Haustieren, Individual Anpassung per App, Kompatibel mit Sprachassistenten
iRobot 4649329 Roomba e5 Serie- Original…iRobot 4649329 Roomba e5 Serie- Original Bürstenmodul Reinigung Kopf Modul Pinsel Motor
€58
iRobot Roomba e5 (e515240)
90 365
€329
iRobot Roomba i3
Product
Store
Price
9036 6
iRobot Roomba i3 (i3152) App-steuerbarer…iRobot Roomba i3 (i3152) App-steuerbarer Saugroboter (Staubsauger Roboter), 2 Gummibürsten für alle Böden, Ideal bei Haustieren, Individual Anpassung, Kompatibel mit Sprachassistenten, Farbe Cool
€449
i3+ (i3558) 9iRobot Roomba i3+ (i3558)
€447
903 54
iRobot Roomba i3+ (i3558)
€469
iRobot Roomba i3+ (i3558)
€469
User Reviews
Cleaning Power
Cleaning Speed
Unknown. Help us offer a price. (iRobot Roomba e5)
Unknown. Help us offer a price. (iRobot Roomba i3)
Faster devices will save you time and therefore more convenience.
cleans all types of floors
✔iRobot Roomba e5
✖iRobot Roomba i3
Designed for all types of floors.
cleaning modes
Unknown. Help us offer a price. (iRobot Roomba i3)
The device provides a wider range of different cleaning options.
wipes
✖iRobot Roomba e5
✖iRobot Roomba i3
The device wipes the floor.
has a dirt detection sensor
✔iRobot Roomba e5
✖iRobot Roomba i3
The device recognizes the most dirty areas and ensures that more time is spent there to thoroughly clean them.
Includes electrostatic filtration system
✖iRobot Roomba e5
✖iRobot Roomba i3
Air moving through the device creates and maintains an electromagnetic charge. This attracts particles of very light dust.
has UV light
✖iRobot Roomba e5
✖iRobot Roomba i3
The device kills germs, viruses and bacteria with an ultraviolet light bulb.
Power
battery capacity
3300mAh
1800mAh
Battery charge, or battery capacity, is the amount of electrical energy stored in a battery. The higher the battery charge, the longer the battery life.
running time
The device works longer without having to be charged.
charging time
Time required to fully charge the battery.
power consumption during operation
Unknown. Help us offer a price. (iRobot Roomba e5)
Unknown. Help us offer a price. (iRobot Roomba i3)
How much power the device consumes when it is running.
Has overheat indicator
✖iRobot Roomba e5
✖iRobot Roomba i3
This prevents the device from overheating caused by a system problem.
has a replaceable battery
✖iRobot Roomba e5
✖iRobot Roomba i3
User can replace the battery in case of failure
automatic shutdown
✔iRobot Roomba e5
✔iRobot Roomba i3
This feature saves power when The device is not being used or is being charged. It also shuts down the machine if it is accidentally trapped in a tight space.
standby power consumption
Unknown. Help us offer a price. (iRobot Roomba e5)
Unknown. Help us offer a price. (iRobot Roomba i3)
How much power the device consumes when it is off but still online.
Features
can map your interior
✖iRobot Roomba e5
✔iRobot Roomba i3
The vacuum cleaner can map your interior. It can then be viewed in the app and enable various features, such as selecting a specific room to clean.
supports the zone restriction function
✖iRobot Roomba e5
✖iRobot Roomba i3
Using the app’s mapping function, you can mark certain parts of your home so that the vacuum cleaner cannot clean them.
smartphone – remote control
✔iRobot Roomba e5
✔iRobot Roomba i3
Allows you to use your smartphone as a remote control.
with obstacle sensor
✔iRobot Roomba e5
✔iRobot Roomba i3
The device detects an approaching obstacle such as furniture or a vase and slows down to avoid it.
has problem area cleaning function
✖iRobot Roomba e5
✖iRobot Roomba i3
Using the app’s mapping function, you can mark an area that needs special attention. This comes in handy if parts of your home need extra cleaning on a regular basis, or if you accidentally spill something.
self-cleaning
✖iRobot Roomba e5
✔iRobot Roomba i3
The vacuum cleaner automatically dumps dust into a larger dustbin located on the charging station. It usually collects dust for 30 days or more, which means that you will have to empty it much less often.
has a carpet detection function
✔iRobot Roomba e5
✖iRobot Roomba i3
Robot vacuums with this function can automatically detect carpets and increase suction power accordingly. It also allows floor cleaners to avoid carpeting.
does not get stuck
✔iRobot Roomba e5
✔iRobot Roomba i3
The device has a design that allows it to move around without getting caught in power cords and other objects.
Apple AirPods Pro (1st generation) vs Bose QuietComfort Earbuds
It seems like everyone has the Apple AirPods Pro these days, but plenty of competitors have risen out of the shadows. The Bose QuietComfort Earbuds are related to their over-ear counterparts, the QuietComfort 35 II and QC 45, and the buds share many of the draws of the AirPods Pro (1st generation). Let’s explore whether one of these competing active noise canceling (ANC) earbuds are the better buy.
Editor’s note: this versus article was updated on June 6, 2023, to add new comparison charts, add more microphone samples, and add a controls section. We also ensured that all information is current and updated the format to match our current style.
Apple AirPods Pro (1st generation) vs Bose QuietComfort Earbuds: Which earbuds have a better design?
Lily Katz / SoundGuys
You can quickly switch between devices if you download the Bose Music app.
The Apple AirPods Pro (1st generation) and Bose QuietComfort Earbuds take very different design approaches to what makes a good pair of earbuds. The AirPods Pro (1st generation) have stems and includes a variety of silicone ear tip sizes. This combination means they are comfortable and stable in your ears. Each Bose earbud is shaped like a bulky pill. Bose features its StayHear Max wing tips, which are comfortable and maintain a stable fit. The Apple and Bose buds in question have an IPX4 rating, so they make for suitable workout earbuds.
How do you control the Bose QuietComfort Earbuds and Apple AirPods Pro?
The AirPods Pro have a lot of helpful touch controls. Rather than administer the controls with taps, you must squeeze an AirPod stem. You can squeeze the stems to activate Transparency Mode — which is like the opposite of ANC — play or pause music, or skip songs.
AirPods Pro controls:
INPUT (stems)
ACTION
One press
Play/pause/answer call
Two presses
Next track
Three presses
Previous track
Press and hold
Toggle ANC/Adaptive Transparency modes
“Hey Siri”
Change volume, request directions, playback control, receive messages, and more
The QuietComfort Earbuds also have touch controls and Transparency mode. The biggest difference between the AirPods Pro (1st gen) and Bose QC Earbuds controls are that Bose lets you adjust the volume from the earbuds. To change the volume on the AirPods, you need to say “Hey Siri,” when paired with an iPhone or reach for your phone.
Bose QC Earbuds controls:
Action
Left side
Right side
Action
Two taps
Left side
Cycle through favorites (ANC modes)
Right side
Pause/play music
Action
Left side
Right side
Pickup/end phone call
Action
Hold
Left side
Skip song
Right side
Access smart assistant
Action
Left side
Check battery level
Right side
Reject incoming calls
Action
Remove/insert
Left side
Pause/play music
Right side
Pause/play music
Action
Left side
Auto Transparency mode (remove)
Right side
Auto Transparency mode (remove)
Action
Swipe
Left side
Right side
Volume up/down
Does the Bose QuietComfort Earbuds or Apple AirPods Pro have better connection?
The AirPods Pro is hard to beat for iOS users.
The AirPods Pro use Bluetooth 5.0 and supports the SBC and AAC codecs. Connection quality is generally good, but some users have reported issues. Updating the firmware version usually fixes these issues, but if you’re still experiencing problems you’ll need to contact Apple’s customer support. Unfortunately, firmware updates are only available to iPhone users, occurring automatically when the iPhone updates.
The Bose QuietComfort Earbuds connect the same way to iOS as it does to Android. This uses Bluetooth 5.1, which is slightly more energy-efficient than the AirPods Pro with Bluetooth 5.0. This doesn’t matter much if you’re using an iPhone with the AirPods Pro because the h2 chip works wonders for energy efficiency. Like the AirPods, the Bose QuietComfort Earbuds support the SBC and AAC codecs, which means Android users won’t have a reliable, high-quality codec. AAC streaming quality is historically spotty on Android.
One of the main perks of using an iPhone with AirPods is streamlined connectivity.
Connecting the AirPods Pro to an Apple device is very easy, thanks to the embedded h2 chip. Once you open the AirPods Pro case a card on your iPhone will pop up, prompting you to connect the device. After establishing this connection, your AirPods Pro will connect to all devices attached to your iCloud account. Once you do this, you can set up things like Find My AirPods.
Pairing the AirPods Pro with an Android or Windows PC is a little more complicated, but not any more than any other brand of Bluetooth earbuds.
What software features do you get with the AirPods Pro and Bose QC Earbuds?
Lily Katz / SoundGuys
You can easily open the charging case with one hand.
The AirPods Pro are known for their array of software features, most of which are only available to iPhone users. Their Spatial Audio with head tracking mimics the experience of movie theatre surround sound. This feature is pretty advanced, as it can differentiate between you moving your head and the car or airplane you’re in making a turn, and adjusts the sound experience accordingly. Additional features include an ear tip fit test via your iPhone’s Settings app, automatic device switching via iCloud connection, and a battery optimization feature that helps protect the long-term health of the buds’ battery.
The Bose QuietComfort Earbuds don’t have a lot of specialized features like the AirPods Pro. Still, they have classic premium features like automatic ear detection, varying noise canceling levels, and quick charging. The Apple AirPods Pro also have all these features, except it only has three active noise canceling settings: On, Off, and Transparency Mode.
If you download the Bose Music app for the QuietComfort Earbuds, you can seamlessly switch between source devices and equalize the sound. The AirPods Pro doesn’t allow for customized EQ settings. The Bose earbuds do have a feature called Active EQ which adjusts the earbuds’ sound based on your surroundings. Similarly, the AirPods Pro has Adaptive EQ which adjusts the sound based on the shape of your ears.
Do the Bose QuietComfort Earbuds have better noise canceling than the AirPods Pro?
Lily Katz / SoundGuys
The Bose QuietComfort Earbuds (left) and Bose Sport Earbuds (right) both stay in place thanks to Bose’s ear tips.
Both the Apple AirPods Pro and the Bose QuietComfort Earbuds provide active noise canceling. The AirPods Pro can’t quite keep up with the best on the market, and won’t outperform the Bose QC Earbuds. As you can see in the chart below, the Bose QuietComfort Earbuds’ isolation and active noise canceling are more effective than the AirPods Pro out of the water.
Ten levels of noise canceling performance is a handy feature on the Bose QuietComfort Earbuds that allows you to tailor the amount of audio passthrough in any given environment. At the highest level, the ANC successfully blocks out loud droning sounds just as well as anything else on the market.
The Bose QuietComfort Earbuds block out much more noise across the board than the AirPods Pro.
Remember, active noise canceling is most useful for predictable low-end sounds like the rumble of traffic, or the droning sound of an airplane. For isolation from more dynamic high-end sound, a rubber tip with a good seal is the best defense against unwanted noise. Both the Apple AirPods Pro and Bose QuietComfort Earbuds offer this.
The battery life of Apple and Bose’s earbuds is similar
The Apple AirPods Pro address listeners’ complaints about a lack of seal from the previous generations.
True wireless earbuds are notorious for having poor battery life, and neither the Apple AirPods Pro (1st gen) nor Bose QuietComfort Earbuds are exceptions. The AirPods Pro last 5 hours, 6 minutes on a single charge, and the QuietComfort Earbuds last 5 hours, 29 minutes. Luckily, the AirPods Pro case holds 24 hours of additional charge and supports quick charging. On the other hand, the QuietComfort Earbuds case holds 12 hours of additional charge and supports quick charging.
True wireless earbuds tend to have long-term battery problems because the constant partial depletion and over-charging that occurs in the cases can wear out the battery over time. Apple has tried to combat this issue by including a battery optimization feature on the AirPods Pro, which prevents the battery from charging to 100%, except when you use them for longer listening periods. The AirPods technology learns your usage patterns to plan this out, but you can disable the feature if you don’t want it.
Apple AirPods Pro (1st generation) vs Bose QuietComfort Earbuds: Which buds sound best?
Bose and Apple’s earbuds sound similar.
The AirPods Pro and QuietComfort Earbuds take similar approaches, with sound signatures that closely follow our target curve.
As the chart above shows, the measured frequency responses of these two products aren’t actually that different. The Bose earbuds’ response dips slightly below our target in the lower midrange (200-500Hz), which can help with the perception of better bass performance. Above that, the Bose follows our target quite well, before rolling off in the high frequencies slightly earlier than the AirPods Pro; this is unlikely to be audible to most people.
Do Apple or Bose’s microphones sound better?
Lily Katz / SoundGuys
Even cats are fans of the Bose QuietComfort Earbuds.
The AirPods Pro (1st generation) do a very good job of relaying speech through the microphone. Regardless of the pitch of your voice, you shouldn’t have a hard time coming through clearly. The AirPods Pro also employs a speech-detecting sensor that, combined with the beam-forming microphones, effectively reduces background noise. You should come through fine whether you’re talking inside or on a busy street.
The Bose QuietComfort Earbuds has a decent microphone, too, though its tone is a bit harsher than the AirPods Pro microphone. The QuietComfort Earbuds mic also sometimes clips audio, which means slight distortion occurs.
After listening to the samples, let us know your preference for each. Then you can see how the rest of the world thinks!
Apple AirPods Pro microphone demo (Ideal conditions):
AirPods Pro (1st generation) microphone demo (Street conditions):
Should you buy the Apple AirPods Pro or the Bose QuietComfort Earbuds?
If you’re already neck-deep in the Apple ecosystem, you should probably get the AirPods Pro over the Bose QuietComfort Earbuds. Switching between listening to music from your MacBook and answering calls on your iPhone will be effortless, thanks to the h2 chip. Plus, you’ll benefit from battery optimization, firmware updates, and Spatial Audio. Don’t splurge on the AirPods Pro if you have an Android phone.
Apple AirPods Pro (1st generation)
Apple AirPods Pro (1st generation)
ANC support • Perfect for iPhones • Deep Apple integration
For iPhone users, not much else can compare
The Apple AirPods Pro offers more features and accessories than the base AirPods, including ANC. A worthy upgrade for any iPhone user if you can afford it!
See price at Best Buy
Save $69.01
See price at Amazon
Save $50.00
If you choose the Bose QuietComfort Earbuds instead, you’ll benefit from a more stable, workout-oriented fit in your ears, custom EQ, and Bluetooth 5.1. Save for the Sony WF-1000XM4, the Bose QC Earbuds have the best ANC of any true wireless earbuds, which makes sense, given Bose’s track record.
Which earbuds’ sound you prefer largely depends on your tastes. If you’re looking for strong bass, go with the Bose earbuds, and if you mostly care about vocals, go with the AirPods Pro. There are newer versions of both of these earbuds. The Apple AirPods Pro (2nd generation) ($179.99 at Best Buy) have replaced the first-gen AirPods Pro, and the Bose QuietComfort Earbuds II ($279 at Amazon) replaced the original QC Earbuds. Bose’s QC Earbuds II have stellar ANC but the default bass response is ridiculous.
Bose QuietComfort Earbuds
Bose QuietComfort Earbuds
Customizable ANC • 5h battery life • Various tip size
Bose QuietComfort earbuds offer high-quality sound. You can choose the degree of noise canceling and enjoy premium features like automatic ear detection.
See price at Amazon
Save $89.01
See price at Bose
Save $80.00
Frequently asked questions about the Apple AirPods Pro and Bose QuietComfort Earbuds
The ear tips are easier than most earbuds to swap out and fit on the Pixel Buds Pro.
If you have an iPhone, there’s really no point to paying a premium for the Pixel Buds Pro when you won’t be able to take advantage of many of their features. As far as Android earbuds go, the Pixel Buds Pro are a strong contender among ANC wireless earbuds. You get direct voice access to the Google Assistant, excellent ANC, and a more durable build than other options. The earbuds have an IPX4 rating, which is pretty standard, but the Pixel Buds Pro case has an IPX2 rating. We rarely see earbuds’ cases with durability ratings unless it’s something like the Jaybird Vista 2, known for its abnormal toughness.
Some may turn up their noses at the bass-heavy sound coming out of the Pixel Buds Pro, but it has its place. Plus, Google lets you equalize the sound through the Pixel Buds app for Android.
Yes, you can use either set of earbuds in mono mode. You can use either the left or right earbud for mono listening.
No, neither the Bose QuietComfort Earbuds nor the AirPods Pro supports multipoint. You can, however, use the AirPods Pro to seamlessly switch between devices associated with the same iCloud account.
Apple AirPods Pro (2nd generation) vs Bose QuietComfort Earbuds II
Austin Kwok / SoundGuys
Two recent arrivals in the active noise canceling (ANC) wireless earbuds space, the Apple AirPods Pro (2nd generation) and Bose QuietComfort Earbuds II are both updates to already beloved earbuds. ANC performance is neck and neck, but earbuds are more than just noise cancellers, they’re music-listening and smart wearable devices. We put both headsets head-to-head to see how they differ, and where the similarities lie.
Editor’s note: this article was published on October 17, 2022, and is the first version of the article. Updates will follow as the market changes.
What’s it like to use the Apple AirPods Pro (2nd generation) compared to the Bose QuietComfort Earbuds II?
The ever-recognizable Apple AirPods Pro (2nd generation) is a glossy white stemmed pair of true wireless earbuds. The case is also white, shaped like a rounded rectangle, and sports a silver lanyard loop and a speaker for locating the case through the Find My app. The earbuds and the case are IPX4 rated to handle water splashes—no problem. The earbuds come with four ear tip sizes, extra-small, small, medium, and large, so you can find the best fit.
Austin Kwok / SoundGuys
The AirPods Pro (2nd generation) and Bose QuietComfort Earbuds II have quite different industrial designs.
The Bose QuietComfort Earbuds II eschews the thin cylindrical stem for a flatter oval shape. You get three sizes of ear tips and “stability bands” (small, medium, large). The silicone stability bands work with the ear tips, keeping the earbuds secure in your ears. This makes the fit more stable and reliable than the AirPods Pro. While this can be good, we’ve experienced a loosening of these bands, which can cover the charging connectors. If your Bose earbuds aren’t charging properly, check the wraparound stabilizers before contacting support. Bose’s earbuds also merit an IPX4 rating and this, paired with the stabilizers, makes them a better pair of workout earbuds than Apple’s.
Like the AirPods Pro (2nd gen), the Bose case is also rounded and has a pairing/multi-function button on the back. You won’t find a lanyard loop or speaker built into the Bose QC Earbuds II case, though. Unlike the AirPods, which only comes in white, you get your choice of black or white with the Bose QC Earbuds II. You don’t really get to express your style with either set of wireless earbuds.
How do you control the Apple AirPods Pro (2nd generation) and Bose QuietComfort Earbuds II?
Lily Katz / SoundGuys
The pressure-sensitive stems support swipes to adjust the volume.
Controlling the AirPods Pro (2nd generation) requires you to use the earbud stems, which react to various presses and swipes. When paired with an Apple device, saying “Hey, Siri” allows you to make hands-free commands. Controls are customizable in the iOS or iPadOS Settings app.
INPUT (stems)
ACTION
One press
Play/pause/answer call
Two presses
Next track
Three presses
Previous track
Press and hold
Toggle ANC/Adaptive Transparency modes
Swipe up/down
Increase/decrease volume
“Hey Siri”
Change volume, request directions, playback control, receive messages, and more
Similarly, the Bose QuietComfort Earbuds II has a capacitive touch surface on the back of each earbud, using taps and swipes to control it as well. You can change controls in the Bose Music App.
INPUT
ACTION (music)
ACTION (phone)
INPUT
Single tap
ACTION (music)
Play / Pause
ACTION (phone)
Answer call / hold current call and answer new call
INPUT
Double tap
ACTION (music)
Track forward
ACTION (phone)
End call / Decline incoming call
INPUT
Triple tap
ACTION (music)
Track backward
ACTION (phone)
N/A
INPUT
Swipe up/down
ACTION (music)ACTION (phone)
Volume up / down
INPUT
Long press
ACTION (music)ACTION (phone)
Voice assistant
Should you use the apps of either Apple AirPods Pro (2nd generation) or Bose QuietComfort Earbuds II?
Edgar Cervantes / SoundGuys
The Bose Music App gives you a few more options to control the performance of the earbuds.
The Apple AirPods Pro (2nd generation), like all other Apple earbuds, uses the iOS or iPadOS Settings app as its software. This means if you use an Android device, you won’t be able to access software features for the AirPods Pro. In the Settings app, you can access an ear tip fit test, toggle listening modes, customize controls, enable personalized Spatial Audio, get firmware updates, and more.
For more universal appeal, the Bose QuietComfort Earbuds II uses the Bose Music App, which you can install on iOS and Android. Here you can change your EQ, adjust ANC intensity and create custom ANC settings for different places, install firmware updates, and access new features as they come up. Strangely, even though you can adjust ANC levels, you can’t turn it off completely. The best you can do is enable Aware mode with ActiveSense; this is equivalent to Apple’s Adaptive Transparency mode on the AirPods Pro (2nd gen).
If you have an Android phone and want to access software features, the Bose QuietComfort Earbuds II is the way to go here. The AirPods Pro won’t be as enjoyable on Android devices due to restricted software features.
It’s also worth noting that both earbuds will require some personal data from you, like location data. Features may not work if you deny permissions.
How do the Apple AirPods Pro (2nd generation) and Bose QuietComfort Earbuds II connect?
Edgar Cervantes / SoundGuys
Opening the case of the Bose QuietComfort Earbuds II starts the pairing process.
Both the Apple AirPods Pro (2nd generation) and Bose QuietComfort Earbuds II connect using Bluetooth 5.3, and support the SBC and AAC Bluetooth codecs. There isn’t a high-bitrate option on either of these buds. The lack of high-quality codec support isn’t a huge issue, but if you want aptX or LDAC support, you’ll have to look elsewhere.
The AirPods Pro has an h3 chip that supports what Apple calls “high bandwidth connectivity,” but it still doesn’t provide lossless audio. The h3 chip also allows for quick pairing when you open the case near an iOS or iPadOS device, as well as quick switching between Apple devices logged into the same iCloud account.
Pairing the AirPods Pro to an iPhone just requires opening the AirPods Pro case beside the phone, which will prompt a card on your screen to connect. If you’re using another OS, it’s the same as pairing any other Bluetooth device:
Make sure Bluetooth is enabled on your device.
Open the AirPods Pro case and hold the setup button on the back for 5 seconds, until the white LED flashes.
In your device’s Bluetooth menu, choose the AirPods Pro in the devices list.
To pair the Bose QuietComfort Earbuds II, the process is similar to any other Bluetooth device:
Make sure Bluetooth is enabled on your device.
Open the charging case and hold the pairing button
Choose the Bose QuietComfort Earbuds II in the devices list to pair.
Is battery life better on the Apple AirPods Pro (2nd generation) or Bose QuietComfort Earbuds II?
Lily Katz / SoundGuys
The case’s Lightning port is next to its speaker.
In our standard battery test, where each product endures constant music playback peaking at 75dB(SPL), the Apple AirPods Pro (2nd generation) lasts 5 hours, 43 minutes with ANC on, just a bit less than Apple’s claim of 6 hours. The Bose QuietComfort Earbuds II lasts 7 hours, 15 minutes with ANC on, and so is the clear battery life winner.
Both earbuds last a fine amount of time, but neither is particularly impressive. With a short battery life per charge, the overall lifetime of batteries in true wireless earbuds is small due to the number of charge cycles they experience. This quick degradation contributes to battery e-waste. If you care about the environment, it’s better to get earbuds with longer battery life or go for a wired option instead.
The AirPods Pro (2nd generation) case requires either a Lightning cable or a wireless charging pad, while the Bose QuietComfort Earbuds II uses the more common USB-C and does not support wireless charging. The lack of wireless charging on Bose’s buds is surprising given the original Bose QC Earbuds case supports it. Both cases fast charge the earbuds, with the AirPods Pro yielding 60 minutes of playback from 5 minutes of charging, and the Bose earbuds get 2 hours of playback from 20 minutes of charging.
Does the Apple AirPods Pro (2nd generation) or Bose QuietComfort Earbuds II block noise better?
The AirPods Pro (2nd generation) has better ANC than the QuietComfort Earbuds II for midrange noises.
Both the AirPods Pro (2nd generation) and Bose QuietComfort Earbuds II have excellent ANC, and are among the best of what’s currently available. The two products are both strong in this category, although our measurements reveal some performance differences worth considering.
The AirPods Pro (2nd generation) does a great job canceling out low-end noise, with good isolation to help block high-frequency noise as well. The Bose QuietComfort Earbuds II does a better job at dealing with those difficult low-end noises below 100Hz, and a bit of the high end, but there is a significant dip in the mid-range where it doesn’t match up to the AirPods Pro’s abilities.
To get the best noise attenuation from either, you’ll need to make sure you have a proper fit. If your ear tips don’t fit your ears properly, outside noise will leak in. This can lead to you turning up the volume to dangerous levels, which over time can result in noise-induced hearing loss. To avoid this, do the in-app ear tests and try out different ear tips to make sure you’re letting as little outside noise in as possible.
Does the Apple AirPods Pro (2nd generation) sound better than the Bose QuietComfort Earbuds II?
That bass boost on the QuietComfort Earbuds II is a little too much for our liking.
In our testing, the Apple AirPods Pro (2nd generation) shows a frequency response that closely follows our target curve, for the most part, providing an enjoyable sound for most people and genres. The AirPods Pro (2nd generation) always has Adaptive EQ enabled, which maintains the sound profile to account for your in-ear fit and ear shape.
The Bose QuietComfort Earbuds II takes a similar approach to the AirPods Pro, adjusting its performance to your ear canal using a test signal. The process is repeated every time you use the earbuds since your fit could change every time you put them in. The frequency response leans very bass-heavy, far from our target range. The Bose QuietComfort Earbuds II also has EQ presets to choose from, including bass boost, bass reducer, treble reducer, and treble boost. All presets are somewhat similar, with bass being overemphasized compared to our target curve, even in the bass reducer EQ. You can also make a custom sound profile to address this.
Does the Apple AirPods Pro (2nd generation) or Bose QuietComfort Earbuds II have a better microphone?
The Apple AirPods Pro (2nd generation) has a good microphone in ideal conditions, but background noise definitely causes issues. Voices can drop out completely when the earbuds try to reject background noise, and wind can make voices nearly inaudible.
Like the AirPods Pro, the Bose QuietComfort Earbuds II sounds okay in ideal conditions, but the microphone isn’t quite as good. It has a similar problem with background noise as the AirPods Pro, making voices very difficult to hear when noise is present.
Neither is good for taking calls outdoors if there’s going to be unpredictable background noise like wind or cars. When using either for phone calls, take things indoors to a quiet space for the best results.
Apple AirPods Pro (2nd generation) microphone demo (Ideal conditions):
Bose QuietComfort Earbuds II microphone demo (Ideal conditions):
Apple AirPods Pro (2nd generation) microphone demo (Windy conditions):
Bose QuietComfort Earbuds II microphone demo (Windy conditions):
Which microphone sounds better to you?
2939 votes
Editor’s note: Our standardized test setup plays back pre-recorded phrases from a calibrated artificial mouth in our test chamber, either with or without simulated background noises, simulated reverberant spaces, or artificial wind. This means that samples from every product can be directly compared, which makes it far easier to make meaningful comparisons between products in terms of the raw speech quality or the product’s ability to reject noise. While this setup is consistent, it’s unable to allow the AirPods Pro (2nd gen) earbuds to detect speech as they would in the real world (using vibrations), so you’re likely to experience something different than our demos above.
Should you get the Apple AirPods Pro (2nd generation) or Bose QuietComfort Earbuds II?
Austin Kwok / SoundGuys
The AirPods Pro (2nd generation) and QuietComfort Earbuds II are good earbuds for different people.
One thing that bears repeating whenever discussing Apple products is that you should not get them if you don’t have an iOS device as your daily driver. If you buy the AirPods Pro intending to use it with an Android device, you will miss out on firmware updates, Spatial Audio support, the ear tip fit test, and more—probably not worth it. The AirPods Pro (2nd generation) is pretty expensive at $249 USD, and there are many other Android-friendly choices in this price bracket.
That being said, the Apple AirPods Pro (2nd generation) is an excellent pair of noise canceling earbuds. The ANC is excellent, the sound profile is versatile and enjoyable, and the h3 and U1 chips bring more great features to the AirPods Pro line. It’s worth getting if you want a pair of earbuds that will perfectly integrate with your Apple ecosystem.
Apple AirPods Pro (2nd Generation)
Apple AirPods Pro (2nd Generation)
Impressive ANC • Comfortable fit • Wireless charging
One of the best true wireless earbuds for iOS users
The second generation of AirPods Pro features top-quality active noise cancelation in a water-resistant package.
See price at Amazon
Save $20.00
See price at Best Buy
The Bose QuietComfort Earbuds II is also a great pair of earbuds, though the default sound signature can be polarizing. However, knowing the EQ can be customized, and the software is OS-agnostic, this is a better pair of earbuds for Android users or anyone who wants the ability to change phones without worrying about compatibility. However, it’s more expensive than the AirPods Pro (2nd generation) at $299 USD, so it may still be worth shopping around.
Bose QuietComfort Earbuds II
Bose QuietComfort Earbuds II
Self-adjusting sound • Bluetooth 5.3 • Bose’s best ANC to date
Bose put its best ANC technology in these earbuds
The QuietComfort Earbuds 2 feature Bose’s best audio know-how. They personalize the sound quality and isolation to fit your ears each time you wear them. They also come with Bluetooth 5.3, USB-C charging, and can last 6 hours on a charge (24 with the case).
See price at Amazon
Save $20.00
See price at Bose
See price at Best Buy
See price at Crutchfield
What should you get instead of the Apple AirPods Pro (2nd generation) and Bose QuietComfort Earbuds II?
With so many great true wireless and noise canceling earbuds on the market, finding an alternative to either is easy, with great options out there for everyone.
An IPX4 rating means splashes, sweat, and humidity won’t kill your earphones.
The Sony WF-1000XM4 is easily one of our favorite noise canceling earbuds, with excellent ANC, an OS-agnostic app with great features, and comfortable foam ear tips. It’s expensive at $278 USD, but it goes on sale for cheaper from time to time.
Android users may enjoy the Google Pixel Buds Pro, which is cheaper than all of the above at $199 USD, and has great features like live Google Translate support, good ANC, and Bluetooth multipoint. It also has a water-resistant case and earbuds.
The Samsung Galaxy Buds 2 Pro is a great option for Samsung phone owners, with amazing ANC, a good sound profile, and IPX7 water resistance. It integrates best with Samsung phones, allowing you to use Samsung’s 360 Audio and the Samsung Seamless Codec. For $229 USD, it’s more affordable than both the AirPods Pro and the Bose QuietComfort Earbuds II.
Frequently asked questions
Neither have multipoint. The AirPods Pro (2nd generation) can quickly switch between Apple devices logged into the same iCloud account, but there’s no true multipoint here.
No, you will not be able to install firmware updates on an Android device for the AirPods Pro (2nd generation).
Which true wireless headphones are the best?
Bose has just released its latest and most impressive set of true wireless headphones, the Bose QuietComfort Earbuds. We got them in the studio and compared them to Apple’s flagship AirPods Pro.
Apple offers AirPods as well as AirPods Pro, but the latter costs under $30 for Bose QuietComfort headphones and also offers active noise cancellation. That’s why we decided to compare these two specific models.
design
It’s inevitable: the Bose QuietComfort headphones are significantly larger than the AirPods Pro. This applies to the case, as well as the headphones themselves. Just by looking at them, you can see that Bose is three times the size of the AirPods Pro case. This makes a big difference for a portable device that you carry around with you all day.
Bose QuietComfort Headphone Case vs. AirPods Pro
They both have flip tops, but Bose has a nice feature that we sometimes wish AirPods would use. There is a physical button that must be pressed before the lid opens. We love the fidget factor in the AirPods case, but if you’ve ever dropped one, you know these separate earbuds fly. The blocking mechanism stops this.
If we look at headphones, very few have copied the iconic look of AirPods (other than gray market knockoffs). Most choose to go their own way, as does Bose. The Bose QuietComfort headphones are much more in line with the traditional set of headphones. They are quite large and have wings that fit the ear, as well as an oval tip that fits into the ear canal.
Bose QuietComfort Headphones and AirPods Pro Headphones
They are ridiculously comfortable to use. Although they are larger and heavier than the AirPods Pro, due to the large size and the spread of weight on the ear, we had no problems with ear fatigue and were comfortable for hours on end. They have a more secure fit compared to AirPods Pro just because of the wings on the back.
AirPods Pro are not bad for us, they fit perfectly. But because of their stem and construction, they release more easily than Bose.
In terms of controls, Apple uses Force Stems on the AirPods Pro while Bose uses a touch gesture. Both are a bit awkward, but we prefer Force Stems because it’s a bit easier to do. Bose has more options, although favorites can be assigned to left and right ears to control playback.
Battery and power
Both of these true wireless earbuds have Qi-enabled charging cases, allowing you to charge them wirelessly. If you prefer to use a cable, you should use a Lightning cable for AirPods Pro and a USB-C cable for Bose.
Battery life is ambiguous for them. Bose wins in six hours of use without recharging. The AirPods Pro only get four and a half hours, though that can be bumped up to five if you turn off ANC and Transparency Mode. But the AirPods Pro win in total usage time with an additional 19watch in the case, for a total of 24 hours. Bose only 18 watches in total with 12 watches in the case.
Bose QuietComfort Battery Indicators
This was surprising to us considering how big the Bose case is. Due to its large size, we expected the total time to be much longer. When you travel with ANC headphones, you may not be able to continue charging, and this total time can make a difference.
Both feature fast charging: Apple advertises an hour of use after five minutes of charging, and Bose claims two hours of use after 15 minutes.
Connectivity
Bose uses Bluetooth 5.1 against Apple still using Bluetooth 5 for AirPods Pro, but Apple uses its h2 wireless chip which gives it a huge advantage. The h2 chip uses a Class 1 Bluetooth audio signal, which is more energy efficient and produces a more reliable signal than the typical Class 2 audio signal used in the industry.
Because of this h2 chip, AirPods Pro have a huge range of 100 feet, while Bose is limited to the standard 30 feet.
AirPods Pro in Control Center
This h2 chip also allows AirPods Pro to automatically sync with all your Apple devices after initial setup with no effort. AirPods Pro appear instantly on your Apple TV, Apple Watch, iPad, and Mac.
Unique Features
Before we get into the all-important comparisons between ANC and sound quality, we want to take a look at the unique features for each set of headphones.
AirPods Pro 9 features0061
As mentioned, the way to distribute AirPods Pro to all your Apple devices is magical. They are easy to connect by simply opening them next to the iPhone and are very tightly integrated with Apple’s operating systems. ANC and transparency modes can be switched directly from the Control Center on Apple Watch, iPhone or iPad. Even in macOS Big Sur.
Battery life is also displayed in the Apple Watch Control Center and the battery widget on iPhone and iPad. Siri can also be helpful, telling you where your AirPods are, what their battery life is, and for ANC control.
Apple AirPods Pro
When you set up your AirPods Pro, Apple offers a unique fit test that lets you try different tips to see which ones fit your ears the best. Adaptive EQ uses an inward-facing microphone to adjust the audio equalizer so that it sounds best to your ears.
With iOS 14, AirPods Pro received new features such as auto-switching, which moves you between devices as needed without having to pair or unpair, and spatial audio, which recreates Dolby Atmos-style 3D audio. It can also be used by developers in their games and apps for a more immersive experience.
Audio Share is another cool feature that allows you to connect multiple sets of AirPods Pro to your iPhone, iPad, or Apple TV at the same time.
Bose QuietComfort Headphones
Bose is unique in that it offers 11 levels of noise cancellation. If you reach zero, you will let all outside noise into your ears, while 11 will block out all outside noise. It’s much more granular than turning AirPods Pro on or off. Since there are 11 levels, Bose allows you to assign your three favorite ANC settings to the left earcup for cycling.
For example, you can set favorites to zero, five, and 11 and press to move between them.
Bose QuietComfort Case
There’s also a neat setting that allows you to automatically answer a phone call when the right earbud is inserted. When a call comes in, you don’t even need to touch the phone, just plug in the earpiece and the call will be answered.
Bose Sound app
All of these can be controlled from the Bose Music app. It shows headphone volume, ANC level, firmware and other settings.
Sound quality
While size, connectivity and other unique features are noteworthy, sound quality and ANC capability should be the deciding factor.
So we can definitely say that Bose wins. The Bose QuietComfort headphones have a bolder, fuller sound with more powerful bass. Since Apple already has a Beats brand with poppy, bass-heavy sound, it decided to make the AirPods and AirPods Pro more neutral. There are no overly heavy basses here, the sound is very clear overall, and the mids are particularly nuanced.
Even then, the Bose, which is larger, produces a more impressive sound. The soundstage is bigger, the bass is stronger and overall better.
Calls between them were good: the AirPods Pro edged out Bose by a hair’s breadth thanks to multiple beamforming microphones.
ANC
ANC is another big deciding factor and once again Bose has the upper hand. As we said earlier, the Bose QuietComfort Earbuds have 11 levels of noise cancellation. It is very nice to customize them to your liking.
Before we boarded the plane, we did limited testing in the studio and outdoors, and Bose impressed them more. We had an old Mac that was rendering 4K video and the fans were running full blast right above our heads. When Bose had 11, we didn’t hear the fan at all.
We tested various white noise sounds played at high volume through our speakers, and the AirPods Pro did a great job, but let in just a little more background noise than Bose did.
Decision time: which is better?
The Bose QuietComfort headphones are the clear winner in terms of noise reduction and sound quality. They sound better and have superior noise cancellation capabilities.
Bose QuietComfort and AirPods Pro Headphones
They also have features such as case lock, standalone app and 25% longer battery life.
At the same time, we acknowledge the inexpressible qualities of AirPods Pro that make them adored by all who use them. They work seamlessly and integrate into the Apple ecosystem like no other.
Where to buy
Apple AirPods Pro vs Bose QuietComfort Earbuds: What is the difference?
77 points
Apple AirPods Pro
78 points
Noise Cancelling 700
Comparison winner
€ 179
vs
59 facts in comparison
Apple AirPods Pro
Bose QuietComfort Earbuds
Why is Apple AirPods Pro better than Bose QuietComfort Earbuds?
1. 8mm more driver? 11mm vs 9.2mm
1.63x longer battery life in charging case? 19.5h vs 12h
Dolby Atmos?
Charging time 1.5h less? 0.5h vs 2h
6.2g lighter? 10.8g vs 17g
Has an infrared sensor?
Why is Bose QuietComfort Earbuds better than Apple AirPods Pro?
Battery life 1h longer? 6h vs 5h
Wingtips included?
Has USB Type-C?
Apple AirPods Pro
vs
Marshall Motif ANC
Bose QuietComfort Earbuds
vs
Beats Studio Buds
Apple AirPods Pro
vs
Xiaomi Redmi Buds 4 Pro
Bose QuietComfort Earbuds
vs
Bose Sport Earbuds
Apple AirPods Pro
vs
Sony LinkBuds S
Bose QuietComfort Earbuds 9000 3
vs
Sony WF-1000XM4
Apple AirPods Pro
vs
Apple AirPods (3rd Gen)
Bose QuietComfort Earbuds
vs
Bang & Olufsen Beoplay E8 3. 0
Apple AirPods Pro
vs
Status Audio Between Pro
Bose QuietComfort Earbuds
vs
Bang & Olufsen Beoplay EQ
Apple AirPods Pro
vs
Marshall Minor III
Bose QuietComfor t Earbuds
vs
Marshall Motif ANC
Apple AirPods Pro
vs
Samsung Galaxy Buds Pro
Bose QuietComfort Earbuds
vs
Beats Powerbeats Pro
Apple AirPods Pro
vs
JBL Live Pro 2
Bose QuietComfort Earbuds
vs
JBL Live Pro 2 Comfort Earbuds
vs
Bose QuietComfort Earbuds II
Apple AirPods Pro
vs
JBL Tune 230NC
Price Matching
Bose QuietComfort Earbuds
Product
Store
Price
Bose QuietComfort® Earbuds Noise Cancell… schwarz
€179
Bose QuietComfort Earbuds mit Lärmreduzi. ..Bose QuietComfort Earbuds mit Lärmreduzierung – Vollkommen Kabellose In-Ear-Kopfhörer mit Bluetooth, Soapstone. Die weltweit effektivsten Noise-Cancelling-Earbuds, Silber, Einheitsgröße 9Apple AirPods Pro Pods Pro
8.0 /10
31 User reviews
Bose QuietComfort Earbuds
3 User reviews
Bose QuietComfort Earbuds
9.3 /10
3 User reviews
Features
Build quality 9Sound quality
8.1 /10
28 votes
10.0 /10
3 votes
Design
8.7 /10
29 votes
9.3 /10
3 votes
Comfort
8.6 /10
29 votes
9.0 /10
3 votes
Battery Life
7.7 /10
29 votes
8.7 /10
3 votes 90 003
Sound quality
has active noise cancellation (noise isolation)
✔Apple AirPods Pro
✔Bose QuietComfort Earbuds
This type of device allows you to listen at lower volume levels, resulting in less ear fatigue because you don’t have to crank up the volume to drown out background noise. Ideal for use on airplanes and morning transport.
is passive noise isolating
✔Apple AirPods Pro
✔Bose QuietComfort Earbuds
Sealed device acoustically isolates your ears from the environment, and sound is not heard by those around you.
driver block size
A driver is a component that plays sound in a device. The larger the drivers, the more powerful they are and can reproduce lower bass.
lowest frequency
Lowest frequency at which the device produces sound. The lower the low frequencies are set, the stronger and richer the bass.
highest frequency
20000Hz
20000Hz
The highest frequency at which the device produces sound. The higher the high frequencies are tuned, the cleaner and more collected the treble.
Dolby Atmos
✔Apple AirPods Pro
✖Bose QuietComfort Earbuds
Dolby Atmos is a surround sound technology that lets you interpret sounds as three-dimensional objects. Thus, Dolby Atmos provides sound in all 360 degrees.
sound pressure level
Unknown. Help us offer a price. (Apple AirPods Pro)
Unknown. Help us offer a price. (Bose QuietComfort Earbuds)
Devices with higher SPL tend to be louder.
resistance
Unknown. Help us offer a price. (Apple AirPods Pro)
Unknown. Help us offer a price. (Bose QuietComfort Earbuds)
Electrical resistance of the device to waves passing through it. The lower the resistance, the easier it is to get louder sounds and the less power is required.
has neodymium magnet
✖Apple AirPods Pro
✖Bose QuietComfort Earbuds
Devices with neodymium magnets are lighter and more powerful than those using ferrite magnets. They also have more bass and cleaner highs.
Power
Battery life
Battery life (when used) as specified by the manufacturer. With a longer battery life, you will charge your device less frequently.
Charging case battery life
Charging case battery life is specified by the manufacturer. A charging case with a longer battery life allows you to charge your headphones multiple times on the go before recharging the case itself.
charging time
Time required to fully charge the battery.
battery capacity
Unknown. Help us offer a price. (Bose QuietComfort Earbuds)
Battery charge, or battery capacity, is the amount of electrical energy stored in the battery. The higher the battery charge, the longer the battery life.
has wireless charging
✔Apple AirPods Pro
✔Bose QuietComfort Earbuds
Supports Qi standard wireless charging. To charge your device, you just need to place it on the charging pad.
has a battery level indicator
✔Apple AirPods Pro
✔Bose QuietComfort Earbuds
The indicator indicates that the battery level is low.
has battery
✔Apple AirPods Pro
✔Bose QuietComfort Earbuds
The device battery can be charged and used again.
Connectivity
Has USB Type-C
✖Apple AirPods Pro
✔Bose QuietComfort Earbuds
USB Type-C has reversible connector orientation and cable routing.
Bluetooth version
Bluetooth is a wireless technology standard that allows you to transfer data between devices in close proximity using shortwave radio waves. Newer versions provide faster data transfer.
yes LDAC
✖Apple AirPods Pro
✖Bose QuietComfort Earbuds
LDAC is a codec developed by Sony for Bluetooth audio. It supports a very high bit rate of 990 kbps, which provides high resolution audio. It can also automatically adjust the lower bitrate of 330Kbps or 660Kbps to improve stability.
yes aptX Adaptive
✖Apple AirPods Pro
✖Bose QuietComfort Earbuds
aptx Adaptive is an audio codec for Bluetooth devices developed by Qualcomm. It has a variable baud rate (from 279kbps up to 420 kbps), which means it can adjust the bit rate under various scenarios such as listening to HD audio or reducing interference from other devices.
Low Latency aptX
✖Apple AirPods Pro
✖Bose QuietComfort Earbuds
aptX Low Latency is a codec developed by Qualcomm. It uses Bluetooth 5.0 technology to provide low latency audio (about 40ms), which is useful when you want to avoid audio latency (such as when playing games).
yes aptX HD
✖Apple AirPods Pro
✖Bose QuietComfort Earbuds
aptX HD is an audio codec for Bluetooth devices developed by Qualcomm. It supports high quality 24-bit audio (with a bit rate of 576 kbps).
has aptX
✖Apple AirPods Pro
✖Bose QuietComfort Earbuds
aptX is a codec used for Bluetooth wireless audio transmission. It is developed by Qualcomm and supports 16-bit audio at 384 kbps.
audio delay
Unknown. Help us offer a price. (Bose QuietComfort Earbuds)
Latency refers to the time it takes for the audio signal to reach the headphones/earbuds. Lower latency reduces audio latency, which is important when playing games or watching videos.
maximum range (Bluetooth) bluetooth
The device can connect to another device over a long distance using Bluetooth/IR.
Features
has Ambient Sound Mode
✔Apple AirPods Pro
✔Bose QuietComfort Earbuds
When in Ambient Sound Mode, the microphones will pass ambient noise just enough to still be heard. This comes in handy when you want to listen to music but be aware of what’s going on around you, such as when you’re running but still want to hear cars passing by.
“Auto ear detection” function
✔Apple AirPods Pro
✔Bose QuietComfort Earbuds
Sensors can detect when the earbuds are out of your ears, music playback will be paused, saving battery life.
Find your headphones
✔Apple AirPods Pro
✔Bose QuietComfort Earbuds
To find your headphones, you can use an app that unmutes your headphones and locates them.
Supports fast charging
✔Apple AirPods Pro
✔Bose QuietComfort Earbuds
Fast charging technologies such as Qualcomm’s Quick Charge or MediaTek’s Pump Express are used to reduce device charging time. For example, with Quick Charge 3.0, the battery can be charged up to 50% in just 30 minutes.
MPI number
Unknown. Help us offer a price. (Apple AirPods Pro)
Unknown. Help us offer a price. (Bose QuietComfort Earbuds)
Multipoint allows you to connect more devices via Bluetooth and easily switch between them. For example, you can easily switch calls from one device to another without turning them off and on manually.
has a mute feature
✔Apple AirPods Pro
✔Bose QuietComfort Earbuds
The device has the ability to mute/unmute the conversation directly from the device.
can be used as a headset
✔Apple AirPods Pro
✔Bose QuietComfort Earbuds
The headset is a single earbud or a pair with a built-in microphone. Can be used for applications that require communication, i.e. Skype, voice chat games, mobile phones, etc.
control panel built into the device
✔Apple AirPods Pro
✔Bose QuietComfort Earbuds
The control panel is on the device so you can easily access and control the volume control without interacting with the cable or other connected to it , device.
warranty period
1 years
1 years
When the product is under the manufacturer’s warranty, in the event of a malfunction, a replacement can be obtained. Depends on the region.
Microphone
number of microphones
The more microphones your device has, the better it filters out background noise and improves the overall sound quality.
has noise canceling microphone
✔Apple AirPods Pro
✔Bose QuietComfort Earbuds
These microphones are designed to filter out noise from the desired sound. Especially useful in noisy environments.
microphone sensitivity
Unknown. Help us offer a price. (Apple AirPods Pro)
Unknown. Help us offer a price. (Bose QuietComfort Earbuds)
This is the highest volume that the microphone can pick up.
highest microphone frequency
20000Hz
Unknown. Help us offer a price. (Bose QuietComfort Earbuds)
The maximum frequencies that the microphone can pick up.
Amazon Smart Thermostat review: An excellent $60 thermostat
Content is created by CNN Underscored’s team of editors who work independently from the CNN newsroom. When you buy through links on our site, we may earn a commission. Learn more
Reviews
Amazon
The $60 Amazon Smart Thermostat pulls off a feat very few smart home devices can accomplish: It offers all the functionality of even the priciest connected thermostats at the lowest price. Even better, it does so with surprisingly few trade-offs. There is, however, one great big caveat, and its name is Alexa.
Like the market-leading Nest Learning Thermostat, which usually retails for $250, the Amazon Smart Thermostat can learn your habits and routines, then automate your home’s heating and cooling schedule to match. Used effectively, that can translate into energy savings and lower utility bills, all without sacrificing comfort. And yet, Amazon’s thermostat is priced well below even the lowest-cost competitor from a renowned discount brand, the roughly $80 Wyze Thermostat.
I disconnected the third-generation Google Nest I had been relying on to manage my townhouse’s heating and cooling controls for the past four years and replaced it with an Amazon Smart Thermostat, which I’ve been testing for over a month. I can tell you this much: The Nest won’t be going back up. Here’s why.
Who this is for: The Amazon Smart Thermostat is for anyone looking for a thermostat that can automatically adjust their home’s temperature and who either lives in an Alexa household or is willing to adapt to Amazon’s smart home ecosystem. Though it doesn’t have a speaker or microphone, it can use one or more Alexa speakers to add to its functionality. In fact, the more smart home devices you have in general, the better both Alexa and the Amazon Smart Thermostat will work.
What you need to know: Unlike most gadgets, the less you interact with a smart thermostat, the better. And the Amazon Smart Thermostat might well be the most autonomous thermostat available, requiring less interaction than even the market pacesetter, Nest. It also happens to be the least expensive and is compatible with most 24-volt systems (most modern residential HVAC installations) — though it does require a C-wire (an adapter is available if your home doesn’t have one).
How it compares: At less than a quarter of the cost of the flagship Nest, the Amazon Smart Thermostat falls short in just one category: build quality. Although its clean, minimalist design is perfectly tasteful and its materials seem plenty durable for a wall-mounted gadget, the Nest’s color LCD and mechanical click wheel made of premium metal are undeniably nicer than Amazon’s cream-colored plastic touchscreen and color icons. How much that matters depends on whether you want your thermostat to serve as a conversation piece or just serve your heating and cooling needs. Another simple yet attractive looking thermostat is the Ecobee SmartThermostat, which includes a speaker and microphone that let you directly communicate with Alexa or Apple’s Siri. What it doesn’t have, however, is the same level of access to your behaviors and habits as Google or Amazon, so its automation algorithm has less data to work with.
Amazon
Physically, the Alexa Smart Thermostat is a white plastic square about 3 1/2 inches tall and wide and just shy of an inch thick. It comes with a soft touchscreen faceplate illuminated by simple color icons (red for heat, blue for AC) and a digital number display.
Disconnecting your old unit and installing the Amazon Smart Thermostat should be easy-peasy for anyone with even a modicum of mechanical aptitude. As with other thermostat kits, Amazon includes a small screwdriver as well as a faceplate to cover any unsightly scars your previous thermostat may have left on the wall.
Amazon also includes detailed printed materials in the box, but for more in-depth instructions and how-to videos, there’s also an Amazon Smart Thermostat support page. When you’re finished installing it, everything should look clean and tidy — even if you need the C-wire adapter, which installs at your furnace rather than at the thermostat.
If you don’t already have the Alexa mobile app, you’ll need to download it to complete installation, but from there, connecting the thermostat to Alexa is a quick, intuitive process that should only take a few minutes (just tap to add a device and follow the onscreen instructions from there).
By default, Alexa sets the thermostat to “auto,” which will switch on either heating or cooling, depending on what’s needed. The default temperature range is set to heat to 68 degrees Fahrenheit and cool to 75 degrees Fahrenheit, but you can adjust it however you’d like. You can also choose to switch to dedicated heat or cool — or, for that matter, turn the whole thing off — but for maximum set-it-and-forget-it enjoyment, I’d recommend you don’t touch a thing and just let Alexa take charge from there.
Amazon
The Amazon Smart Thermostat doesn’t work with Google Assistant or Apple HomeKit, which means you’ll have no choice but to cozy up to Alexa. In fact, you’ll need the Alexa mobile app to set up the thermostat and for anything more complicated than adjusting the temperature. The device itself offers only a few basic touchscreen controls using three buttons: up, down and mode (to switch between heating, cooling, auto and off).
Unlike with the Ecobee, you’ll need to add at least one Amazon Echo smart speaker or display to the Smart Thermostat if you want in-home voice control. You can, in a pinch, bark commands at the Alexa app, but it’s not nearly as simple. However, that’s not the only reason you might want to consider adding one or more Alexa devices to your home — the more you use Alexa, the better Alexa gets to know you and your schedule (and the better your thermostat can adjust accordingly).
I happen to have about a dozen Amazon Echo and Echo Show devices strewn about my townhouse and I rely on Alexa for everything from turning my lights off at night to keeping an up-to-date shopping list. I share my location so Alexa knows when I’m home and when I’m away. Alexa even shushes my two dogs when they bark in the house. In other words, Alexa knows me and my household well — my Amazon Echos can even distinguish my elementary-aged daughter’s voice and face from my own. Up next: Why that makes such a difference.
Just a few years ago, Amazon introduced a quirky new feature called Alexa Hunches. At first, enabling Hunches just gave Alexa permission to make suggestions based on your patterns of behavior. If every night around 9 p.m., for example, you usually turn off the front porch light and lock the front door, then one night you lock the door without flipping the light, with Hunches turned on, Alexa might chime in a few minutes later and ask if you’d meant to turn off the porch light (then offer to do it for you).
Sharing your location with the Alexa app on your phone supercharges Alexa Hunches, adding your physical whereabouts to Alexa’s list of available data points. Another power-up is to turn on Automatic Actions, which grants Alexa permission to act on Hunches without having to consult with you first. With Hunches and Automatic Actions enabled, Alexa can adjust all sorts of smart home gadgets, including smart lights, smart locks and — you guessed it — the Amazon Smart Thermostat, all in the background.
cnn.com/_components/paragraph/instances/cl1uueg4q00ay3f6sav57gnm3@published” data-editable=”text” data-component-name=”paragraph”>
If that sounds a little too hands-off to you, just remember that if Alexa doesn’t get it just right, you can always adjust things back the way you want them and Alexa will learn from the interaction and (try to) do better next time.
Amazon
I live in Kentucky, where the Midwest intersects with Appalachia, so early spring usually means a handful of warm-to-hot days peppering stretches of abysmal cold. Honestly, the whole year can be almost as unpredictable, so I usually keep my thermostat set to a temperature range that triggers heat if it gets too cold and cooling if it gets too hot — which is the trickiest mode for a smart thermostat to get right.
In the four years I spent with a Nest, I had to turn off the heat in the summertime or cancel cooling in the winter at least a few dozen times. Not once, however, during the six or so weeks I spent with the Amazon Smart Thermostat did I have to make such an adjustment.
This was due to Amazon’s default setting — which heats up to 68 degrees and cools down to 75 degrees — and which sets a wider spread than I had on my Nest (68 and 72 degrees, respectively). But here’s the thing — I set my Nest at those temperatures because I constantly felt hot when cooling was set anywhere above 72 degrees. Yet, go figure, I was comfortable all day when the Amazon Smart Thermostat was set to cool to 75 degrees.
In fact, after the initial set-up, I only adjusted the temperature a handful of times. About four or five times in the first two weeks of having the device installed, I turned the AC down to 68 degrees at around 9 p. m. From then on, however, whenever I headed upstairs for bed, my bedroom was the perfect temperature.
This is exactly the kind of thing that makes a smart device feel magical, and the number-one reason the Nest isn’t going back up on my wall. After three or four weeks of using the Amazon Smart Thermostat, I never had to adjust it again.
It’s too soon to tell whether the Amazon Smart Thermostat saved me any money on my utility bill in the last month, but I suspect it will in the long run it will.
The only real drawback to the Amazon Smart Thermostat is its sole compatibility with Alexa, but that only matters if you don’t already or aren’t willing to use Amazon’s digital voice assistant. Otherwise, sure, the Nest may look a lot nicer, but I’ll trade nice form for better function any day of the week.
Besides, the Amazon Smart Thermostat’s form actually emulates its function — the physical device fades into the surrounding decor just like the device’s controls recede from your awareness as it learns to anticipate your heating and cooling needs.
If you’re looking for the best smart thermostat that can learn your habits and automate your HVAC controls, there are really only two options: the Amazon Smart Thermostat, for $60, and the Nest for $250. As long as you don’t mind Alexa, the decision is practically a no-brainer.
Note: The prices above reflect the retailers’ listed price at the time of publication.
Thanks for signing up!
Your welcome email is on its way.
Receive product recommendations, reviews & deals several times a week.
By signing up, you agree to our privacy policy
Amazon Smart Thermostat review: cheap comfort
Since the Nest Learning Thermostat launched in 2011, no other smart thermostat has emulated its core function — learning your schedule and adapting to it automatically, so you don’t have to lift a finger. This feature has made the Nest one of the best smart thermostats (lots of) money can buy for years. But just a decade on, Amazon has finally done it. The online shopping giant’s $60 Amazon Smart Thermostat can intelligently determine if you’re home, away, or sleeping and automatically adjust your climate to keep you comfortable and potentially save you money. And you don’t have to program anything.
Amazon worked with Resideo (owner of the historic thermostat brand Honeywell Home) to develop the thermostat, and its internals are very similar to the Honeywell Home T9 and T5 smart thermostats. It’s compatible with most 24 volt HVAC systems (you can check compatibility here), but doesn’t support systems with more than three stages or multi-speed fans. Together, Amazon and Resideo seem to have finally cracked the smart thermostat conundrum, and the Amazon Smart Thermostat’s learning feature — called Hunches — is very good. No, it isn’t quite as good as Nest’s, but it also doesn’t cost $250. So, tradeoffs.
8.5Verge Score
Amazon Smart Thermostat
$59.99
The Good
The cheapest smart thermostat you can buy
Hunches controls your climate intelligently
Works with Alexa voice control
Clean, modern design
Comes with a faceplate
The Bad
Limited control over Hunches
Switching to Away seems slow
No native temperature sensors
App experience needs some work
No Google, HomeKit, or SmartThings support
$60 at Amazon
How we rate and review products
Hunches — which are part of Amazon’s broader Alexa smart home platform — are AI-driven decisions that use data from your Alexa smart home to decide what to do with your temperature. It follows, unsurprisingly, that the more Echo smart speakers and displays you have in your home, the better it will be. According to Amazon, Hunches also uses “select other smart home devices like lights, locks, and sensors” to determine if you are home or away, as well as geolocation of yours and your household members’ smartphones (everyone has to have the Alexa app installed and location settings turned on for the thermostat).
However, unlike with the similar Nest experience, you don’t have control over which devices make those decisions; you don’t even know which ones make the decisions. This led to some confusion in my testing, including that Alexa now thinks I get up at 4:31AM every morning, I assume because my daughter sat up in bed at that time and has an Echo Show as her bedside clock.
For the next three days, it turned on the heat a little too early, and I had to go into the thermostat settings in the app to tell Alexa its Hunch was wrong. After three times telling it that, no, we do not wake up at 4:31AM, it reverted to our regular wake-up time.
The controls on the Smart Thermostat are three touch points on the bottom. LED icons show you the ambient temperature by default, then the current set point when you tap on one of the arrows.
It’s hard to quibble much at this price, however, because at least it’s trying to be smart. Outside of Nest and Ecobee, few thermostats are actually smart. Most are just controlled remotely — either by an app, voice, or geolocation (where it adjusts based on whether your smartphone is at home). This is all very handy, but it’s not intelligent.
Case in point, the new Nest Thermostat has no advanced AI features of which to speak. While it can do useful energy-saving or comfort-increasing tasks such as preheat or cool the home or use the fan to circulate air to more efficiently use air conditioning, it doesn’t have the same learning features as the Nest Learning Thermostat and its smarts are largely reliant on Google’s home / away modes, which can use geofencing, on-board motion sensing, and other Nest smart home products to determine if someone is home. As with the Learning version, you can choose which devices feed into the home / away modes, which you can’t do with the Amazon Smart Thermostat.
If you don’t like the idea of Amazon controlling your climate willy-nilly, the Smart Thermostat has a standard scheduling option. With either set up, you can also use Alexa’s Routines to have your thermostat do specific things based on time of day, when a smart home device tells it to (such as a compatible temperature or motion sensor), or with your voice. These functions are available to any smart thermostat that works with Alexa, but you will not find one as inexpensive as this one.
The Amazon Smart Thermostat is a simple white box that snaps on to a base, which you wire into your existing thermostat wiring.
It comes with a faceplate to help cover up any holes in the wall from removing your existing thermostat.
The closest competitor price-wise — the Wyze Smart Thermostat — is $80, and the Honeywell Home T5 and T9, whose hardware the Amazon thermostat shares, start at $120. Most other smart thermostats are over $100, including the Emerson Sensi, the Lux Kono, and then Ecobee’s and Nest’s start at $180 and $130, respectively.
Of course, almost all those thermostats work with multiple platforms. The Amazon thermostat only works with Alexa. And while the coming smart home standard Matter — which promises interoperability between ecosystems — may change that, Amazon has not confirmed that this device will be upgraded to support Matter.
While this thermostat is inexpensive, it doesn’t look cheap, unlike the Wyze Smart Thermostat, which has a plasticky feel and an odd, oblong design. The simple, clean design of the Amazon Smart Thermostat will fit in with most homes, and because it doesn’t have an LCD screen, it doesn’t scream “high tech” like others in this space.
Instead, the all-white plastic body has a capacitive touch surface that illuminates LEDs to show you the touch points, system mode, and set temperature. There is also a small green tree that appears when you set the temperature to ones Amazon thinks are energy-saving — 68 degrees or below for heating and 75 degrees or above for cooling in my location. They say imitation is the sincerest form of flattery; I have to wonder how Nest and its iconic green leaf feels about this. At least Amazon didn’t copy Nest and make you pay an extra $15 for a faceplate to cover up any wall warts left after installation; you get one included (and a screwdriver!).
The simple, clean design of the Amazon Smart Thermostat will fit in with most homes
Despite the minimalist look, there are enough controls on the device for easy, everyday use — you can switch modes from heat, cool, fan, and auto, as well as adjust the temperature up and down and turn the system off. Only the bottom of the device is touch-capacitive, and there are three small markers to show where to touch.
Most of the setup and programming of the thermostat requires the Alexa app. And, as you’d expect from an Amazon device, it’s designed to be controlled with your voice. This makes it surprising that the Alexa voice assistant isn’t built in as it is in some of Ecobee’s models. Instead, you need to have a compatible Alexa device for voice control.
Physical installation of the Smart Thermostat is identical to that of Honeywell Home’s T9 or T5 and requires shutting off the power and wiring the base.
Integration with Alexa is straightforward and doesn’t require a skill or account linking. Setup and installation of the thermostat is similarly simple. You will want to check if your heating and / or cooling system is compatible first, however. And if you don’t have a C-wire, you will need to opt for the $75 version that comes with a C-wire adapter and plan for a much more involved installation. (C-wire is short for common wire and supplies power to your thermostat. Most connected thermostats need a C-wire to connect to Wi-Fi, which is a big power drain.)
The Alexa app offers a good interface for controlling the thermostat, it just takes a bit of digging to find it.
Everything you need to install the thermostat comes in the box, including a screwdriver and handy labels for identifying the thermostat wires. The Alexa app guided me through installation very well, making it clear which wires should go where, connecting the thermostat to my Wi-Fi, and testing that everything was working correctly. If you are uncomfortable with wiring or aren’t familiar with how your heating and cooling system works, you should get professional help. Messing up your HVAC system will be a costly mistake.
Using the Alexa Smart Thermostat was a smooth experience. The Hunches worked well (other than my 4:30AM blip), turning my heating down between 11PM and 11:30PM every night and back on at 6AM in the morning. Switching to away when the house was empty during the day was less reliable, and in my week of testing, I wasn’t able to get a firm read on how long it takes to adjust to an empty home — this is a key component of any energy savings this device will get you, so I’ll update this review once I’ve had more time to evaluate the feature. However, you do have the option of telling Alexa, by saying “Alexa, I’m leaving” as you walk out the door.
Controlling the thermostat with voice using an Echo speaker or display was smooth — and with the latter, an interactive screen pops up for further control if needed. You can control the mode with voice, too, switching to heating or cooling, and even ask Alexa to change the temperature when no one is home.
AGREE TO CONTINUE: AMAZON SMART THERMOSTAT
Every smart device now requires you to agree to a series of terms and conditions before you can use it — contracts that no one actually reads. It’s impossible for us to read and analyze every single one of these agreements. But we’re going to start counting exactly how many times you have to hit “agree” to use devices when we review them since these are agreements most people don’t read and definitely can’t negotiate.
In order to use the Amazon Smart Thermostat, you’ll need to download the Alexa app for iOS and Android. An Amazon account is required to sign in. By signing up for one of those, you must agree to its conditions of use.
Once you connect the thermostat to Alexa, you need to agree to Amazon’s conditions of use and all of the terms found here. You can explore the documentation at that link, but below, we’ve listed the 12 terms that you must agree to:
If you choose to use the Hunches feature, you will need to enable location permissions on your smartphone and enter your home address.
Final tally: 13 mandatory agreements
But the app was a more frustrating experience. It takes four or five taps to get into the thermostat screen, although eventually I was able to add the thermostat to the new Favorites section in Alexa’s devices page, which speeds things up a tad. Once on the correct screen, the controls mimic those of the physical device, plus there’s a humidity reading (the thermostat has a humidity sensor in it, a temperature sensor, and an ambient light sensor for adjusting the brightness of the LEDs).
The one other area I ran into issues with was using the thermostat in a two-zoned home. As with all thermostats, you need one for each zone in a multi-zoned systemand they control the climate independently.Butthe Alexa app wouldn’t let me set the home, away, and sleep temperatures separately; whatever I set for my upstairs zone also applied to my downstairs zone. That’s not ideal if you like to sleep at 66 degrees but want your living room and kitchen to drop to 62 at night to save energy.
Multi-zone support needs some work
Switching the upstairs thermostat to a schedule and keeping the downstairs on Hunches did allow me to have different set points, but that’s not an ideal solution. This is a problem in the Alexa software, as with every other thermostat I have tested in this two-zone system, each thermostat controls each zone entirely independently.
The other drawback is that there are no temperature sensors designed specifically for the Alexa Smart Thermostat. It’s possible to set Alexa Routines to use with the temperature sensors built into some Echo speakers or with compatible third-party motion or temperature sensors like those from Centralite and Aqara, plus Amazon’s new Smart Air Quality Monitor will work with Routines. But that integration isn’t as seamless or as easy to use as thermostats with native temperature sensors.
While there are basic controls on the device, the Alexa app on a compatible smartphone is required to set up and control the thermostat.
The Nest Learning Thermostat, the Ecobee thermostats, and the Honeywell Home T9 Thermostat all work very well with their own external sensors, but these thermostats cost $100 to $150 more than Amazon’s. You also don’t get useful extra features such as the time and weather displayed on this cheaper thermostat or integration with platforms or voice assistants other than Alexa. Still, if those features aren’t important to you, then you really can’t go wrong with this device.
It’s hard to not be impressed with this thermostat
Based on my testing, it’s hard not to be impressed with the Amazon Smart Thermostat, and not just because it’s cheap. I have tested almost every smart thermostat released since the Nest Learning Thermostat launched a decade ago, and this is easily one of the best.
I would still choose a Nest Learning Thermostat for my home because I love the look and feel of it, and I have more control over how it manages my home’s climate (plus it works with both Google and Alexa). However, I thoroughly recommend the Amazon Smart Thermostat over the new Google Nest Thermostat, which is a dumbed-down version of the original (something of a theme with Nest devices these days). Honestly, the Amazon Smart Thermostat is the budget thermostat Google Nest should have made.
Photography by Jennifer Pattison Tuohy / The Verge
Update, Friday, November 19th 4:45 pm: Added details on HVAC systems the thermostat is not compatible with.
Update, Tuesday, December 7th 2:44 pm: Added details on how the new Nest Thermostat’s home / away modes work.
Ecobee4 smart thermostats have been integrated with Amazon Alexa voice assistant
3DNews Technologies and IT market. News development and production of electronics Ecobee4 smart thermostats have been integrated…
The most interesting in the reviews
05/07/2017 [15:31],
Dmitry Prikhodko
Ecobee decided to turn to the creation of Amazon – their Alexa voice assistant, to outperform competitors in the face of Nest Labs, which has settled in the segment of smart thermostats, smoke detectors and other electronics for the smart home. The key “chip” of the Ecobee4 thermostat is the recognition of the user’s voice commands thanks to the support of the digital assistant Alexa, as well as the ability of the novelty to play the role of a smart speaker of a non-standard form factor.
theVerge.com
Alexa integration will allow the Ecobee4 owner to manage their indoor climate through verbal commands, in addition to controlling the smart thermostat remotely via a companion app or web interface. The Ecobee4 model is also a simplified version of the wall-mounted Amazon Echo smart speaker. The user will have access to almost the full potential of the voice service that audio devices with Alexa “on board” can boast of.
CNET.com
If, in addition to a high-tech thermostat, you also want a device that can remind you of an event or promptly advise you on an issue of interest, buying an Ecobee4 looks like a completely rational way out in such a situation. The Ecobee4 thermostat will be available for order in US stores from May 15th. There, its cost will be $ 249, which corresponds to the pricing policy of Nest Labs.
The developers of Ecobee4 are confident that the 2-in-1 format they have taken as a basis will convince both ardent skeptics of this way of interacting with gadgets, as well as those who do not want to spend money on smart speakers that are useless in their opinion. built-in digital assistant. The Ecobee4 model is positioned as a universal solution that can take over the regulation of climatic conditions in an apartment and at the same time act as a “smart” home hub.
CNET.com
Sources:
If you notice an error, select it with the mouse and press CTRL+ENTER.
Related materials
Permanent URL: https://3dnews.ru/951834
Headings:
News Hardware, electronics design and manufacture,
Have you purchased an Amazon Alexa voice assistant and would like to use it to keep your home at a comfortable temperature? Just replace your old thermostat with a new one. In this guide, we will personally help you choose the one that best suits you. Based on your budget and of course according to your heating system.
This aspect should not be underestimated, not all thermostats are the same and each of them is specialized in controlling a certain type of heating system (gas, boiler or water). That’s why, before you see the best WiFi thermostats, it’s best to clarify how they work and what their characteristics are. Before the guide, subscribe to our telegram channel.
Commands for Amazon Alexa
Here are some examples of commands you can give your Amazon Echo:
“Alexa, turn on the thermostat!”
“Alexa, set the temperature to 20°C”
“Alexa, turn off the thermostat in the kitchen!”
“Alexa, what is the temperature in the house?”
Best WiFi Thermostat for Alexa Chosen by Us
Best Thermostats for Amazon Alexa
Here are the smart thermostats that we recommend you buy and that we are particularly impressed with. Efficiency, ease of installation, reliability and features offered. They also fit any budget and we made sure to find solutions for you. Namely, compatibility with your heating system (be it a boiler, radiator, stove or something else). Here’s what came out of it:
Amazon Alexa: Decdeal WiFi
Photo: amazon
Are you looking for the cheapest smart thermostat? In addition to being app controlled, the thermostat is compatible with Amazon Alexa, Google Home and IFTTT! In a word, it is almost impossible to find better in this price range, and the reviews of those who have already tried it are positive and portend its reliability. There are two different versions. The first is for gas and water boilers (radiators) and the second is for gas boilers only.
After you replace this smart thermostat on your old appliance, you will have a large display with a lot of information that it can also give thanks to its Internet connection via Wi-Fi. Through the app or via voice commands, you can set timers, raise/lower the temperature, or perform many actions.
Amazon Alexa: BTicino Smarther SXW8002
Photo: amazon
Among the cheapest and most functional, this is BTicino Smarther SXW8002! With a futuristic and touch-sensitive design, this thermostat is sold for both wall and recessed mounting (also in DIY or Professional versions). 3 years warranty and many functions are also controlled from a special application and remotely thanks to a WiFi connection with a home modem. Even though it’s an old model, the BTicino SX8000W is still definitely up to date and is primarily compatible with Amazon Alexa and Google Home. Therefore, if you need this compatibility, we advise you to buy a new model. Installation is very easy because you only need to replace it with your thermostat.
Tado V3 + thermostat and climate control
Photo: tado.com
Tado offers two systems to control the heating (via the thermostat with the V3 base kit) and air conditioning (with the air conditioning manager) of your home. The air conditioning control system connects to your device, including Daikin, Mitsubishi, Panasonic, Toshiba, LG, General Electric, Samsung, Fujitsu. The thermostat is compatible with 95% of home systems and also includes the option to add thermostatic valves.
They include many functions. Including: geolocation if you are not at home, and disable systems. Weather data (display data as if it were a weather station). Open window detection, multi-zone environment control, intelligent programming, savings report and integration with smart home platforms such as Amazon Alexa, Apple HomeKit, Google Assistant and IFTTT.
Netatmo by Starck
Photo: netatmo.com
Netatmo is one of the leading companies in the home automation sector and this thermostat combines ease of use with many features. Such as: voice control, intelligent heating based on the thermal characteristics of the house, programming on and off. It can be installed on gas, oil, wood and heat pump boilers or connected to radiators via Netatmo valves.
This WiFi thermostat is compatible with Amazon Alexa, Google Home and Apple HomeKit. It is one of the best products on the market in terms of the design of these systems, despite the fact that the design is not very attractive or not particularly rich in features. But remember that it is only compatible with boilers, and that if you want to use it for radiators as well, you will have to purchase Netatmo valves separately to connect them to the thermostat via the app.
Honeywell T6
Photo: honeywellhome.com
With excellent value for money, we also recommend this Honeywell T6, which has been on the market for several years and has won many people’s homes (especially judging by the many positive reviews). Its strong point is undoubtedly its compact and minimalistic design combined with the interface, touch display and its smart component.
The Wi-Fi connection makes it remote controllable – like all smart thermostats, but in this case it also integrates with Amazon Alexa, Google Assistant and Apple HomeKit with which you can control the thermostat with a simple voice command!
Among the most interesting features is the geofencing program, which, using the location functions of your smartphone, can understand when the house is empty or when you return, and automatically adjusts the temperature in the room.
Netatmo Kit Base
Photo: netatmo.com
If your heating is entrusted to radiators, then with the basic kit and additional valves you can control them all, even via your smartphone and remotely! Among the many features is the detection of open windows, which will automatically turn off the valves in this room. Installation is very simple, and the configuration can be either manual or through the application. The valves are compatible with the Starck seen before.
Hive Thermostat
Photo: hivehome.com
Another popular WiFi thermostat compatible with Amazon Alexa and Google Assistant is the Hive Thermostat. A smart thermostat with a very unusual and elegant design that can be used to control your boiler. It has a very specific function because it is a side mounted thermostat (instead of your old thermostat). The HUB must then be connected to the wall by powering it and connecting the boiler pipes to it, while the thermostat can be placed in any corner of the house and does not need to be built into the wall. The latter will take care of “talking” to the wall HUB and giving it your commands for temperature control and home climate control.
There are two versions that we referred to above, depending on how experienced you are with thermostat assembly: the second version is more expensive, but combines professional installation services with a code you will find in the package, through which you can request specialist assistance for thermostat installation.
What a Smart Thermostat Can Do
A thermostat is an electronic device that can sense temperature and change. Its circuitry behaves exactly like a switch that activates and deactivates the device it’s connected to (such as a radiator) depending on the temperature you set. It is activated to bring the temperature to the desired level – for example, 22 degrees Celsius – and when this is reached, it turns off to save energy.
At this point, the temperature will start to drop, but the thermostat will activate again at a certain point, thereby maintaining the ambient temperature in the desired temperature range.
How to Set Up A Vizio Sound Bar & Connect To TV (9 Steps)
Last Updated:
Vizio has released various versions and models of their sound bars, but they’re pretty much the same when it comes to setup and use. Still, you can get lost in the instructions if you don’t know what you’re doing. So, we’re walking you through the setup with easy-to-follow steps.
Instructions For Vizio Sound Bar Installation
Here’s a video explaining the process:
How To Setup A Vizio Soundbar:
Locate the two analog audio jacks called INPUT1 and INPUT2 on the right side of the rear panel of the soundbar. Plug-in the two analog audio cables to those jacks.
Find the yellow connector labeled SUB OUT in the center of the rear panel and plug-in the subwoofer. If your soundbar has surround speakers, they will be usually connected to the subwoofer through speaker cables.
Plug-in the HD S/PDIF cable inside the S/PDIF input jack found on the left side of the yellow SUB OUT jack. In case you have a non-HD version of the soundbar, you can skip this step.
Plug-in the AC/DC power adapter included in the package into the 24V DC jack. You can find this jack on the left side of the soundbar’s rear panel. Afterward, you can plug the other end of the power adapter into the wall outlet.
Press the power button. It is located on the left side of the soundbar’s top panel. Remember to turn on the speaker bar, too.
Press the Input button and select the input you prefer. This button will come in handy whenever you’re switching between different audio sources.
Select the Vol- or Vol+ buttons to control the speaker bar volume. There is a Mute button you can select as well.
Press the TVOL button (TruVolume) to turn it on/off. If TruVolume is on, it will maintain a comfortable volume level and prevent sudden bursts of loud audio.
You can also turn the surround sound ON and OFF with the TSHD button.
Vizio offers different sound bar systems that cater to varying audio needs. Some may have just the soundbar unit while others may have separate speakers you need to place around the room. You may look at the systems options in the catalog so you can select the one that’s best for your setup.
These soundbars feature anywhere between two to five audio channels. They are also optimized for an immersive sonic experience that will transform a common movie or TV show into an immersive watching experience.
Aside from the wired setup, the Bluetooth connectivity feature benefits those who want to go the wireless route with their Vizio soundbar. With Bluetooth, you can program and control a range of tasks remotely, streamline the installation procedure, and keep the house clutter-free.
Fundamentals Of The Vizio Sound Bars
There are three different soundbar packages from Vizio. The brand also has best Dolby Atmos soundbars you can find in the market, which all vary in terms of their functions and size.
Out of these three, the most affordable package is called “Enhanced Sound” system. It provides its users a two-channel stereo sound bar and there is an option available for adding wireless subwoofers.
The other two packages are the Premium Home Theater and the Surround Sound. Both of these packages include rear surround speakers and a single wireless subwoofer.
The basic difference between these packages is that a specific number of audio channels are included in the sound bar itself. But of the two, the “Premium Home Theater” is Vizio‘s high-grade option, which includes a range of powerful extras such as Wi-Fi connectivity.
Set-up
No matter what package you buy from Vizio for your sound bar system, most of the installation steps will be the same, despite possible difference in some of the hardware.
Upon unwrapping the package, make sure it contains all the cables, screws, and mounts as indicated by the catalog or the official product description by Vizio. In case any of these parts are missing, you should directly contact customer service to get the missing parts or replace the unit altogether.
If the parts are complete, you may proceed with deciding where to put the system. Make sure you are settled with the final position of the sound bar, subwoofers, and speakers before you start hooking them up to each other and the television.
If you’re unsure where to place them, we don’t recommend connecting them before you’ve finally decided. That’s because you might risk damaging the hardware when you move around the main pieces after they’re already connected with cable wires.
Once placed, you can connect your TV or other media to the sound bar easily without worrying about the subwoofer.
On the other hand, if your soundbar comes with a wireless subwoofer, you’ll have more freedom when it comes to placement, but our experts recommend placing it in the front of the room, where the TV is also located.
Connect the SPDIF cable included in the kit to the optical port at the back of the TV and sound bar. The optical port is usually covered, so it’s easier to spot. After connecting the SPDIF cable, the system will get ready for testing.
Plug the soundbar to a power outlet and then turn it on by using the remote control included. Select the appropriate input source. Next, check the Menu settings by pressing Menu on the remote. Then, select the audio option.
Make sure you disable the TV speakers and make the sound bar your main audio resource. To check if it’s done correctly, go to the TV settings and raise the volume of the system. You should hear the audio played via the sound bar instead of the TV speakers.
Aside from the SPDIF, you may also connect the sound bar to your TV by using the optical connection. You would have to purchase a separate standard RCA cable for this type of connection though. Rather than selecting the optical input, you should select the Aux as the preferred audio input method.
Pairing A Vizio Soundbar To A Subwoofer
Pairing the subwoofer to the soundbar is simple and straightforward. Press and hold the button labeled “pairing” on the back of the sub. When the light starts to blink, press and hold the power button on the soundbar for 5 seconds.
When the subwoofer is successfully linked to the soundbar, the LED indicator lights on the front panel will blink 3 times.
Vizio Soundbar Not Working – Troubleshooting
1. Optical input not working
If the optical input isn’t working, make sure you have inserted the optical cable tightly into each input. Sometimes it just takes some jostling and jiggling to get it to work, but it’s pretty easy to do.
Take a closer look at the power cables to make sure that there are no tears or cuts. Physical damage can also be the cause of the optical input not working. If there is damage, you would need to replace the cables.
2. Static Noise
Static noise can also be a result of the inputs not being secured tightly. Look at the inputs and make sure you have inserted them all the way. You can also check for physical damage as you would in the case of the input not working.
Another possibility is that your input settings are incorrect. Try selecting a different audio input on the remote and see if it makes a difference.
3. Buzzing
If there is a buzzing or humming sound coming from your TV, try turning off the power of all devices and then turn them on again. If that doesn’t work, try turning the devices off again but unplug all the cables this time. Then, replug them in and turn everything on again.
It could also be a case of the backlight. In this case, press the menu button for the TV menu, select “picture”, then find the “backlight” setting and turn it down lower.
4. Crackling
The crackling or even maybe popping sound may be from nearby wireless devices. Move other Wi-Fi devices further away from your soundbar and see if it helps.
If not, then resetting your soundbar to factory settings is your best bet. Hold down the Bluetooth button and the volume down button for up to 5 seconds. Doing this will erase all your previous settings, though, just something to keep in mind.
5. Blinking with No Sound
A blinking light on a Vizio soundbar most likely means it’s waiting to be paired. Similar to most products, the light is a signifier of it standing by. Power whichever device you want to pair with the soundbar by pressing the “pairing” button.
Want to know how to fix other soundbar issues? Check our guide on troubleshooting common soundbar problems.
Summary
All sorts of soundbar installation methods are available for connecting a soundbar to TV sets. A range of cables can also be used for installation, including a coaxial cable, digital optical cable, or an RCA cable.
However, the one we recommend the most is the HDMI ARC because you don’t need a separate audio cable to connect the TV and the soundbar.
Some of the Vizio sound bars also come with a Bluetooth pairing feature for a wireless connection. If your sound bar has Bluetooth, you can use your smartphone to stream music or other content. In addition, some of the finest sound bars allow connections to Bluetooth speakers or headsets as well.
For the best home theater experience, make sure to place the sound bar close to your ear levels. However, it should be below the TV so as not to make any obstruction.
When you are not sure about the various ports available on the TV’s back, read the TV manual or user guide before you carry out the soundbar installation. Also, refer to the Vizio manual if you have any specific concerns on settings. The manual is always a great reference on how some things work so you can use your device to the fullest.
If you’re looking for other options, you can find some good ones for cheap with our list of top models under 300 bucks.
PrevPrevious Post
Next PostNext
How to connect a sound bar to Vizio TV?
Quick Answer: To connect a Vizio soundbar to your TV, turn off both devices, connect the HDMI cable to the HDMI ARC ports on the TV and soundbar, turn on both devices, set the soundbar input to HDMI, and adjust audio settings on your TV. Enable CEC for volume control via your TV remote.
Connecting a sound bar to your Vizio TV is a great option if you’re looking for an easy way to improve your home entertainment system.
Adding extra speakers, you’ll get better sound quality and a more immersive experience when watching movies or TV shows.
It’s a quick and easy process, and in this guide, we’ll walk you through the steps.
Don’t let poor sound quality prevent you from enjoying your favorite shows and movies – read on to learn how to connect a soundbar to Vizio TV.
We’ll cover three methods to connect your sound bar to a Vizio TV. Here’s a quick breakdown below if you need to skip ahead.
Short on time? Jump ahead
Pairing a Soundbar to Vizio TV
Image: KnowTechie
READ MORE: How to connect a Vizio sound bar to a Samsung TV
Method 1: Via HDMI Cable
Before we begin with the process, here are the things that you need:
A soundbar with an HDMI port
An HDMI cable
A Vizio TV with an HDMI ARC port
If your soundbar and Vizio TV both have an HDMI ARC port, then connecting them is easy, and you will have the added advantage of controlling the soundbar’s volume through the TV remote.
Just follow these steps:
Turn off both your Vizio TV and sound bar.
Connect one end of the HDMI cable to the HDMI ARC port on your Vizio TV
Now, connect the other end to the HDMI ARC port on your soundbar.
Turn on your Vizio TV and then your soundbar.
Set the input on your soundbar to HDMI.
Navigate to the TV menu, and find ‘Audio.’ Next, change the ‘Digital Audio Out’ option to ‘Bitstream’ or ‘Digital.’
You should now be able to hear the audio from your Vizio TV through the soundbar.
READ MORE: Vizio sound bar HDMI ARC not working? Here’s how to fix it
If you want to control the soundbar’s volume with your TV remote, you need to
set up CEC (Consumer Electronics Control)
On your Vizio TV, go to Menu > System > CEC.
Set the CEC option to ‘Enabled/On. ’
Now, adjusting the volume on your Vizio TV will also adjust the volume on your soundbar.
If you own the latest Vizio TV (2021), and your soundbar supports Dolby Atmos and DTS:X, you can use eARC (Enhanced Audio Return Channel).
This feature allows lossless, high-quality audio to be passed from your TV to your soundbar.
READ MORE: Vizio sound bar won’t turn on? Here’s how to fix it
You will hook the sound bar with Vizio TV by following the steps above to enable this feature.
Once connected, you will have to enable the eARC function from the TV menu:
Settings>Audio>Enable eARC.
Method 2: Via S/PDIF Cable
Image: KnowTechie
To connect your Vizio TV and sound bar using a S/PDIF cable, follow these steps:
First, turn off both your Vizio TV and soundbar.
Next, connect one end of the S/PDIF cable to the ‘S/PDIF port,‘also known as the ‘Optical port‘ on your Vizio TV.
From here, connect the other end of the cable to the ‘S/PDIF In’ port on your soundbar.
Finally, turn on your Vizio TV and then your soundbar.
Set the input on your soundbar to ‘Optical.’ Also, turn off the internal speakers and change the audio output on your Vizio TV.
You should now be able to hear the audio from your Vizio TV through the soundbar.
Method 3: Via Analog Cable
Image: KnowTechie
To connect the sound bar and Vizio TV using an analog cable, follow these steps
First, turn off both your Vizio TV and soundbar.
Next, connect one end of the RCA or Analog cables to the ‘Analog’ ports on your Vizio TV (Red and White color).
Connect the other end of the cables to the ‘Audio In’ port on your soundbar(Red and White color).
Turn on your Vizio TV and then your soundbar.
Set the input on your soundbar to ‘Analog.’ Also, disable the internal speakers of your Vizio TV.
Congratulations, you have now connected your Vizio TV to the soundbar.
Can you connect a Sound bar to Vizio TV via Bluetooth?
Image: KnowTechie
Most Vizio TVs don’t come with Bluetooth, so you can’t connect your external speakers or soundbar to Vizio TV using Bluetooth.
READ MORE: How to reset Vizio TV without remote? 2 methods
A few models come with ‘Bluetooth LE‘ (Low Energy), but it’s not the same as regular Bluetooth.
Vizio uses this technology to connect its SmartCast app and not for audio streaming.
So, a wired connection is your option to connect a soundbar to Vizio TV.
Wrapping up
In conclusion, this article explains the different methods you can use to connect a soundbar to your Vizio TV.
We hope this guide was helpful and that you were able to connect the soundbar without any issues.
READ MORE: Vizio Sound Bar turning on or off by itself? Here’s how to fix that
Have any thoughts on this? Carry the discussion over to our Twitter or Facebook.
Editors’ Recommendations:
How to connect JBL speakers together?
How do I reset my JBL speaker?
How to connect JBL speakers to iPhone?
JBL speaker won’t connect? JBL speaker keeps disconnecting? Here’s how to fix that
Just a heads up, if you buy something through our links, we may get a small share of the sale. It’s one of the ways we keep the lights on here. Click here for more.
Follow us on Flipboard, Google News, or Apple News
google-news
Related TopicsAudioHow-ToNewsSoundbarTVVizio
Kevin is KnowTechie’s founder and executive editor. With over 15 years of blogging experience in the tech industry, Kevin has transformed what was once a passion project into a full-blown tech news publication. Shoot him an email at [email protected] or find him on Mastodon or Post.
How to Connect Vizio Soundbar to TV [4 Ways]
Vizio offers several different soundbar models available in the market such as Immersive Soundbar, All-in-One Soundbar, Home Theater Soundbar, Compact Soundbar panel and soundbar for cinema. Connecting your Vizio soundbar to your TV is pretty easy. All Vizio soundbars are packed with great features and plenty of connectivity options. The soundbar is definitely worth the price and has features for customization and wireless playback. There are four ways you can connect your Vizio soundbar to any TV.
Vizio Soundbar Connection Methods
Using Bluetooth
Using HDMI ARC
Using the SPDIF cable
Using RCA cable
How to connect your Vizio soundbar to your TV using Bluetooth
1. On the side of the Vizio soundbar, you can see the Bluetooth button.
2. Press and hold the Bluetooth button to start pairing.
3. Make sure the Bluetooth of your Vizio TV or any other TV is turned on.
4. Select Soundbar from Bluetooth pairing menu.
5. You can now access the sound from your TV on the soundbar.
If you want to connect your Vizio soundbar to your TV without a remote control, you can use the Bluetooth method. Since Bluetooth is a common function of Smart TV, you can connect the soundbar to various Smart TVs such as Roku, Hisense, Samsung, Emerson, Toshiba, Sony, Panasonic, JVC and Fire TV.
How to connect the Vizio Soundbar to a TV using HDMI ARC
1. Connect an HDMI cable to the HDMI OUT (ARC) port on the Vizio Soundbar.
2. Also connect the other end of the HDMI cable to your TV via the HDMI 1 (ARC) port.
3. Turn on the soundbar by pressing the Force button on it after connecting to the power supply.
4. Press the Input button on the soundbar remote and select HDMI as the input method.
5. The soundbar will now be connected to the TV.
How to connect your Vizio soundbar to your TV using the SPDIF cable
1. Make sure you have all the cables, mounts, screws, and other accessories that came with your soundbar.
2. Take the SPDIF cable ( Toslink or fiber optic cable) and connect one end of the cable to the TV through the OPTICAL port.
3. Then connect the other end of the SPDIF cable to the soundbar.
4. Connect the soundbar to the power supply with the power cable and press the button Power button.
5. Using the Soundbar remote control, press the enter button and select the Optical , Toslink or SPDIF option.
6. Open the Vizio menu on the screen by clicking the Menu button on the remote.
7. Select Audio option and turn off TV Speakers feature.
8. Change Digital audio output to Dolby Digital or Bitstream .
9. You can now listen to all your TV audio through the soundbar.
How to connect Vizio Soundbar to TV with RCA cable
1. On your TV, you can find Audio output port with red connector and white connector.
2. Take the red and white RCA audio cable and then connect it to Audio port with similar color.
3. Connect the other end of the RCA cable to the AUDIO INPUT and AUX port on your soundbar.
4. Connect the soundbar to a power source and turn it on by pressing the button on the device. Force button.
5. Using the soundbar remote control, press the Input button and select AUXILIARY as your input.
6. Press the Menu button on the remote control and open the Visio menu.
7. Select Audio option, and then turn off the speaker setting with the switch.
8. You can choose Fixed option or Variable option as you like.
C Variable Option, the volume of your soundbar can be adjusted manually.
C Fixed option, the volume of the soundbar is controlled by the soundbar itself.
9. Now you can listen to all songs with the soundbar.
If you are a private listener, you can connect headphones to your Vizio TV and listen to songs and podcasts.
FAQ
1. How do I connect the Vizio soundbar to my TV?
You can connect your Vizio Soundbar to yourself using an HDMI cable, Bluetooth cable, RCA cable, and SPDIF cable.
2. How to connect VIZIO soundbar to TV without cable?
If you want to connect the soundbar to your TV without a cable, you can connect it using Bluetooth.
3. How can I connect the VIZIO soundbar to a TV without HDMI?
In addition to using an HDMI cable, you can connect your Vizio soundbar to your TV using Bluetooth, an RCA cable, and an SPDIF cable.
How to connect and set up a soundbar [translation] • Stereo.ru
Today, soundbars are becoming more and more popular choice for those who want to improve the sound of their TV. They are compact, virtually wire-free, and easier to set up than full-sized home theater systems. However, soundbars are suitable not only for sounding TV shows: you can connect additional devices to different models that can expand the functionality of the soundbar. Here are some tips for purchasing and setting up soundbars.
Location
If the TV is placed on a pedestal, stand, shelving unit, table or chest of drawers, the soundbar can simply be placed directly in front of it. True, you need to measure the distance from the surface of the stand to the screen and check whether the soundbar will fit in this gap and whether it will block the image. But such an arrangement is ideal – the sound will come almost “out of the picture”.
If you want to install the soundbar inside a rack, then it should be pushed as far forward as possible so that the side walls of the rack do not interfere with the sound. Also keep in mind that soundbars that support Dolby Atmos and DTS:X should not be placed inside racks – as they work with sound reflected from the ceiling to create vertical audio effects.
It is better not to cover the front and side panels of the soundbar with anything and not to impede the spread of sound. Although the photo shows otherwise
If the TV is hanging on the wall, then the soundbar can be screwed under it – many models are equipped with wall mounts. You can place it both under the TV and above it, but from below it is still better, since the height of the sound source is about the same as that of the listeners, and this option looks, in our opinion, prettier. Soundbars often come with mounts and/or paper templates that make it easy to mark the wall for screw holes.
The Bluesound Pulse Soundbar can even be mounted on a TV stand
If there are no mounts included with the soundbar, you should refer to the user manual and see if it can, in principle, be hung on the wall, and what the manufacturer recommends to purchase for this.
Basic connections
Once you know exactly how to position the soundbar, it’s time to think about how to connect your TV and other devices to it. In the case of a wall mount, you must first connect everything, and then hang the soundbar.
The photo below shows the connectors found on the soundbar. Of course, the location and captions may differ depending on the brand and model, but this photo illustrates the “hospital average” option well.
From left to right, digital optical input, digital coaxial input, and analog stereo input are shown, with the corresponding cable plugs below the connectors. A digital connection is best suited for transferring the signal from the TV to the soundbar. If the TV with which you plan to make friends with the soundbar does not know how, you should use an analog connection. If the TV is ready to connect both digitally and analogously, then you should choose to your taste.
Now you need to make sure that the TV is sending audio to the soundbar it is connected to with a cable. To do this, go to the sound settings menu on the TV, turn off the built-in acoustics of the TV and enable the option to work with external acoustics. In the same place, it is quite possible that the TV will offer to choose which output it will send the audio signal to – digital or analog. But smart TVs themselves determine which input and what they have connected.
In theory, external acoustics is selected only once. If you want to watch something through the TV’s built-in audio system, you will need to go into the settings again, turn off the soundbar and turn on the built-in speakers. And then do all the manipulations again.
The digital coaxial input can be used to connect Blu-ray, DVD players and other digital sources that have this output. If they lack a coaxial output, they most likely have optics or equivalent.
Another connection option (not shown in the picture) is a 3.5 mm mini-jack. It either replaces the analog stereo inputs or is adjacent to them. The mini jack is convenient for connecting portable digital audio devices. But they can also be connected using an RCA-to-minijack adapter, which is sold separately.
More connection options
In addition to the digital optical, digital coaxial, and analog stereo inputs discussed in the previous section, higher-end soundbars are equipped with other connectors. They are visible in the photo.
HDMI. Using the HDMI input, you can transfer the video signal from your DVD/BD player and set-top box to your TV through the soundbar. The soundbar passes the video signal through itself without changing it in any way, but pulls out the sound from the broadcast and decodes / processes it on its own.
This solution reduces the hassle of wires: you do not need to connect the TV with a separate cable to both the video source and the soundbar. What’s more, the soundbar is capable of supporting HDMI ARC (Audio Return Channel) – the TV then sends the audio signal to the soundbar using the same HDMI cable that the soundbar uses to send video to the TV. This again reduces the number of cables required.
To use this feature, you must enable it in the TV’s HDMI menu. Before doing this, it is better to consult the user manuals for both the soundbar and the TV, since these settings are located in different sections for different brands.
Subwoofer output. Many soundbars have a subwoofer output. If the custom soundbar has one, you can physically connect an external subwoofer to it. Very often, soundbars need subwoofers as low-frequency support for a more complete movie experience.
While soundbars often come with a subwoofer, some don’t. But if there is a connector, you can add a subwoofer to the system yourself. Many soundbars that come with a subwoofer communicate wirelessly with the subwoofer to reduce the number of cables required, even if they have the required connector.
Ethernet port. Another connection option is the Ethernet port. Soundbars with this connector can be connected to a home network, and through it to streaming services. Or even implement in a multi-room system.
Soundbars with an Ethernet port are often equipped with Wi-Fi, which, again, does not require cables. Here it is already worth choosing which network connection option is more convenient for a particular case.
Setting up soundbars with a subwoofer
If your soundbar comes with a subwoofer, you need to find a suitable location for it. You need to arrange it, firstly, conveniently (that is, next to the outlet), and secondly, so that it sounds.
The sub in the right place (where it booms best) needs to be synchronized with the soundbar. A properly installed subwoofer should sound at the same volume level as the soundbar.
Bose SoundTouch 300 Soundbar and AcoustiMass 300 Subwoofer with Virtually Invisible 300 Wireless Speakers
First check to see if there are buttons on the soundbar remote control to control the volume of the soundbar and subwoofer separately. If there is, then it will be much easier to synchronize devices. You also need to see if the soundbar has a master volume control. It will allow you to adjust the volume of the soundbar and subwoofer at the same time, keeping the balance, and you will not have to synchronize the volume levels of the devices every time.
Soundbars with surround sound system
There are also soundbars that come with both a subwoofer and satellites for surround sound. In these systems, the subwoofers are wireless, but the satellites are attached to the subwoofer with cables.
The soundbar is responsible for the front channels – left, center and right, but sends the bass and rear channels to the subwoofer. The subwoofer, on the other hand, redirects the signal to the satellites, and itself buzzes with bass.
In this situation, there are no wires that run from the TV to the rear channels, but the satellites still need to be connected to a subwoofer, and the subwoofer should therefore be placed at the back of the room.
Heos Bar multi-room soundbar paired with Heos Subwoofer, complemented by Heos 1 speakers
On the other hand, some soundbars, for example, Sonos Playbar and Polk Audio SB1 Plus, allow you to connect a pair of wireless speakers to them, which do not need to be connected to a subwoofer with a cable – but it’s still worth plugging into the outlet. This solution is more expensive, but more convenient.
If the custom soundbar can handle surround speakers, it is best to place them behind the listening point, shifted from the center by 10-20 degrees. Also, satellites should be moved a couple of inches from the corners of the room and side walls. The subwoofer they may need to be connected to should be moved along the back wall and found where it delivers deep yet clear bass.
After everything is connected, it is necessary to equalize the volume of not only the subwoofer, but also the satellites – so that they do not clog the soundbar, but are not lost either. You need to see if there are buttons on the remote control to control the volume of specific satellites. After synchronization, you can control the volume using the main knob without the need for adjustment, if it is, of course, there is one.
Soundbars with digital sound projection
Another type of soundbar is with digital sound projection. Such devices are manufactured by Yamaha and released in the YSP (Yamaha Sound Projector) line. These soundbars are distinguished by the fact that instead of classic speakers, they have arrays of speakers on the front panel. These speakers are combined into groups, emulating a 2-, 3-, 5- or 7-channel configuration.
Due to the complex design of the soundbar itself, setting it up is also complicated. First you need to choose in which configuration the array of drivers should work. Then connect the supplied microphone in order to properly adjust the sound. The soundbar plays test tones that determine the configuration of the room. The microphone picks up signals and reflections and sends them to the soundbar for analysis, which adjusts the sound of the speakers to the conditions of a particular room.
This technology requires a room with walls that reflect sound. If the room lacks one or more walls (they are too far away), then a digital sound projector is not the best option.
Should you choose a soundbar or an audio TV stand?
Another version of the soundbar is the TV stand. Its speakers and connection options are classic soundbar ones, but the size (depth and width) allows you to install a TV directly on its top panel.
These stands work well with TVs that have one foot in the middle. That is, for example, it is not a fact that TVs with legs located at the edges can be placed on such a stand: the legs may be set too wide, and the stand may be too narrow.
In addition, the height of such a stand may be greater than the distance from the shelf on which the TV is placed to its frame. These are factors to consider if TV stands are more to your liking than classic soundbars.
Depending on the brand, these devices are called differently: audio console, sound platform, sound stand, and so on.
Bluetooth soundbars with wireless multi-room
Bluetooth is a feature that is often found even in budget soundbars. In most cases, Bluetooth allows the soundbar to receive audio from smartphones and other mobile devices. However, some higher-end soundbars can send audio to wireless headphones and speakers.
The latest addition to soundbars is wireless multi-room. With this functionality, you can use the soundbar connected to the mobile application to work in a multi-room system – listen to music from connected sources or streaming services and send melodies to other speakers on the same network. Multi-room systems are closed or semi-closed: the soundbar decides which speakers it can interact with.
That is, for example, a Sonos soundbar will work only with Sonos speakers, Yamaha MusicCast soundbars – only with Yamaha devices, as well as Denon Heos will only work with Heos devices, and Visio – with SmartCast. And the DTS Play-Fi system is cross-platform, it is used by several brands, and all devices that support it, regardless of the brand, can be connected to the network.
Conclusions
Soundbars are popular for one simple reason: they are easy to set up and start using.
For those new to the world of smartphones, the Jitterbug Smart3 is an intuitive entry point. With its simplified menus, voice commands, and optional safety features, it’s one of our favorite smartphones for seniors.
In this Jitterbug Smart3 review, we’ll take a closer look at how this phone works and how it performed in our tests.
Pro Tip: If you’re looking for a high-performing smartphone, be sure to check out my guides to the best iPhones for seniors and best smartphones for seniors.
The Jitterbug Smart3 allows you to take notes, ask questions, and set reminders with your voice.
Jitterbug Smart3 Pros and Cons
A Smartphone, Simplified: With its bright screen, large text, and streamlined menus, the Jitterbug Smart3 makes its advanced features accessible. Even for the most technologically averse person, I could see them using this phone with ease.
Safety Features: In addition to minutes and data, Lively also offers health and safety packages, turning your phone into a personal safety device. Their 5Star urgent response feature gave me 24/7 access to highly trained agents who could connect me to help in the event of an emergency.
Powerful Cellular Network: Although the Jitterbug Smart3 is only compatible with Verizon, this cellular provider offered everything I’d need in terms of coverage.
Affordable Plans: Between talk, text, data, and health packages, Lively offers a wide range of service options. Starting at just $14.99 per month with no long term contracts, they offer plans that can suit any budget.
Slow Navigation: While my Jitterbug Smart3 was a breeze to use, I couldn’t help but notice that loading times for apps and the web browser were a bit slower than on other smartphones.
Overage Charges: Despite their competitive pricing of talk, text, and data plans, Lively charges additional fees when you go over your monthly allowance. While $0.35 per minute might seem negligible, this could add up quickly if you make a lot of calls.
Our Jitterbug Smart3 Video Review
Purchasing My Jitterbug Smart3
The Jitterbug Smart3 features a simplified menu, making the smartphone easy to pick up and use.
The Jitterbug Smart3 can be purchased over the phone, online, or through physical stores such as Best Buy. I decided to buy my device directly from Lively’s website. In my experience, purchasing directly from Lively will give you the lowest prices.
Lively’s website made everything easy for me. First, I was able to take a closer look at the Jitterbug Smart3 and learn about some of its features. I appreciated the straightforward way in which Lively lists their pricing. Unlike many cellular providers, who require costly long-term contracts in order to purchase for the listed price, Lively keeps it simple and honest.
My Jitterbug Smart3 ended up costing me $149. 99 for the device in addition to a $35 activation fee. Sure, this might seem a bit pricey, but considering that modern smartphones can cost upwards of $500, not to mention data plans and hidden fees, I was pleased with this price point.
Jitterbug Smart3 Service Plans
Before I could complete my order online, I also had to figure out my service plans. Lively offers two different types of plans. Of course, there is the standard type of plan that includes some level of talk, text, and data, but there is also the option to sign up for a health and safety package. This latter type of plan provides you with features that can turn your Jitterbug Smart3 into a personal emergency response system, but more on that later. First, let’s dig into the basics.
Currently, Lively offers two different plans for the Smart3: Value Talk and Text and Unlimited Talk and Text. The former costs $14.99 per month, and the latter costs $19.99 per month. Additionally, since the Smart3 is a smartphone, you’ll likely want to add data to your plan which costs an additional monthly amount depending on the amount of data you’d like. For example, 500MB per month will cost an additional $5 per month while unlimited data will cost an extra $30 per month.
Jitterbug Smart3 Plans and Costs
Plan
Monthly Cost
Allowance
Value Talk and Text
$14.99 per month
300 minutes
10 cents per text message
Unlimited Talk and Text
$19.99 per month
Unlimited minutes
Unlimited messages
Unlimited Talk and Text with 500MB of Data
$24.99 per month
Unlimited minutes
Unlimited messages
500MB of data
Unlimited Talk, Text, and Data
$49.99 per month
Unlimited minutes
Unlimited messages
Unlimited data
To make the most of my Jitterbug Smart3, I decided to sign up for the unlimited talk, text, and data plan. Another thing that factored into my decision was that Lively charges additional fees in the event of an overage ($0.35 per minute, $0.10 per text, and $0.10 per megabyte). While small, these fees could quickly add up to your bill. If overages are something that concerns you, then I’d recommend checking out Consumer Cellular, who automatically upgrades your plan in the event of an overage.
Any Lively plan includes calling to both the continental U.S. and Canada. Calls made to Mexico, the U.S. Virgin Islands, and Puerto Rico will cost $0.20 per minute. Calls made to all other international destinations will cost $1 per minute.
With my cellular plan figured out, there was just one more step, and that was choosing a health and safety package.
Savings Tip: When you sign up for a Lively health and safety package, you’ll automatically receive discounts on your plans for talk, text, and data.
Lively Health and Safety Packages
You’re probably wondering: What exactly is a health and safety package? In short, they’re a range of services designed for older adults that provide convenience, safety, and general wellbeing for the user. Essentially, they helped turn my Jitterbug Smart3 into my own personal emergency response system. Now, let’s get into the specifics.
5Star Urgent Response: In the event of any emergency, medical or otherwise, the 5Star Urgent response feature can come in handy. By pressing the dedicated button on the bottom of my Jitterbug Smart3’s screen, I was immediately connected to one of Lively’s IAED-certified agents who could trace my location and send help if necessary. Luckily, during my time with the Jitterbug Smart3, I had no medical emergencies; however, when I lost my way on a walk through the city, I contacted an agent for assistance, and, using my location, she helped me find the nearest bus stop.
The Jitterbug Smart3 has a dedicated Urgent Response button on the bottom right-hand corner of the screen.
Urgent Care: One of my favorite wellness features, Urgent Care, allowed me to speak directly with registered nurses and doctors, who were able to provide me with medical advice and even prescribe common medications over the phone. Did I mention this service is also available 24/7?
Lively Link: The free Lively Link app is a great way for caregivers to keep tabs on their loved one. Using this app on his smartphone, my husband received notifications each time I pressed my 5Star button. He could also check on my location and the battery level of my Jitterbug Smart3.
Brain Games: Studies have demonstrated that puzzle-based games can help maintain cognitive function, even in advanced age. Because of this, I loved the addition of Lively’s brain games. One of my favorites, called Right Turn involves rotating a series of images in order to create matching pairs. It’s almost like the gym for your brain!
Personal Operator: Much like the telephone operators of yore, my Lively personal operator-assisted me with looking up numbers and addresses.
These features come in three different packages. Here is an overview of the plans and their costs.
Lively Health and Safety Packages
Basic
Preferred
Ultimate
5Star Urgent Response
Yes
Yes
Yes
Brain Games
Yes
Yes
Yes
Urgent Care
No
Yes
Yes
Lively Link
No
Yes
Yes
Personal Operator
No
No
Yes
Monthly Cost
$19.99
$24.99
$34.99
Jitterbug Smart3 Accessories
In addition to the plethora of services offered through Lively, there are also some additional bits of hardware you can purchase for your Jitterbug Smart3. Here’s a closer look at each of them.
Glass Screen Protector: More durable than a plastic protector, this tempered glass covering will prevent cracks and scratches on your Jitterbug Smart3’s screen. It’s also thin enough to preserve its touch-based operation.
Wallet Folio Case: This bi-fold case not only protects your phone, but it also allows you to store your valuables such as credit cards and cash.
Bluetooth Headset: Made by Insignia, this bluetooth headset hooks right onto your ear and allows you to more easily take calls while on the go. Perfect for commuters, this headset’s speaker can also be used to listen to music.
Stereo Earphones: For those who want a stereo listening experience, look no further than these stereo headphones. Like traditional earbuds, they connect to your Jitterbug Smart3 and provide a higher definition audio experience.
Gel Case: This gel case, available in either blue or red, offers a slimmer profile than that of the wallet folio. It also features holes for the speaker, camera, and headphone jack, giving you full access to your Jitterbug Smart3.
The Jitterbug Smart3 is rated M4/T4 in terms of hearing aid compatibility.
Jitterbug Smart3 Accessory Pricing
Jitterbug Smart3 Accessory
Price
Wall Charger
$19.99
Car Charger
$24.99
Glass Screen Protector
$9.99
Wallet Folio Case
$24.99
Bluetooth Headset
$29.99
Stereo Earphones
$24.99
Gel Case
$19.99
FYI: When purchased directly through Lively, your Jitterbug Smart3 will come with both a wall charge and a car charger at no additional cost.
The Jitterbug Smart3 In Action
After purchasing my Jitterbug Smart3 and signing up for a plan, all I had to do was wait for my package to arrive. In the box, I found my Jitterbug Smart3 device, a wall charger, a car charger, and a user manual, which guided me through the setup process. First, I plugged my new phone into the wall charger, plugged that into an outlet, and then waited about an hour for it to fully charge. Once I powered the phone up, all I had to do was dial the service number listed in the guide, confirm my information, and then I was ready for some tests.
Unlike an iPhone or Samsung Galaxy, which feature complex graphics, widgets, and display features, the Jitterbug Smart3’s home screen looks more like a list. Therein, I found dedicated buttons for the most essential functions: phone, voicemail, text messages, camera, internet, and maps. Sure, the design may not have been the most cutting edge, but I could definitely see the appeal of this simple layout. The on-screen text was also large, which is great for the many people with vision impairment.
Also easy to use was the text message feature. With the Jitterbug Smart3’s five and a half-inch screen, I had no trouble accurately typing, and the same goes for dialing numbers. In my many test phone calls, I noticed no issues. Both the call quality and volume were superb, and all of my calls, both in and outside my home, went through without a hitch. Similar to the Jitterbug Flip2, the Jitterbug Smart3 also features voice dialing, so I was able to call various contacts using only my voice.
The one drawback I noticed with the Jitterbug Smart3 was that browsing the web often came with considerable wait times. For example, even when connected to my home’s Wi-Fi network, it would still take about 5-7 seconds for my phone to load The Senior List. Now, in the grand scheme of things, this isn’t really that long of a wait; however, it is certainly longer than the load times from other smartphones.
Bottom Line
When all is said and done, a Jitterbug Smart3 can’t replace a full-fledged medical alert system, many of which are waterproof, can be worn around the neck, and feature automatic fall detection. With falls being the main source of fatal injury to older adults, I think of fall detection as an essential feature of any bonafide medical alert system.
Still, what the Jitterbug Smart3 offers is a bridge between older adults and the modern smartphone. With its intuitive controls and added safety features, chances are this smartphone be great for any of your loved ones.
To learn more about our favorite cell phones and providers, be sure to check out our helpful guides:
Best Cell Phone Plans for Seniors
T-Mobile Senior Plan
AT&T Senior Plan
Verizon Senior Plan
Mint Mobile Review
Cricket Wireless Review
Senior Cell Phone Discounts
Jitterbug Smart3 Frequently Asked Questions
Is the Jitterbug Smart3 compatible with hearing aids?
The Jitterbug Smart3 has a hearing aid compatibility score of M4/T4, meaning that it complies with FCC guidelines and will work with most hearing aids.
How much storage is available on the Jitterbug Smart3?
The Jitterbug Smart3 has 32GB of internal memory, which is enough to store about 3,200 songs, 6,000 photos, or several hours of video. Granted, these numbers will vary based on the quality of your files. Additionally, you can add up to 256BG of external storage through a micro SD card.
Which operating system is used on the Jitterbug Smart3?
Technically speaking, the Jitterbug Smart3 uses the Android 7.0 Nougat operating system, albeit a customized version that allows for greater ease of use.
How is 5Star on my Jitterbug Smart3 different from a traditional medical alert system?
A traditional medical alert service offers you a direct line of communication with a monitoring center, one that can call for emergency assistance. Lively’s 5Star service does this, in addition to offering roadside assistance. Based on your personal profile, which you’ll set up at the beginning of your service, 5Star’s agents will be able to assist you in just about any situation, whether you’re lost, need medical attention, or simply feel in danger.
What is the Jitterbug Smart3 battery life?
In our tests, the Jitterbug Smart3 lasted for 15 hours of talk time and nearly a week on standby.
Plans and Costs in 2023
Combining affordable plans with medical alert features, Lively is one of the best options for senior cell phones.
Jitterbug phones have evolved to offer users simple interfaces with surprisingly advanced features. The Jitterbug Flip2 is modern take on an easy-to-use flip phone, while the Jitterbug Smart3 is ideal for first-time smartphone users. Both of them are ideal for users of any skill level.
Did You Know: A good cell phone is nothing without a quality network to pair it with. Read my rundown of this year’s best senior cell phone plans to learn more.
Jitterbug Flip2
The Jitterbug Flip2 placed in its charging cradle
At $99. 99 (plus activation), the Jitterbug Flip2 is the more affordable of Lively’s two device options, and with its classic flip phone design, it’s also the more simplistic model. For the user looking to make calls, send text messages, and snap the occasional photo, the Jitterbug Flip2 is ideal. With its large buttons, voluble speaker, and sizable screen, this phone is a breeze to use. Additionally, this phone boasts an M4/T4 rating for hearing aid compatibility.
Despite the Jitterbug Flip2’s simple appearance, it also is capable of some advanced features not seen from the average flip phone. On the outer edge of the handset, you’ll find a dedicated 5Star button. When pressed, this button will connect you to a Lively monitoring agent who will assess your situation and contact a loved one or emergency services if necessary.
The one downside of the Jitterbug Flip2 would have to be its 2-megapixel camera. While it can certainly capture images in a pinch, it lacks the clarity and resolution of the camera featured on the Jitterbug Smart3. Still, as far as flip phone cameras go, this one is about par for the course.
In terms of plans, the Jitterbug Flip2 can be paired with one of two plans that start at $14.99 per month.
Jitterbug Flip2 Plans
Plan
Costs
Monthly Allowance
Value Talk and Text
$14.99 per month
300 minutes
10 cents per text message
Unlimited Talk and Text
$19.99 per month
Unlimited minutes
Unlimited text messages
Lively Overage Charges
Unlike Consumer Cellular, who will automatically upgrade your service plan in the event that you go over your monthly allowance, Lively will charge you for the overage. Each additional minute will cost $0. 35, and additional texts will be $0.10 each.
In terms of calls, users may make calls anywhere in the continental U.S. or Canada for no additional charge. With that said, calls made to Puerto Rico, the U.S. Virgin Islands, or Mexico will cost an additional $0.20 per minute.
Activation Fees: Although Lively does not require you to lock into a long-term contract, both Lively devices require a one-time activation fee, though this is waived with the purchase of a health and safety package.
Jitterbug Smart3
The Jitterbug Smart3 features a simplified menu, making the smartphone easy to pick up and use.
Lively’s response to the fact that more and more seniors are getting in on the mobile movement, the Jitterbug Smart3 features larger text and icons and is the company’s biggest smartphone. The phone comes with everything users know and love from the Lively name—including the preloaded 5Star emergency app, as well as MedCoach and UrgentCare. And did we mention that the Jitterbug Smart3 also includes mobile internet access from anywhere at any time?
Starting at $149. 99 plus activation fees, the Jitterbug Smart3 is also one of the most affordable smartphones out there. Voice typing, a built-in camera, a handy usage meter, and a convenient long-lasting battery round out the list of reasons why this Jitterbug is a “smart” choice for today’s connected users.
As with the Jitterbug Flip2, users choose between Lively plans aimed at meeting their individual needs free of annual contracts, cancellation fees, and other unnecessary expenses. With the Jitterbug Smart3, plans start as low as $14.99 per month; however, you’ll likely want to purchase data usage, which comes at extra costs.
Jitterbug Smart3 Plans
Plan
Costs
Monthly Allowance
Value Talk and Text
$14.99 per month
300 minutes
10 cents per text message
Unlimited Talk and Text
$19. 99 per month
Unlimited minutes
Unlimited text messages
Unlimited Talk, Text, and Data
$49.99 per month
Unlimited minutes
Unlimited text messages
Unlimited data usage
Lively Health and Safety Packages
Available on both the Jitterbug Flip2 and Jitterbug Smart3 are Lively Health and Safety Packages. For the user looking to expand the functionality of their device, these packages provide you with the assistance and peace of mind normally confined to medical alert devices. Starting at $19.99 per month, these plans allow you to make use of your dedicated 5Star button (built into both phones), which gives you 24/7 access to one of Lively’s trained emergency specialists.
Here is an overview of Lively’s Health and Safety Features:
5Star Service: With this service enabled, you’ll have 24/7 access to IAED-certified agents. When contacted, one of these agents can use your phone to track your location, assess your situation, and get you the help that you need, whether this means contacting a loved one, or emergency services, or simply giving you directions to the bus stop.
5Star Service from Lively
Urgent Care: With Lively’s Urgent Care feature, you get access to a registered nurse or board-certified doctor who can give you on-the-spot medical advice, no appointment required. What’s more, you can even use this service to fill common prescriptions over the phone.
Lively Link: A handy feature for caregivers, the Lively Link app can be downloaded on a smartphone. In use, it will give you access to updates from your loved one’s phone, notifying you whenever they use the 5Star button, in addition to allowing you to check their location and status of their phone.
Personal Operator: For the user tired of having to look up phone numbers, the personal operator feature gives you unlimited access to a friendly operator who will assist you in looking up addresses and connecting you to any number in the United States and Canada.
Did You Know: If you’re looking for a full-fledged medical alert system, then read my rundown of this year’s best medical alerts.
Lively Health and Safety Packages
Basic
Preferred
Ultimate
Monthly Cost
$19.99
$24.99
$34.99
5Star Service
Yes
Yes
Yes
Urgent Care
No
Yes
Yes
Lively Link
No
Yes
Yes
Personal Operator
No
No
Yes
Lively Recap
While modern cell phones have a reputation for being beyond the capabilities of older adults, the Jitterbug Flip2 and Jitterbug Smart3 prove that this is not the case. With their combination of simple devices, wellness features, and affordable service plans, each Lively device is tailored to keep seniors connected to their loved ones with little hassle.
To learn more about the best cell phones for seniors, be sure to check out our helpful guides:
Best iPhones for Seniors
Best Smartphones for Seniors
The Best Flip Phones for Seniors
Easiest Phones for Seniors
Senior Cell Phone Discounts
Lively Frequently Asked Questions
How is 5Star different from similar medical alert services?
Much like a mobile medical alert system, a 5Star-enabled Lively gives you peace of mind anywhere you go. Unlike a medical alert system, however, this service is not confined to medical emergencies, as it can also be used to contact roadside assistance; however, this service does not include fall detection on Lively phones.
What makes the Jitterbug Flip2 so easy to use?
Through a combination of large buttons, a bright screen, and intuitive menu design, the Jitterbug Flip2 is designed to have no learning curve whatsoever. Additionally, it’s accessible to people with vision and hearing impairments.
Is the Jitterbug Smart3 hearing aid compatible?
The Jitterbug Smart3 has a hearing aid compatibility rating of M4/T4, the highest rating possible. This ensures that nearly any hearing aid can continue to work without static while using the Jitterbug Smart3.
Do I have to sign a contract for Lively service?
The longest commitment you’ll have to make with Lively is for just one month. Paying for your service on a monthly basis, you will never be asked to lock into a long term agreement.
Are roaming and long distance calls included with my Lively?
Regardless of your Lively service plan, you will never be charged extra for long distance calls or roaming.
Jitterbug Smart2 review – Wildly useful tips for choosing
electronics
login
Welcome! Log in to your account
Your username
Your password is
Have you forgotten your password?
create an account
Register
Welcome! Register to create an account
Your email address is
Your username
The password will be sent to you by e-mail.
password recovery
Retrieve your password
Your email address
GreatCall offers a wide range of products and services specifically designed to keep in touch with people who may live alone and need an emergency insurance network. situation and get the help you need quickly and efficiently..
The latest product to be used by 5Star is the Jitterbug Smart2, an affordable Android phone with software that makes it easier for older people to use. like the latest iPhone?
Pricing and Availability
Jitterbug Smart2 is available for sale at www. greatcall.com and at retailers nationwide.
For a list of all retailers, visit: http://www.greatcall.com /StoreLocator
design
The hardware in this case would be familiar to anyone who knows the Alcatel A30 Plus mobile phone, as the Jitterbug Smart2 is that phone.
There may be some minor internal differences such as the Smart2 is locked to Verizon, but anyone who owns Alcatel will recognize this device. GreatCall has done with this device, focusing on changing the interface and how it can be used to access the services they sell with the device..
Critical, a button to access 5Star is available on every screen. That way, no matter what the phone does, if something goes wrong, help is at hand.
It’s a good idea because if you’re facing any type of emergency, the last thing you can do is navigate the interface to get exactly the icon you want.
But the interface changes on the Jitterbug Smart2 go further , reducing phone functions to those actions that most owners really need. These include calling, texting, taking pictures, using the internet, accessing email, maps, and connecting to a live response carried by GreatCall..
If you wear Lively, the phone may be on your face and you can still activate 5Star and contact an agent without even touching your phone.
(Image credit: GreatCall)
Another great feature on the menu is ‘Brain Games’, a collection of brain games designed to help seniors stay sharp and focused while performing cognitive functions.
If this product has flaws, then it assumes that the elder’s already have a good quality mobile phone that they use every day. And, over the years, the number of older people who don’t we believe the level of technological proficiency will plummet.
For this solution to be of value, the phone must be carried by the person it serves, and he must remember to charge it regularly. like Parkinson’s.
Good job GreatCall has done changing Alcatel to be suitable for the elderly, they may not address these medical issues if they exist.
Before investing in a phone and a service, it would be wise to assess whether the person they are called to support can benefit from it.
5Star service
We’ve already mentioned how the phone provides direct access to the 5Star service, but that’s only part of the story. which allows the wearer to speak to a nurse or doctor at any time of the day,
and even get a prescription for regular medicines.
GreatCall Link includes everything except Basic 5Star service, a means to inform caregivers of the phone’s owner..
The link can install an application on the caregiver’s phone or a web portal that any computer can access with the correct reporting credentials. It’s designed not to be intrusive, but to alert those who need to know if help is needed.
5Star starts at $19.99 per month for the basic package. Also, it’s a Preferred service that adds Urgent Care and GreatCall Link for $24.99 per month, and if you want to replace your phone and personal carrier, the Ultimate Health & Safety package costs $24. 9$9 per month..
In addition to this cost of services, you also need a Verizon data plan, which varies from $7.49 per month depending on the minutes of the call, included texts and data package..
(Image credit: GreatCall)
View
The MediaTek MT6738 chip in this device may be quad-core, but it isn’t a powerhouse.
Where this platform’s limited performance is most noticeable in areas that use the most resources, such as photography. But it can be sluggish in other cases, as the amount of storage available for apps isn’t huge, forcing you to work with flash if you have a lot of apps open.
The mobile side of this unit is acceptable as it was built to use GSM (850/900/1800/1900), CDMA (0/1), UMTS (1/2/4/5) and a decent amount of 4G. LTE bands (2/4/5/7/12/13/17). Since Verizon uses LTE bands 2, 4, 5, 13, and 66, it should work with one of those if LTE is available in your area. Smart2 because it turns the complexity of an Android smartphone into a simple package that even the most unfavorable tech owner should use. .
The phone is priced at competitive prices and emergency support contracts aren’t too expensive. Considering the potential costs associated with getting help quickly, paying for a service like 5Star can be a very smart investment.
Service and interface customization are strengths of the Jitterbug Smart2 offering, but it’s not without a few weaknesses too.
At the top of this list are the technical specifications of the base phone, which, if bought from an online store, would cost less than $100..
Another consideration is Verizon’s cellular network and how this requirement applies to the customer.
While Verizon is considered one of the largest networks with the most extensive service, it can’t guarantee any service in a particular geographic location.
Unless you’ve checked cell service in places where the phone is likely to be deployed and where the signal is strong and then fixed on that device and the associated network wouldn’t be a smart choice .
Since the system is exclusive to Verizon, it doesn’t, unfortunately you can get by with another mobile carrier.
For most phones, the sales step is directed at the user. But here the real market is those who have distant family members and want to make sure something happens so they’ll be able to get help quickly. And keep posted if something happens.
With this device, they know that help is at hand, even if they’re far away, and that peace of mind can easily be worth the modest cost of a phone and an associated plan.
jitterbug flip review – Wildly useful tips for choosing
electronics
login
Welcome! Log in to your account
Your username
Your password is
Have you forgotten your password?
create an account
Register
Welcome! Register to create an account
Your email address is
Your username
The password will be sent to you by e-mail.
password recovery
Retrieve your password
Your email address
If you thought that flip phones stopped being a thing before The Matrix sequel, then we have to point out that they’re still popular in parts of Asia.
But they are also a good idea for older people. Since they’re small and compact, they’re rugged and aren’t ambiguous about where you need to speak and listen.
These are no doubt some of the good reasons why Greatcall chose the flip phone for the Jitterbug Flip solution. The phone to call is so important that it can be a matter of life or death for the person making it. For a list of all retail stores, visit: http://www.greatcall.com/StoreLocator
design
Like the Jitterbug Smart2, also from Greatcall, the Jitterbug Flip is a redesigned phone with some minor aesthetic changes and a bigger interface change. for those who got one from Sprint or T-Mobile.
Available in red or graphite, it has two displays, one inside the bed and a smaller one outside.
The large one is 3.2 inches and has a resolution of only 320 x 480 pixels, while the smaller external screen is only 1.44 inches.
As these screen sizes and resolutions show, these displays cannot read documents or maps, they’re for large and easy-to-read options, such as entering a phone number or reading the time.
The tiny external display may seem like overkill, but it allows you to flip the Flip over like a bedside clock when it’s on its charger, and it doesn’t negatively impact battery life.
To make or receive a call, simply open the phone and you’re ready to speak or dial a number. It’s very basic and somewhat reminiscent of a phone from the ‘feature phone’ era rather than a modern smartphone.
It has extra large buttons for the numeric keypad and above them an up/down selector and easy to follow ‘Yes No’ option.
However, it’s Android on the inside and has all sorts of features you could expect from a phone that first appeared in 2016.
There’s a basic 2-megapixel camera with flash, Bluetooth 3.0, a headphone jack, a Micro USB port for charging and file transfer, and 1GB of RAM. There’s also a Micro SD card slot inside to add more storage, but that’s not mentioned in the manual at all.
The battery capacity is only 1780 mAh, but with a very modest processor and small screens, which is more than enough to keep the Flip powered for up to five days before it needs to be recharged. .
(Image credit: Greatcall)
What separates this product from cheap Chinese phone technology is the extremely simplified user interface Greatcall designed for it, and how to use it to access their support services in the event of a problem.
Instead normal android icon pages, the user is presented with a scrolling menu to select one of the functions, ideal for people with dexterity limitations..
However, what they didn’t do’ This design has a 5Star button on the screen, which is located directly below the number pad and is colored red for easy identification. may contact friends and family for minor issues or emergency services for more serious scenarios.
The phone’s inherent GPS technology can transmit its geographic location, so they should be able to locate you quickly when they receive assistance.
What this phone, in its modified form, doesn’t offer Internet services or email that can discourage older people who are tech-savvy to use. What’s interesting about Jitterbug Flip is how many basic features have been tweaked slightly to help those who may have vision problems or lack fine control in their hands..
As we mentioned, this phone has a rear-facing camera and a flash.
Camera’s extra feature is that the menu offers a magnifying glass mode, allowing you to use the phone to read small text or scan a small dropped object. And the flash can be used as a flashlight to see in the dark for short periods of time.
This phone also has one of the loudest speakers we’ve ever heard on a phone and it supports hearing aids with the highest M4/T4 rating.
But what the phone can do is the extra service that Greatcall provides through it, and they have plans that start at just $19.99 per month.
However, the best value option we’ve ever had is a premium service that includes Urgent Assistance and GreatCall Link for $24.99 per month. Urgent Care lets you talk to a nurse or doctor 24/7 and even get a prescription for your regular medications over the phone, while GreatCall Link lets you inform assigned friends, family, and caregivers immediately if you access 5Star.
When you sign up for a phone and service, you can even transfer your existing number to the phone to minimize any disruptions.
And if you choose not to continue service, the Jitterbug Flip will still work as a phone with a suitable mobile SIM card. expected, but it also has some of the same technology performance limitations.
While inverted jitterbug’If an 8-core processor or iPhone 11 internals is required, it can be greatly improved with better hardware than the current platform offers.
Where this is particularly true is in mobile phone frequencies,
Alcatel has newer Cingular Flip 2 and Quickflip designs that meet these criteria, so it might be time for one of them become Jitterbug Flip 2?
What the low spec allows allows the device to be relatively cheap, although the Alcatel Go can be found for a third of the $74.99 Greatcall asks for this device.
What the Jitterbug Flip does best is provide a simple means access to the Greatcall support system for older people who need it, and does the job adequately and at an affordable price.
When you purchase through links on our site, we may earn an affiliate commission. Here’s how it works.
(Image credit: Future)
Every iPad owner should consider getting one of the best iPad screen protectors to protect their shiny new tablet, but it’s especially important for digital artists to preserve an enjoyable drawing experience.
Below, we’ve picked out a range of products based on price, features, and protection to help you choose the right screen protector for you. There are some more affordable options in our list, but this is probably the sort of thing you don’t want to cheap out on too much; iPads are pretty pricey, and repairing them doesn’t come cheap, either.
Mak sure to check which iPad generations each product is compatible with before you buy – we’ve listed this information for each entry – and why not take a look at some of thee best iPad keyboards and the best iPad stands.
Why you can trust Creative Bloq
Our expert reviewers spend hours testing and comparing products and services so you can choose the best for you. Find out more about how we test.
This is our favourite, providing easy use, solid protection, and a wonderful drawing experience, all in one. Made with (and by) design professionals and artists, it’s created to give the feel of paper under your stylus – and that’s exactly how it performed when we tested it. Read more in our full review.
02. Spigen Glas.tR EZ Fit
The best glass iPad screen protector
Materials: 9H tempered glass Finish: Gloss
Spigen’s Glas.tR EZ Fit tempered glass protector is incredibly easy to fit with its foolproof installation kit. Plus you get extra scratch and drop resistance and an oleophobic coating to see off greasy fingerprints, too. However, it may interfere with your Apple Pencil. Read more in our full review.
03. Ocushield Anti Blue Light Screen Protector
The best light blocking iPad screen protector
Materials: Tempered glass Finish: Gloss
The Ocushield Screen Protector is a tempered glass construction that filters out a lot of blue light. This makes it easier and more comfortable to use your iPad at all times of day. It’s a solid, multi-functional screen protector in general, and we found it easy to fit with the included applicator.
04. amFilm Glass Screen Protector
Superior screen protector for the iPad Pro 12.9
Materials: Tempered glass Finish: Gloss
If you have a 12.9-inch iPad Pro, amFilm’s affordable Glass Screen Protector is great. Its carefully shaped design fits neatly around the selfie camera, so Face ID still works fine. The premium-grade tempered glass is resistant and does a good job of protecting the screen from scratches. Overall, it’s crystal clear and robust.
The Olixar screen protector should effectively prevent damage while retaining touch sensitivity. It features an oleophobic coating to reduce fingerprints and smudges, and we didn’t notice any effect on the clarity of the display. It comes with an installation kit to help you position it and a two-year guarantee.
06. Belkin Screenforce True Privacy
The best iPad screen protector for privacy
Materials: Plastic Finish: Matte
The Belkin Screenforce True Privacy provides a privacy screen so that anyone looking over your shoulder sees nothing but darkness, but looking at the screen directly, everything is perfectly visible. It’s great if you’re worried about entering sensitive data in public, but doesn’t offer a great deal of physical protection for your iPad.
If you’re looking for a budget alternative to the Paperlike screen protector, the ESR Paper-Feel is significantly cheaper, and you get two protectors in the pack. It’s not quite the same paper-like feel, but ESR’s specially-treated surface does simulate the feeling of pen on paper pretty well, and it’s also nicely fingerprint-resistant.
08. Ailun Screen Protector
The best iPad screen protector for the iPad mini
Materials: 9H tempered glass Finish: Gloss
Ailun’s screen protector is great for the iPad mini. Made from 9H tempered glass, it offers great scratch and drop resistance, has an oleophobic coating to repel oils and it’s very well-priced too.
Which is the best iPad screen protector?
The best iPad screen protector for you will depend on what you want it for. If you’re going to carry your iPad in a case or sleeve and simply want a little extra protection against scratches, then you could get away with one of the cheapest iPad screen protectors like the Olixar Screen Protector.
However, if you think you’re going to use it a lot without a case or sleeve and want extra confidence – particularly if you have one of the more expensive iPads, then you might want to invest in some more heavy duty protection such as the ZAGG InvisibleShield Glass Screen Protector.
Artists and illustrators, or indeed anyone who is going to use a stylus a lot on an iPad might have other requirements than simply protecting the screen, wanting a surface that will enhance their experience with the stylus. For that we recommend Paperlike, at number 1 in our list of the best iPad screen protectors, because it actually improves the feel of writing and drawing on the tablet.
Daily design news, reviews, how-tos and more, as picked by the editors.
Contact me with news and offers from other Future brandsReceive email from us on behalf of our trusted partners or sponsors
Beren has worked on creative tech magazines and websites at Future Publishing for 13 years. He started this journey as Staff Writer on the digital art magazine ImagineFX, and in 2012 found himself bridging the magazine/website divide as Commissioning Editor on the newly launched Creative Bloq. Since then he took the editor role on ImagineFX, was Launch Editor of the fine art magazine Paint & Draw, moved to Canon Pro Europe website as Deputy Editor, and then edited the graphic design magazine Computer Arts. In 2020 he moved back to Creative Bloq, the biggest global art and design website, and as Deals Editor has applied his expertise in creative tech to help digital creatives get the best deals on the kit that they need and love. Outside of work, Beren likes nothing better than to climb himself a bit of rock.
With contributions from
Josephine WatsonManaging Editor for Lifestyle
The 2 Best iPhone Screen Protectors of 2023
We independently review everything we recommend. When you buy through our links, we may earn a commission. Learn more›
Electronics
Accessories
Photo: Marki Williams
FYI
After testing new screen protectors for the iPhone 14, we stand by our current picks, which work with Apple’s newest phones.
Using a glass screen protector isn’t a guarantee that you’ll never break your iPhone’s screen. But a protector can prevent screen scratches, which affect the structural integrity of the glass and make cracks more likely.
After testing dozens of iPhone-screen protectors over the past eight years, we’ve found that most of them are made of the same glass. The biggest differences lie in the ease of installation—few things are more annoying than a slightly misaligned screen protector or a trapped speck of dust.
Spigen’s Glas.tR EZ Fit Tempered Glass Screen Protector (Sensor Protection) for iPhone 14 offers one of the most foolproof installation systems we’ve found.
Our pick
Also available for these iPhones:
Spigen Glas.tR EZ Fit Tempered Glass Screen Protector (Sensor Protection) for iPhone 14 Plus
Spigen Glas.tR EZ Fit Tempered Glass Screen Protector (Sensor Protection) for iPhone 14 Pro
Spigen Glas.tR EZ Fit Tempered Glass Screen Protector (Sensor Protection) for iPhone 14 Pro Max
Spigen Glas.tR EZ Fit Tempered Glass Screen Protector (Sensor Protection) for iPhone 13 and 13 Pro
Spigen Glas.tR EZ Fit Tempered Glass Screen Protector (Sensor Protection) for iPhone 13 mini
Spigen Glas.tR EZ Fit Tempered Glass Screen Protector (Sensor Protection) for iPhone 13 Pro Max
Spigen Glas.tR EZ Fit Tempered Glass Screen Protector (Sensor Protection) for iPhone 12 and 12 Pro
Spigen Glas.tR EZ Fit Tempered Glass Screen Protector (Sensor Protection) for iPhone 12 mini
Spigen Glas. tR EZ Fit Tempered Glass Screen Protector (Sensor Protection) for iPhone 12 Pro Max
Applying a Spigen Glas.tR EZ Fit Tempered Glass Screen Protector is foolproof because the plastic guide tray is designed so that you can’t line it up incorrectly. The tempered glass meets our expectations for clarity and scratch resistance. The glass covers the iPhone’s front-facing cameras and the Dynamic Island on iPhone Pro models with no ill effects, leaving only the earpiece exposed. And for about the price of a movie ticket, you get two pieces of glass, so you can have a backup or share one.
Advertisement
Runner-up
Also available for these iPhones:
amFilm OneTouch Glass Screen Protector for iPhone 14 Plus
amFilm OneTouch Glass Screen Protector for iPhone 14 Pro
amFilm OneTouch Glass Screen Protector for iPhone 14 Pro Max
amFilm OneTouch Glass Screen Protector for iPhone 13 and 13 Pro
amFilm OneTouch Glass Screen Protector for iPhone 13 mini
amFilm OneTouch Glass Screen Protector for iPhone 13 Pro Max
amFilm OneTouch Glass Screen Protector for iPhone 12 and 12 Pro
amFilm OneTouch Glass Screen Protector for iPhone 12 mini
amFilm OneTouch Glass Screen Protector for iPhone 12 Pro Max
amFilm’s OneTouch Glass Screen Protector is comparable to the Spigen screen protector in its glass quality and coverage area. The only real difference is that this protector’s applicator tool isn’t quite as easy to use (although it’s still far superior to most others). Most people should stick with the Spigen screen protector, but if its price jumps or it’s unavailable, the amFilm protector is a good choice.
Everything we recommend
Our pick
Runner-up
The research
Why you should trust us
Who this is for
How we picked and tested
Our pick for any iPhone 14 or iPhone 13: Spigen Glas.tR EZ Fit Tempered Glass Screen Protector (Sensor Protection)
Runner-up for any iPhone 14 or iPhone 13: amFilm OneTouch Glass Screen Protector
What about the iPhone SE?
The competition
Why you should trust us
Staff writer Roderick Scott has been using iPhone screen protectors going back to the iPhone 4s. For this update, we tested seven screen protectors from different companies and landed on two iPhone 14 picks.
Wirecutter’s Nick Guy conducted most of the previous testing and writing for this guide.
In preparing previous iterations of this guide, we interviewed Matt Ham, who has a master’s in mechanical engineering and is the founder and president of Computer Repair Doctor; Kyle Wiens, CEO of iFixit, likely the most well-known technology-repair advocate; Timothy Katsch, vice president of iDropped; and Mario Haas, head of development and application at Schott, which makes ultrathin glass.
Who this is for
A glass screen protector is no guarantee against cracks. A number of factors—everything from the height of the drop to the angle at which the phone lands to the material it lands on to the humidity of the area (really!)—can cause a screen to crack. So it’s impossible to make such a promise. Even the tougher “ceramic shield” glass on the iPhone 12, iPhone 13, and iPhone 14 isn’t unbreakable or unscratchable. Considering that, is a screen protector worth your money?
A good case is more important than a screen protector for keeping your screen intact.
“While screen protectors aren’t perfect, they definitely help,” said Computer Repair Doctor’s Matt Ham. “The basic science is simple. Adding an extra layer of tempered glass protects the original screen. The tempered-glass screen protector is not an impenetrable force field of protection; it’s an added layer of defense.”
That last point is key: A screen protector is only a bit of added protection—not an impervious shield. And a screen protector can’t do much to guard against blows to the phone’s corner or the edge of the phone’s body, which are far more common: Our friends at iFixit tallied the broken screens they had on hand and concluded that 75% of them had been damaged at the corner or edge. This means that when it comes to protecting against a catastrophe, a good case is even more important than a screen protector.
But scratch protection is a worthwhile investment, too. A phone with a scratched screen is less pleasant to use, and it will be worth less if you ever decide to sell it. More important, scratches weaken the structural integrity of the glass. “A major factor in glass breaking is if anything has already scratched it,” Kyle Wiens of iFixit told us. “It’s much easier to break scratched glass. So if the screen protector takes the scratch instead of your screen, then it reduces the likelihood the screen will break.”
How we picked and tested
We use a Mohs test kit to measure the hardness of glass screen protectors. Video: Sarah Kobos
We focus on glass screen protectors because protective plastic films are less scratch resistant and detract from the look and feel of an iPhone’s display. For each screen protector model we test, we follow the instructions in the box to install it on an iPhone (an iPhone 14 Plus in our latest round), evaluating how clear the instructions are and how helpful any installation tools prove to be. Then we visually inspect it to look for any obvious degradation of screen quality or brightness, and we run our fingers along the perimeter, checking for obnoxiously sharp edges. We confirm that the protector doesn’t interfere with the touchscreen functionality, and we also observe how the protector shows fingerprints, after which we wipe off the screen (using a cotton T-shirt) to see how easily we can remove them.
We then break out our Mohs hardness test kit. The Mohs test evaluates the hardness of a mineral based on whether it can be scratched by a set of reference minerals, each rated on a scale from 1 (talc, the softest) to 10 (diamond, the hardest). This isn’t the test that screen-protector manufacturers use or advertise. Instead, they rely on something called the ASTM Film Hardness by Pencil Test, which is designed for coated materials, but even the hardest pencil in this test (9H) is softer than tempered glass, and many of the things that might scratch a screen or a screen protector are harder than a 9H pencil. The Mohs kit includes materials that can scratch tempered glass.
We spoke with Ivar Reimanis, PhD, Herman F. Coors Distinguished Professor of Ceramic Engineering and professor of metallurgical and materials engineering at the Colorado School of Mines. Though Reimanis said that the Mohs test wasn’t a perfect analogue to the pencil test, he concluded that “the ranking would be similar, since you are just evaluating the resistance to scratching with two different probes.”
In the Mohs test, we start with the number-1 stylus, holding it at about a 70-degree angle and applying a moderate amount of force as we drag it down the glass screen protector multiple times in various directions. For each screen protector, we repeat this test with increasing reference picks until a pick scratches the glass. We then record the number of the hardest stylus that didn’t scratch the glass, along with the number of the stylus that did. Because we don’t have styluses with hardness ratings between integers, in this guide we note for each protector the range of hardness (for example, “between 6 and 7”), which includes the actual scratch resistance of that model.
We don’t do drop tests with screen protectors because we don’t think such tests are particularly relevant. Dropping a heavy object, such as a ball bearing, directly onto the screen doesn’t represent a real-world scenario—not to mention that an impact that breaks a screen protector may not have broken the phone’s unprotected screen. (We can’t easily measure the strength and hardness of a phone’s screen, and proprietary data on screen glass isn’t available.) It’s also impossible to re-create every kind of impact that a phone may suffer, so no drop test can cover all scenarios.
Our pick for any iPhone 14 or iPhone 13: Spigen Glas.tR EZ Fit Tempered Glass Screen Protector (Sensor Protection)
Photo: Marki Williams
Our pick
Also available for these iPhones:
The Spigen Glas. tR EZ Fit Tempered Glass Screen Protector (Sensor Protection) is the best iPhone screen protector that’s affordable, tough, and easy to apply. It’s as clear and strong as any glass protector we’ve ever tested. Also, this Spigen protector covers the front-facing cameras, providing as much protection as possible (unlike some other models, which leave the iPhone 14’s notch or the iPhone 14 Pro’s Dynamic Island exposed). Plus, you get two protectors in each inexpensive package.
Applying this screen protector is extremely easy. Newer-model iPhones, including the 12, 13, and 14, have edge-to-edge displays without a Home button to help align the protector, so an alignment tool is essential for good installation. Spigen’s screen protector installation is the absolute best we’ve found, and the included visual instructions make the process clear. Each box includes two plastic installation trays, with the glass already in place. Once you’ve cleaned your phone’s screen with the included alcohol wipe, dry wipe, and dust-removal sticker (if necessary), you peel off the backing from the screen protector and snap the frame onto your phone. This design ensures that you can’t misalign the glass. The instructions guide you to press and slide along a sticker on the front of the protector and then remove the frame.
This process allows anyone—not just those with experience and a steady hand—to line up a screen protector perfectly every time. As long as you clean the phone’s screen thoroughly before installation, you won’t have any air bubbles underneath.
The installation tray makes it much easier for anyone to achieve flawless alignment and a perfectly smooth result. Photo: Marki Williams
Photo: Marki Williams
Once the Glas.tR EZ Fit (Sensor Protection) screen protector is installed, you’re likely to forget it’s there. Photo: Marki Williams
The installation tray makes it much easier for anyone to achieve flawless alignment and a perfectly smooth result. Photo: Marki Williams
It offers full coverage. This Glas.tR EZ Fit protector covers the iPhone’s display yet leaves enough room to avoid interference with most cases. We appreciate that the edges of the glass aren’t sharp—something we’ve seen on several glass screen protectors—since that can make a phone uncomfortable to use. This protector matches the size and shape of the iPhone’s display, and on the iPhone 14 models, it leaves only the earpiece exposed. We tested extensively to confirm that the cameras and sensors wouldn’t be affected by being covered with glass, and we found no issues; even a selfie that we took with the sun glaring over our shoulders looked the same as one that we took with an uncovered phone.
The Spigen protector (on top) covers the phone’s front-facing camera, unlike many other glass protectors, which leave the notch exposed. Photo: Sarah Kobos
Spigen’s glass is as clear as it gets. We saw no problems with clarity or brightness, and we quickly got used to the Glas.tR EZ Fit protector being on the phone. Although any glass surface accumulates fingerprints and oil from skin, we found that this protector’s glass didn’t show them too readily, and they wiped off easily. The touchscreen’s responsiveness was unaffected, since it still recognized even the slightest brush of a finger and still worked with touchscreen gloves.
It’s tough, too. In our Mohs hardness tests, the Glas.tR EZ Fit protector measured between 7 and 8. That’s as high a rating as we’ve found on any glass screen protector we’ve tested, and it’s significantly higher than the results we got with some competitors. We also saw no damage when we tested the Glas.tR EZ Fit protector by scraping it with house keys, a good sign of real-world protection. And after carrying the phone in a pocket for a few weeks, we didn’t see any significant buildup of dust around the glass’s edges, which is a problem with some adhesive protectors.
It’s a great deal. Not only is the Glas.tR EZ Fit protector much less expensive than protectors from the big brands, but the low-priced package also includes two screen protectors. And since you’re unlikely to mess up the installation, that means you have a backup or an extra protector to share with a friend. If you break your screen protector, Spigen offers a one-year replacement program through which it gives you 50% off the full price of a new one.
Flaws but not dealbreakers
The Glas.tR EZ Fit protector’s installation tray makes the process simple, but it also creates waste. (This is common among similar screen protectors.) You end up throwing away single-use plastic, and that’s a problem. We hope to see the concept evolve into something less wasteful in the future.
Runner-up for any iPhone 14 or iPhone 13: amFilm OneTouch Glass Screen Protector
Photo: Marki Williams
Runner-up
Also available for these iPhones:
The amFilm OneTouch Glass Screen Protector is another good choice for your iPhone, though we found the Spigen Glas. tR EZ Fit (Sensor Protection) a little easier to apply.
It’s just as good as our top pick. If you were to compare the amFilm OneTouch protector and the Spigen Glas.tR EZ Fit protector, you wouldn’t notice a difference in the glass quality. The two protectors are equally hard, and both cover the entirety of an iPhone’s display. We found Spigen’s installation tray a bit easier to use, however, and because we do compare screen protectors side by side, we did notice a difference in that regard. If the Spigen protector is out of stock when you’re shopping, the amFilm protector is a very good option.
amFilm’s installation tray is good, but it’s not as foolproof as Spigen’s. Photo: Marki Williams
Photo: Marki Williams
Photo: Marki Williams
Like the Spigen protector we tested, this amFilm protector covers the front-facing camera. Photo: Marki Williams
amFilm’s installation tray is good, but it’s not as foolproof as Spigen’s. Photo: Marki Williams
What about the iPhone SE?
Our pick
Screen protector installation is easier on iPhones that have a Home button—including the iPhone SE (the 2nd-generation model, released in 2020, and the 3rd-gen version, released in 2022) and older iPhones. For these phones, amFilm’s Tempered Glass Screen Protector is the best choice, as it has the same high-quality glass as our iPhone 14 and 13 runner-up pick.
The competition
You shouldn’t spend more than $10 on a glass screen protector or buy any model that doesn’t come with a great installation system. At the time of our research, the following protectors either cost too much or lacked an alignment tool (or both), and therefore we found no reason to consider them over our picks.
The Aliun Glass Screen Protector package offers three screen and camera protectors in the box for a budget price. But it feels budget, too—no screen applicator is provided, and in our scratch test the glass was weaker than our top picks.
Amazon sells two kinds of Amazon Basics screen protectors: one made of “AGC soda lime” and one made of “premium aluminosilicate glass. ” Other than the AGC soda-lime version coming with two protectors in the pack, we didn’t find any obvious differences between them. In some of our tests, the protector failed to stick to our phone’s screen—an automatic disqualification. Additionally, we found the installation tray inferior to those of our picks from Spigen and amFilm. Both of these Amazon Basics protectors leave the iPhone’s notch exposed, and we were able to scratch both with our level-8 stylus.
We almost named the ESR Armorite Screen Protector as a pick because it appeared durable and was easy to apply. But both of the screen protectors that came in the package completely cracked during our scratch testing.
This article was edited by Arthur Gies and Caitlin McGarry.
Meet your guides
Roderick Scott
Roderick Scott is Wirecutter’s staff writer reporting on smartphones, tablets, and accessories. He is the former publisher of TechGuySmartBuy, where he reviewed everything from phones to headphones to smart speakers to cars. He is also a former aspiring songwriter, music producer, and A&R working with local talent.
Nick Guy
Nick Guy is a former senior staff writer covering Apple and accessories at Wirecutter. He has been reviewing iPhones, iPads, and related tech since 2011—and stopped counting after he tested his 1,000th case. It’s impossible for him not to mentally catalog any case he sees. He once had the bright idea to build and burn down a room to test fireproof safes.
Further reading
Which iPhone Should I Get?
by Nick Guy and Roderick Scott
The iPhone 14’s excellent camera, screen, and battery life make it the best iPhone for most people.
The Best Lenses for iPhone Photography
by Erin Roberts
If you want to expand on your smartphone’s cameras, we think Moment’s Anamorphic Lens is the best way to do that.
Wirecutter is the product recommendation service from The New York Times. Our journalists combine independent research with (occasionally) over-the-top testing so you can make quick and confident buying decisions. Whether it’s finding great products or discovering helpful advice, we’ll help you get it right (the first time).
About Wirecutter
Our team
Staff demographics
Jobs at Wirecutter
Contact us
How to pitch
Deals
Lists
Blog
Newsletters
Make a Plan: Moving
Dismiss
Best iPad Pro Screen Protectors (2021)
ParityFlorian Posted on
We may earn a commission if you make a purchase through the links on this page.
So you bought the New Apple M1 Advanced Engine iPad Pro 12.9 inch or 11 inch Tablet. Now you can protect the mini LED display on the pricey iPad Pro 12.9 2021 or the gorgeous Liquid Retina display on the 11-inch model. Well, you’ve come to the right place!
Here we have the best 2021 iPad Pro screen protectors you can choose from right now, for both the larger 12. 9-inch iPad and the smaller 11-inch. Whether you’re looking for the best protection from everyday wear and tear, better fingerprint resistance, or something that will work better when drawing with an Apple Pencil, we’ve got a screen protector for you.
Now let’s find the best screen protector!
What size display does your 2021 iPad Pro have?
Spigen Tempered Glass Screen Protector for iPad Pro 12.9 inch
Trusted in smartphone and tablet cases and screen protectors, Spigen Tempered Glass may be your best bet right now. It has a hardness rating of 9H on the Mohs scale and sports an oleophobic coating to reduce glare and fingerprints on the iPad Pro screen. To make it easier for you to apply this Spigen screen protector, it also comes with an intuitive auto alignment installer.
JETech Screen Protector for iPad Pro 12.9 inch
This Amazon’s Choice screen protector is also 9H rated and made from tempered glass. Similar to the Spigen above, it will protect your iPad Pro’s screen from everyday wear and tear. While it’s cheaper, there’s no installation tool included. But if brand awareness isn’t important to you and you’ve already installed a screen protector, this shouldn’t be a problem and is a good and affordable alternative.
BERSEM Paper-feel screen protector for iPad Pro 12.9inch
If you use an Apple Pencil, this matte paper screen protector is worth buying. Paper-like screen protectors are meant to mimic the feel of writing on paper rather than glass, but on the other hand, they can affect the quality of watching movies. So, only buy this kind of paper screen protector if you really enjoy using the Apple Pencil in your professional life or as a student who writes by hand every day.
Spigen Tempered Glass Screen Protector for iPad Pro 11″
For your 11″ iPad Pro (2021), we again recommend Spigen Screen Protector for the best possible experience. Although this protector is more expensive than other options, Spigen is known for making quality cases and screen protectors and this is one of them. Rated 9H on the Mohs hardness scale and coated with an oleophobic coating to reduce glare and fingerprints, it will protect your iPad Pro screen from everyday scratches and wear and tear.
Caseology Tempered Glass Screen Protector for 11″ iPad Pro
If you’re looking for a more affordable screen protector for your 11″ iPad Pro (2021), this film is a good choice. Like the previous ones on this list, it is rated 9H, has an oleophobic coating, and even includes a rig leveling kit.
Tukellen Paper-feel Screen Protector for 11-inch iPad Pro
If you want to create professional art on your 11-inch iPad Pro or use it when a student writes a lot with an Apple Pencil, this screen protector is for you a good choice. Tukellen Touch Screen Protector is one of Amazon’s popular choices, offering scratch resistance, anti-reflective coating, and of course, a commitment to making your Apple Pencil more secure. Real paper than on glass.
I get it. You’ve just put your hands on the iPad 7th generation and are looking forward to experiencing all of its features. And why not; Even though the tablet only costs $329, it takes away most of the basics. The highlight of this affordable iPad is the 10.2-inch Retina display (2160 x 1620 pixels), which delivers a peak brightness of 500 nits, which is perfectly acceptable for both streaming media and gaming needs. Given the high cost of screen repairs, it’s best to put a durable screen protector on the screen before taking your tablet to its full potential. And for that, look no further than this list of the best 10.2-inch iPad screen protectors, as they are fully equipped to protect your Retina display from not only unexpected bumps, but also ugly scuffs.
The best 10.2″ iPad screen protectors you can buy
Giving protection and maximum clarity a higher priority, I’ve only opted for top tempered screen protectors for the 10.29″ iPad. Along with the industry standard 9H hardness, protective films also provide purity up to 99. 99. In terms of responsiveness, most of the screen protectors listed below have an extra coating to resist fingerprints, smudges, and oil. Since they are able to maintain transparency and sensitivity for a long time, they are ideal display companions. That’s all, as they say, let’s look at the composition!
1. amFilm
Whenever I have assembled top screen protectors for any tablet/smartphone (including the iPad Mini 5), the one from amFilm has never been out of range. Well, that speaks volumes about the quality of this manufacturer’s screen protectors.
Programs for Windows, mobile applications, games – EVERYTHING is FREE, in our closed telegram channel – Subscribe 🙂 It also has an extra coating to keep stain and sweat out. Mainly thanks to ‘s high sensitivity of , this works quite well with the Apple Pencil. So you can expect your creative time or note taking to stay smooth.
Buy from Amazon: $7.99 (pack of 2)
2.
Tech Armor
In terms of providing reliable protection from bumps or scratches This is an offer from Tech Armor, no doubt , is one of the best in the business. The protective screen is made of high quality ballistic glass and is impact resistant. The company claims that the screen guard has six layers for enhanced protection.
There’s also anti-fingerprint coating so the iPad 10.2″ screen continues to look pristine. As far as clarity is concerned, it is quite capable of to provide an acceptable purity of 99%. With its high touch sensitivity and responsiveness, it works quite well with any digital pen, including the Apple Pencil.
Buy from Amazon: 14.9$5 (pack of 2)
3. Supershields
When you talk about the most famous screen screen manufacturers, the name Supershieldz comes to mind. And rightfully so, as this accessory maker has been producing high quality screen protectors for a long time. Even this time, he came up with tempered glass screen protector for 10.2″ iPad.
I love it ‘s curved design plays a key role in ensuring full coverage of the entire Retina display. It’s bubble free and comes with hydrophobic and oleophobic coating strictly repel fingerprints so that they do not interfere with the clarity and responsiveness of the screen. In addition, Supershieldz also offers a robust lifetime replacement warranty. In terms of pricing, the screen protector is available for $7.99 in three packs, which is a steal.
Buy from Amazon: $7.99 (pack of 3)
4. Yocktec
Yocktec screen protector looks full is equipped to protect the 10.2″ Retina display. Whether it’s 9H hardness or an optional coating that resists sweat and dust, the screen protector has all the features to provide long-lasting screen protection. In terms of clarity, it is capable of delivering up to 99% maximum clarity.
Another quality that makes Yocktec a standout option is ‘s 2.5D rounded edges which help the screen protector be easily fitted to full screen. With a thickness of 0.3 mm, it can be one of The thinnest protective films for the 7th generation iPad on the market, but it is the same protective as any durable screen defender
Buy from Amazon: $ 5.50
5. IVSO
on In a cutthroat market, this IVSO offering can hold its own and even outperform many popular competitors. The best part about this screen guard is maximum scratch resistance and true touch sensitivity. As someone who always prefers a more responsive screen protector to get the most out of the Apple Pencil, I found it up to par when it comes to responsiveness.
This is laser cut in design and comes with rounded edges. In terms of clarity, it provides 99.99% transparency to enhance your viewing experience. Oil and sweat proof, ELTD screen protector is able to keep clean and sensitive intact. In terms of price, this comes priced at $6.99 and is available in a double pack of making it affordable.
Buy from Amazon: $6.99 (pack of 2)
7. Tshion
At the end of this review, I would like to put Tshion’s screen protector, which looked promising to me. And I would like to mention three qualities that deserve serious consideration. First of all screen protector is completely bubble free which is great for a painless installation experience.
Second, the is business friendly and offers full screen coverage. So whether you’re using sleek covers or opting for stylish folio suits for the 7th generation iPad, screen guarding won’t be a sport. And thirdly, it also has an extra coating to prevent sweat, oil residue and dirt. Finally, Zshion screen price is 9$.99, which is a little higher.


 They are not selected or validated by us and can contain inappropriate terms or ideas. Please report examples to be edited or not to be displayed. Rude or colloquial translations are usually marked in red or orange.

 MadridYogaOne Nuevos MinisteriosDiR Metasports PolinyàYogaOne LleidaBDiR Sant QuirzeBDiR ParetsBDiR FigueresYogaOne AuditorioYogaOne MirafloresYogaOne ReusBDiR VilanovaYogaOne Puerta de ToledoYogaOne ArrosadiaYogaOne HispanoamericaYogaOne Arturo SoriaYogaOne SuryaYogaOne SerranoSant Cugat DiRYogaOne LavapiesYogaOne Pep VenturaYogaOne CerdanyolaYogaOne Playa de San JuanYogaOne PacificoDiR Esportiu RocafortDiR Fontanals Golf ClubYogaOne AlcorcónYogaOne Las TablasBDiR MallorcaYogaOne San Sebastián de los ReyesBDIR MONTESAYogaOne El PerchelYogaOne SalamancaYogaOne VelázquezDiR ClaretUp&Down DiRTuset DiRYogaOne VerdiBDiR GranadosYogaOne SabadellYogaOne TarragonaBDiR AlcudiaTots ClubsYogaOne MarinaYogaOne Pl.MolinaYogaOne Sagrada FamiliaYogaOne SarriàYogaOne Sant CugatYogaOne Les CortsYogaOne TerrassaBDiR MaresmeYogaOne La MilagrosaBDiR LessepsYogaOne Aragó-ClotYogaOne Aragó-EixampleYogaOne VicBDiR SabadellYogaOne SantsYogaOne MataróYogaOne BornYogaOne GranollersYogaOne RubíBDiR CalvetYogaOne Sant AndreuJambox EixampleYogaOne CornellàYogaOne EspluguesYogaOne GironaYogaOne GavàDiR Paradise MataróYogaOne Santa ColomaYogaOne Nou BarrisBDiR LlúriaDiR Gimbe ManresaYogaOne VilanovaYogaOne PoblenouYogaOne MandriYOGA TESTBDiR MandriYogaOne TusetDiRebelBDiR BorboDiRBootcamp
 About Tonic


 But, if your hair requires special care for recovery, give preference to it and increase the frequency of use of tinting products. Choose the frequency of application of Tonic tint balms individually, as soon as you understand that your favorite shade has begun to fade and lose intensity.

 Sometimes the solution has a color: pink indicates a calming effect, blue indicates a refreshing quality, and green indicates the ability to solve skin problems.
  Even if you carefully removed makeup with milk or micellar water, and then washed with foam, then on a cotton pad moistened with tonic, you will most likely still find traces of impurities. This means that it is the tonic that completes the cleansing process after the stages of make-up removal and washing.
  Even if you carefully removed makeup with milk or micellar water, and then washed with foam, then on a cotton pad moistened with tonic, you will most likely still find traces of impurities. This means that it is the tonic that completes the cleansing process after the stages of make-up removal and washing.
  To get evidence, conduct a two-week experiment on the regular use of the tonic, or better, extend the test to 28 days – this is the period the body and skin in particular need to form new “habits”.
 Their goal is to tame oily sheen, as well as cleanse the skin of excess sebum, thus helping to reduce oily sheen, and at the same time blackheads.


 In the composition – extracts of French rose and jasmine.
 © iStock
  As you remember, it increases the effectiveness of the active ingredients in the products that you apply after toning.
 You should not buy a product, even if it suits you in all other respects, if you are not satisfied with the smell. Most likely, you will not use such a tonic or turn care into an unpleasant duty.


 It strongly favors bass and mids, with a bit of a drop-off in treble response. The opening acoustic guitar plucks get plenty of lower-frequency resonance, but there isn’t quite enough high-end finesse to bring out all the texture in the strings. When the track properly kicks in, the bassline stands out with the guitar strums and hi-hat poking through the mix, leaving the vocals to settle a bit in the background. You can probably massage a more balanced sound by playing with the bass and treble levels of the soundbar, but, out of the box, it leans low.
 The Arc costs twice as much, however, and can’t provide the same surround experience because it lacks rear satellites.
 1 Sound Bar (M51ax-J6) combines a subwoofer and two rear satellites to produce powerful audio for movies and music.
 Back when I was using only my TV speakers, it always seemed like the audio balance was very off – scenes that were primarily dialogue would be whisper quiet while action scenes would be blaringly loud. So, I set out to fix that issue by getting myself a soundbar, which did help quite a bit but didn’t solve it entirely. The quest to fix this issue permanently seems to lie with multi-speaker/surround sound setups, so I was hopeful that Vizio’s new M-Series 5.1 Home Theater Soundbar would do the trick.

 No matter how you want to use the M-Series system, Vizio has you covered with the accessories and cables that come in the box, which is always nice to see.
 As I started watching the freshly-released Lord of the Rings 4K remasters, I noticed that the sound bar and surround speakers were emitting a popping noise every few seconds.
 The subwoofer was placed too close to my wireless router, which is in my living room right next to my TV because I rent and that’s the only place I have a coaxial hookup. Vizio told me that moving the subwoofer at least six feet away from my router – previously the router was right in between the soundbar and subwoofer, about three feet from both – should solve the issue.
 There’s no option to hardware the two components if wireless isn’t working out. Thankfully, being in a small space without a ton of layout options doesn’t pose more of an issue besides considering your router and subwoofer placement. While Vizio’s setup diagrams show the two surround speakers placed directly behind the seating area, I don’t have any room behind my couch as it’s up against the wall. So, instead of putting the speakers behind my couch, I simply stuck them in the corners of the living room opposite the soundbar and the surround sound effect still worked just fine.
 You might want to give the system a pass if you live in a complex where you share a wall with someone else, but you can also adjust treble, bass, mids, and even your surround sound and subwoofer balance using the remote that comes packed with this system. The remote comes with a built-in display that tells you what you’re adjusting, and a column of LED lights on the soundbar itself will show you the level of whatever setting you’re changing.
 If you’re only using TV speakers or a soundbar in your audio set up, this could indeed be a good upgrade that won’t necessarily break the bank – at least not as much as other surround sound systems might.
 Connection to the network is carried out via Wi-Fi or via an Ethernet connector.
  The song’s guitar sound and vocals had a full, warm quality, a rich tone that was detailed but not sharp. The dialogue in the films was also clear and positioned.
  The former aims to recreate a high quality home theater experience in a more usable form factor. Whether it’s a passive L/C/R soundbar like GoldenEar’s SuperCinema 3D Array or a powered multi-channel model like Focal’s Dimension, these soundbars are usually more substantial in both size and price. The second is an entry-level soundbar that is sold at your local big box store. This type of soundbar has much more modest goals: to be better than the crappy speakers in a flat-panel TV while taking up as little space as possible.

 I connected the SB4551’s ARC-enabled HDMI output to an LG smart TV and had no issues getting audio back from LG’s internal Netflix app.
  Whether I used it in my closed family room or in a large, wide open living room with movies or music, the SB4551 filled the room with sound.

 Good dynamics, clean treble and solid bass paired well together for everyday music streaming, and that’s what this soundbar is likely to be used for. And you can’t discount the convenience of being able to stream music to the SB4551 from virtually any source.
 However, many of these options are two-channel soundbars that lack the dedicated center channel and separate surround speakers you get with the VIZIO SB4551. Most of them have Bluetooth, but lack HDMI inputs and video pass-through.
 99
99 99
99


 The company’s first camera, the eufyCam 2 Pro, was released in 2018. The eufyCam 2 Pro was praised for its solid video quality and battery life but criticized for its lack of smart home integration and limited software features.
 We do not present information about every offer available. The information and savings numbers depicted above are for demonstration purposes only, and your results may vary.
 This means you’ll receive an alert whenever one of the sensors detects motion at a door or window opens.
 99 for the eufyCam E model. However, eufy offers bundled savings for packages like the HomeBase and four cameras package costs $469.99, saving you close to $150 for the system.
 98
98 97
97
 The Wi-Fi Smart Lock and Video Doorbell are the only products that can be integrated right now.
  99/month

 3
3 But it’s not a heart-stopping value like the Eufy Solo IndoorCam C24, which sports a higher resolution and similar performance for $100 less (if you don’t mind a power cable).
 99
99 Read full disclaimer.
 Still, you can find slight variations among cameras that look similar—like the EufyCam 2C and EufyCam 2. Here are key features you can expect in Eufy security cameras.
 You can ask for a live feed on a smart display, which is great for family members without smartphones. While we like this for quick checks on a camera, the Eufy app is a better interface.

 You can sign up for a Eufy cloud plan using the Eufy Security app and your online customer account.


 With a behemoth card like that, there’s more storage capacity than other Eufy cameras.
 Eufy bypasses this, making it cheaper to maintain and a better solution for off-grid homes.
 com list price as of post date. Read full disclaimer.
 Learn why we think it’s worth the price in our full Eufy Floodlight Cam 2 Pro review.
 99
99

 We think it’s an excellent alternative to these popular brands, especially for local video storage. Still, it doesn’t offer as many innovative features as Arlo and pales in comparison to Ring and Wyze’s smart home ecosystems.
 Safewise.com utilizes paid Amazon links.
 SafeWise recommends security systems for…
 These and other topics are in the review of the day from Pavel Lysenkov.


 Boyle – Seguin ( 2), Fiddler (2)
  However, this did not help Dallas.
  And I agree with him.
  29)
29)  Karlsson, Thornton – Vrbata (2), Croatian
  After all, every gardener knows that there will be no beautiful garden without pruning. There will also be no rich harvest of fruits and berries. The magazine will cover the pruning of the main garden trees and shrubs in detail and with illustrations. It also provides expert advice and a pruning calendar.
  The article “Furniture Fantasies” in the magazine “My Beautiful Garden” No. 11 for 2017 (pp. 40-43) will convince you that creative furniture with your own hands is spectacular and simple. The illustrations of the article clearly prove this: creative garden chairs made of tin barrels, sofas made of pallets, a swing made of driftwood, and an old chair decorated using decoupage technique. Category “In addition” presents photos from the sites of the winners of the photo contest in the nomination “Gift for your favorite garden” (pp. 54-55), which eloquently testify that everyone can create country furniture and comfort on the site.
  The article “Harvest Festival” (pp. 24-30) reveals the secrets of reliable harvest storage. In Siberia, where it is cold and snowy most of the year, vast folk experience has been accumulated in the careful collection and reliable preservation of the crop. True, times and living conditions are changing, new storable varieties of vegetables and fruits appear, and also original methods and modern technologies for their processing, so each generation of gardeners has to learn the secrets of storage again. Today, many gardeners use drying and drying vegetables. You can dry and dry vegetables in the summer just in the sun, and in the fall in an oven or a special dryer. Delicious chips made from tomatoes and other vegetables can be enjoyed all winter long.
  10-13). Those who like to be in trend will be interested in the article “Metal with character” (pp. 38-41). An article titled “One garden – two ideas” will tell you how to turn the front garden into the main aesthetic accent of the site “(pp. 18-21). All articles are written by professional landscape designers who will teach you how to create indescribable beauty on one square meter, how to beautifully decorate a fence or building facade, place a lawn or combine flower beds.


 Like hardwood floors, it scored a 99% removal rate (by weight) on low pile carpet.
 i3 – What’s the Difference?
 0
0
 You can also buy the Clean Base charger separately.
 These bags are marked as “disposable”, but I found the quality to be better than expected.


 The features lacking on the i3 includes:
  44 lbs.

 It uses iRobot’s systematic navigation technology to digitally map your home, which allows for serviceable navigation. It misses out on room-named cleaning and keep out zones, a feature you’ll find on the more expensive S9+ and i7+. Nevertheless, the i3+ packs a lot of value into the price point, the most significant of which is the self-emptying dust bin.
 7%
7%


/cdn.vox-cdn.com/uploads/chorus_asset/file/23163829/vtuohy_211029_4963_0013.jpg)


 25%
25%

 8 decibels (versus the I3+’s 64.9 dB) despite having more airflow, which is impressive.
 However, the filter isn’t washable, so remove washing. Tap the filter on a solid surface to dislodge dirt and replace once every two or three months.


 The vacuum cleaner is cheaper, has simpler movement algorithms, but still cleans well and is compatible with the Braava M6 robotic floor polisher, as well as the docking station for cleaning the dust container. I will say right away – I liked the vacuum cleaner and after meeting its price does not seem high.
  You can read more about it in the review of the Roomba i7+ model.
  Round, flattened shape, bumper with sensors at the front, another sensor at the top, three-button control panel on the top panel, and a dust bin and filter eject button at the back. The bottom is also nothing new – three wheels, a pair of rubber brushes and an additional three-beam brush for cleaning in hard-to-reach places.
 This is not harmful to hearing, but the silence is noticeably disturbed. But, on the other hand, the quality of cleaning Roomba i3 fully justifies this.
  Here it is worth saying thanks not only to the great suction power, but also to the rubber rollers, which capture everything that is possible from the surface and do not require additional cleaning. Unlike conventional brush rollers, the hair from which is then still a pleasure to remove.
  The manufacturer claims the possibility of cleaning up to 150 square meters on a single charge or 75 minutes of operation. But, as I said, the final operating time will depend on the amount of dust, as well as the mode of operation. It can be either a single pass or a double pass.
  During testing, the vacuum cleaner cleaned my apartment every day in far from the simplest conditions for several weeks. A lot of dust, a lot of different obstacles on the way, but, if possible, he coped with these tests with honor. Yes, its price is slightly higher than some of its competitors, but given the quality of cleaning, it is completely understandable for me. I did not find any shortcomings in this model related to the quality of cleaning or software algorithms and I can recommend it for purchase. Of course, there are nuances that should be taken into account, but this vacuum cleaner copes with its main function.
  3l more dust bag?
  ..iRobot Roomba e5 (e5154) App-steuerbarer Saugroboter (Staubsauger Roboter) mit Zwei Gummibürsten für alle Böden, Ideal bei Haustieren, Individual Anpassung per App, Kompatibel mit Sprachassistenten
  Help us offer a price. (iRobot Roomba e5)
 It also shuts down the machine if it is accidentally trapped in a tight space.

 The biggest difference between the AirPods Pro (1st gen) and Bose QC Earbuds controls are that Bose lets you adjust the volume from the earbuds. To change the volume on the AirPods, you need to say “Hey Siri,” when paired with an iPhone or reach for your phone.

 Additional features include an ear tip fit test via your iPhone’s Settings app, automatic device switching via iCloud connection, and a battery optimization feature that helps protect the long-term health of the buds’ battery.


 Above that, the Bose follows our target quite well, before rolling off in the high frequencies slightly earlier than the AirPods Pro; this is unlikely to be audible to most people.
 Then you can see how the rest of the world thinks!
 A worthy upgrade for any iPhone user if you can afford it!
 You can choose the degree of noise canceling and enjoy premium features like automatic ear detection.
 Plus, Google lets you equalize the sound through the Pixel Buds app for Android.
 Updates will follow as the market changes.
 This makes the fit more stable and reliable than the AirPods Pro. While this can be good, we’ve experienced a loosening of these bands, which can cover the charging connectors. If your Bose earbuds aren’t charging properly, check the wraparound stabilizers before contacting support. Bose’s earbuds also merit an IPX4 rating and this, paired with the stabilizers, makes them a better pair of workout earbuds than Apple’s.
 You can change controls in the Bose Music App.

 Both cases fast charge the earbuds, with the AirPods Pro yielding 60 minutes of playback from 5 minutes of charging, and the Bose earbuds get 2 hours of playback from 20 minutes of charging.


 This means that samples from every product can be directly compared, which makes it far easier to make meaningful comparisons between products in terms of the raw speech quality or the product’s ability to reject noise. While this setup is consistent, it’s unable to allow the AirPods Pro (2nd gen) earbuds to detect speech as they would in the real world (using vibrations), so you’re likely to experience something different than our demos above.
 The AirPods Pro (2nd generation) is pretty expensive at $249 USD, and there are many other Android-friendly choices in this price bracket.
 However, knowing the EQ can be customized, and the software is OS-agnostic, this is a better pair of earbuds for Android users or anyone who wants the ability to change phones without worrying about compatibility. However, it’s more expensive than the AirPods Pro (2nd generation) at $299 USD, so it may still be worth shopping around.
 The AirPods Pro (2nd generation) can quickly switch between Apple devices logged into the same iCloud account, but there’s no true multipoint here.
/earbuds2-b4374f37cd094acd81bd637610732463.jpg) This applies to the case, as well as the headphones themselves. Just by looking at them, you can see that Bose is three times the size of the AirPods Pro case. This makes a big difference for a portable device that you carry around with you all day.
This applies to the case, as well as the headphones themselves. Just by looking at them, you can see that Bose is three times the size of the AirPods Pro case. This makes a big difference for a portable device that you carry around with you all day.


 The h2 chip uses a Class 1 Bluetooth audio signal, which is more energy efficient and produces a more reliable signal than the typical Class 2 audio signal used in the industry.
 ANC and transparency modes can be switched directly from the Control Center on Apple Watch, iPhone or iPad. Even in macOS Big Sur.


 We had an old Mac that was rendering 4K video and the fans were running full blast right above our heads. When Bose had 11, we didn’t hear the fan at all.
 8mm more driver?
  0
0  ..Bose QuietComfort Earbuds mit Lärmreduzierung – Vollkommen Kabellose In-Ear-Kopfhörer mit Bluetooth, Soapstone. Die weltweit effektivsten Noise-Cancelling-Earbuds, Silber, Einheitsgröße 9Apple AirPods Pro Pods Pro
 Ideal for use on airplanes and morning transport.
 A charging case with a longer battery life allows you to charge your headphones multiple times on the go before recharging the case itself.
 It uses Bluetooth 5.0 technology to provide low latency audio (about 40ms), which is useful when you want to avoid audio latency (such as when playing games).
 For example, with Quick Charge 3.0, the battery can be charged up to 50% in just 30 minutes.
 Though it doesn’t have a speaker or microphone, it can use one or more Alexa speakers to add to its functionality. In fact, the more smart home devices you have in general, the better both Alexa and the Amazon Smart Thermostat will work.
 Although its clean, minimalist design is perfectly tasteful and its materials seem plenty durable for a wall-mounted gadget, the Nest’s color LCD and mechanical click wheel made of premium metal are undeniably nicer than Amazon’s cream-colored plastic touchscreen and color icons. How much that matters depends on whether you want your thermostat to serve as a conversation piece or just serve your heating and cooling needs. Another simple yet attractive looking thermostat is the Ecobee SmartThermostat, which includes a speaker and microphone that let you directly communicate with Alexa or Apple’s Siri. What it doesn’t have, however, is the same level of access to your behaviors and habits as Google or Amazon, so its automation algorithm has less data to work with.
 It comes with a soft touchscreen faceplate illuminated by simple color icons (red for heat, blue for AC) and a digital number display.


 If every night around 9 p.m., for example, you usually turn off the front porch light and lock the front door, then one night you lock the door without flipping the light, with Hunches turned on, Alexa might chime in a few minutes later and ask if you’d meant to turn off the porch light (then offer to do it for you).
 cnn.com/_components/paragraph/instances/cl1uueg4q00ay3f6sav57gnm3@published” data-editable=”text” data-component-name=”paragraph”>
 Not once, however, during the six or so weeks I spent with the Amazon Smart Thermostat did I have to make such an adjustment.
 m. From then on, however, whenever I headed upstairs for bed, my bedroom was the perfect temperature.
 Otherwise, sure, the Nest may look a lot nicer, but I’ll trade nice form for better function any day of the week.

 It’s compatible with most 24 volt HVAC systems (you can check compatibility here), but doesn’t support systems with more than three stages or multi-speed fans. Together, Amazon and Resideo seem to have finally cracked the smart thermostat conundrum, and the Amazon Smart Thermostat’s learning feature — called Hunches — is very good. No, it isn’t quite as good as Nest’s, but it also doesn’t cost $250. So, tradeoffs.
  It follows, unsurprisingly, that the more Echo smart speakers and displays you have in your home, the better it will be. According to Amazon, Hunches also uses “select other smart home devices like lights, locks, and sensors” to determine if you are home or away, as well as geolocation of yours and your household members’ smartphones (everyone has to have the Alexa app installed and location settings turned on for the thermostat).
 As with the Learning version, you can choose which devices feed into the home / away modes, which you can’t do with the Amazon Smart Thermostat.
 Most other smart thermostats are over $100, including the Emerson Sensi, the Lux Kono, and then Ecobee’s and Nest’s start at $180 and $130, respectively.
  They say imitation is the sincerest form of flattery; I have to wonder how Nest and its iconic green leaf feels about this. At least Amazon didn’t copy Nest and make you pay an extra $15 for a faceplate to cover up any wall warts left after installation; you get one included (and a screwdriver!).
  Instead, you need to have a compatible Alexa device for voice control.
 :no_upscale()/cdn.vox-cdn.com/uploads/chorus_asset/file/23019733/jtuohy_211115_4885_0003.jpg) The Alexa app guided me through installation very well, making it clear which wires should go where, connecting the thermostat to my Wi-Fi, and testing that everything was working correctly. If you are uncomfortable with wiring or aren’t familiar with how your heating and cooling system works, you should get professional help. Messing up your HVAC system will be a costly mistake.
The Alexa app guided me through installation very well, making it clear which wires should go where, connecting the thermostat to my Wi-Fi, and testing that everything was working correctly. If you are uncomfortable with wiring or aren’t familiar with how your heating and cooling system works, you should get professional help. Messing up your HVAC system will be a costly mistake.

 Once on the correct screen, the controls mimic those of the physical device, plus there’s a humidity reading (the thermostat has a humidity sensor in it, a temperature sensor, and an ambient light sensor for adjusting the brightness of the LEDs).
 Still, if those features aren’t important to you, then you really can’t go wrong with this device.

 built-in digital assistant. The Ecobee4 model is positioned as a universal solution that can take over the regulation of climatic conditions in an apartment and at the same time act as a “smart” home hub.
  In this guide, we will personally help you choose the one that best suits you. Based on your budget and of course according to your heating system.
  Efficiency, ease of installation, reliability and features offered. They also fit any budget and we made sure to find solutions for you. Namely, compatibility with your heating system (be it a boiler, radiator, stove or something else). Here’s what came out of it:
 The air conditioning control system connects to your device, including Daikin, Mitsubishi, Panasonic, Toshiba, LG, General Electric, Samsung, Fujitsu. The thermostat is compatible with 95% of home systems and also includes the option to add thermostatic valves.

 The latter will take care of “talking” to the wall HUB and giving it your commands for temperature control and home climate control.

 The brand also has best Dolby Atmos soundbars you can find in the market, which all vary in terms of their functions and size.
 The optical port is usually covered, so it’s easier to spot. After connecting the SPDIF cable, the system will get ready for testing.
 Press and hold the button labeled “pairing” on the back of the sub. When the light starts to blink, press and hold the power button on the soundbar for 5 seconds.
 You can also check for physical damage as you would in the case of the input not working.
 Hold down the Bluetooth button and the volume down button for up to 5 seconds. Doing this will erase all your previous settings, though, just something to keep in mind.
 Enable CEC for volume control via your TV remote.
 ’
’


 Connecting your Vizio soundbar to your TV is pretty easy. All Vizio soundbars are packed with great features and plenty of connectivity options. The soundbar is definitely worth the price and has features for customization and wireless playback. There are four ways you can connect your Vizio soundbar to any TV.

 Now you can listen to all songs with the soundbar.
  However, soundbars are suitable not only for sounding TV shows: you can connect additional devices to different models that can expand the functionality of the soundbar. Here are some tips for purchasing and setting up soundbars.
 In the same place, it is quite possible that the TV will offer to choose which output it will send the audio signal to – digital or analog. But smart TVs themselves determine which input and what they have connected.
 Before doing this, it is better to consult the user manuals for both the soundbar and the TV, since these settings are located in different sections for different brands.
  Here it is already worth choosing which network connection option is more convenient for a particular case.
 This solution is more expensive, but more convenient.
  Such devices are manufactured by Yamaha and released in the YSP (Yamaha Sound Projector) line. These soundbars are distinguished by the fact that instead of classic speakers, they have arrays of speakers on the front panel. These speakers are combined into groups, emulating a 2-, 3-, 5- or 7-channel configuration.
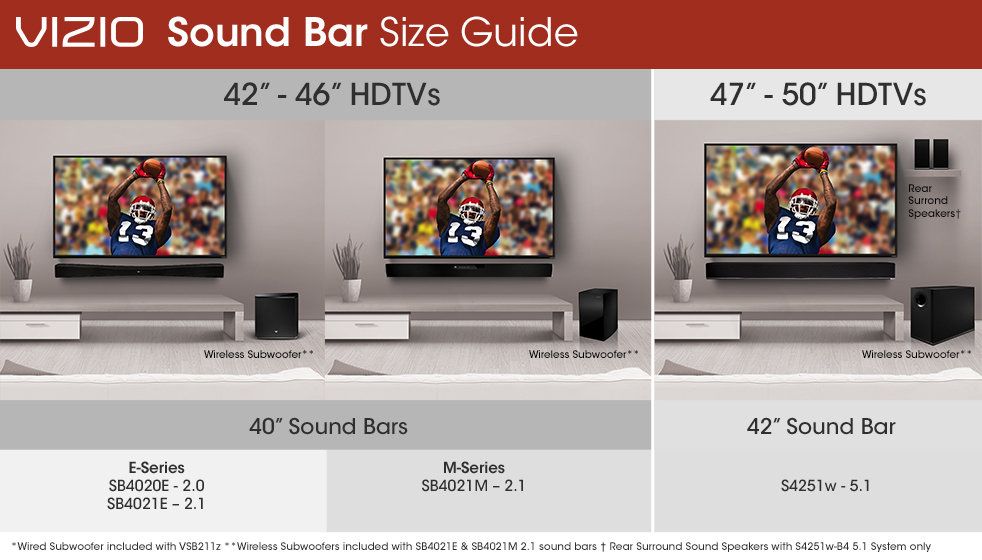
 In most cases, Bluetooth allows the soundbar to receive audio from smartphones and other mobile devices. However, some higher-end soundbars can send audio to wireless headphones and speakers.

 99 for the device in addition to a $35 activation fee. Sure, this might seem a bit pricey, but considering that modern smartphones can cost upwards of $500, not to mention data plans and hidden fees, I was pleased with this price point.
 For example, 500MB per month will cost an additional $5 per month while unlimited data will cost an extra $30 per month.
 Another thing that factored into my decision was that Lively charges additional fees in the event of an overage ($0.35 per minute, $0.10 per text, and $0.10 per megabyte). While small, these fees could quickly add up to your bill. If overages are something that concerns you, then I’d recommend checking out Consumer Cellular, who automatically upgrades your plan in the event of an overage.
 Essentially, they helped turn my Jitterbug Smart3 into my own personal emergency response system. Now, let’s get into the specifics.
 Did I mention this service is also available 24/7?
 It’s also thin enough to preserve its touch-based operation.
 Once I powered the phone up, all I had to do was dial the service number listed in the guide, confirm my information, and then I was ready for some tests.
 Similar to the Jitterbug Flip2, the Jitterbug Smart3 also features voice dialing, so I was able to call various contacts using only my voice.
 With its intuitive controls and added safety features, chances are this smartphone be great for any of your loved ones.
 Granted, these numbers will vary based on the quality of your files. Additionally, you can add up to 256BG of external storage through a micro SD card.
 99 (plus activation), the Jitterbug Flip2 is the more affordable of Lively’s two device options, and with its classic flip phone design, it’s also the more simplistic model. For the user looking to make calls, send text messages, and snap the occasional photo, the Jitterbug Flip2 is ideal. With its large buttons, voluble speaker, and sizable screen, this phone is a breeze to use. Additionally, this phone boasts an M4/T4 rating for hearing aid compatibility.
 Still, as far as flip phone cameras go, this one is about par for the course.
 35, and additional texts will be $0.10 each.
 99 plus activation fees, the Jitterbug Smart3 is also one of the most affordable smartphones out there. Voice typing, a built-in camera, a handy usage meter, and a convenient long-lasting battery round out the list of reasons why this Jitterbug is a “smart” choice for today’s connected users.
 99 per month
 When contacted, one of these agents can use your phone to track your location, assess your situation, and get you the help that you need, whether this means contacting a loved one, or emergency services, or simply giving you directions to the bus stop.

 Additionally, it’s accessible to people with vision and hearing impairments.
 greatcall.com and at retailers nationwide.
  These include calling, texting, taking pictures, using the internet, accessing email, maps, and connecting to a live response carried by GreatCall..
 9$9 per month..
  .
. 


 .
.  What’s interesting about Jitterbug Flip is how many basic features have been tweaked slightly to help those who may have vision problems or lack fine control in their hands..

 Plus you get extra scratch and drop resistance and an oleophobic coating to see off greasy fingerprints, too. However, it may interfere with your Apple Pencil. Read more in our full review.
 Its carefully shaped design fits neatly around the selfie camera, so Face ID still works fine. The premium-grade tempered glass is resistant and does a good job of protecting the screen from scratches. Overall, it’s crystal clear and robust.
 It’s great if you’re worried about entering sensitive data in public, but doesn’t offer a great deal of physical protection for your iPad.


 tR EZ Fit Tempered Glass Screen Protector (Sensor Protection) for iPhone 12 Pro Max
 The only real difference is that this protector’s applicator tool isn’t quite as easy to use (although it’s still far superior to most others). Most people should stick with the Spigen screen protector, but if its price jumps or it’s unavailable, the amFilm protector is a good choice.
 For this update, we tested seven screen protectors from different companies and landed on two iPhone 14 picks.
 So it’s impossible to make such a promise. Even the tougher “ceramic shield” glass on the iPhone 12, iPhone 13, and iPhone 14 isn’t unbreakable or unscratchable. Considering that, is a screen protector worth your money?
 This means that when it comes to protecting against a catastrophe, a good case is even more important than a screen protector.
 For each screen protector model we test, we follow the instructions in the box to install it on an iPhone (an iPhone 14 Plus in our latest round), evaluating how clear the instructions are and how helpful any installation tools prove to be. Then we visually inspect it to look for any obvious degradation of screen quality or brightness, and we run our fingers along the perimeter, checking for obnoxiously sharp edges. We confirm that the protector doesn’t interfere with the touchscreen functionality, and we also observe how the protector shows fingerprints, after which we wipe off the screen (using a cotton T-shirt) to see how easily we can remove them.
 The Mohs kit includes materials that can scratch tempered glass.
 tR EZ Fit Tempered Glass Screen Protector (Sensor Protection) is the best iPhone screen protector that’s affordable, tough, and easy to apply. It’s as clear and strong as any glass protector we’ve ever tested. Also, this Spigen protector covers the front-facing cameras, providing as much protection as possible (unlike some other models, which leave the iPhone 14’s notch or the iPhone 14 Pro’s Dynamic Island exposed). Plus, you get two protectors in each inexpensive package.
 This design ensures that you can’t misalign the glass. The instructions guide you to press and slide along a sticker on the front of the protector and then remove the frame.
 We appreciate that the edges of the glass aren’t sharp—something we’ve seen on several glass screen protectors—since that can make a phone uncomfortable to use. This protector matches the size and shape of the iPhone’s display, and on the iPhone 14 models, it leaves only the earpiece exposed. We tested extensively to confirm that the cameras and sensors wouldn’t be affected by being covered with glass, and we found no issues; even a selfie that we took with the sun glaring over our shoulders looked the same as one that we took with an uncovered phone.
 The touchscreen’s responsiveness was unaffected, since it still recognized even the slightest brush of a finger and still worked with touchscreen gloves.
 If you break your screen protector, Spigen offers a one-year replacement program through which it gives you 50% off the full price of a new one.
 tR EZ Fit (Sensor Protection) a little easier to apply.
 For these phones, amFilm’s Tempered Glass Screen Protector is the best choice, as it has the same high-quality glass as our iPhone 14 and 13 runner-up pick.
 ” Other than the AGC soda-lime version coming with two protectors in the pack, we didn’t find any obvious differences between them. In some of our tests, the protector failed to stick to our phone’s screen—an automatic disqualification. Additionally, we found the installation tray inferior to those of our picks from Spigen and amFilm. Both of these Amazon Basics protectors leave the iPhone’s notch exposed, and we were able to scratch both with our level-8 stylus.
 He is also a former aspiring songwriter, music producer, and A&R working with local talent.
 Our journalists combine independent research with (occasionally) over-the-top testing so you can make quick and confident buying decisions. Whether it’s finding great products or discovering helpful advice, we’ll help you get it right (the first time).
  9-inch iPad and the smaller 11-inch. Whether you’re looking for the best protection from everyday wear and tear, better fingerprint resistance, or something that will work better when drawing with an Apple Pencil, we’ve got a screen protector for you.
  While it’s cheaper, there’s no installation tool included. But if brand awareness isn’t important to you and you’ve already installed a screen protector, this shouldn’t be a problem and is a good and affordable alternative.
  Rated 9H on the Mohs hardness scale and coated with an oleophobic coating to reduce glare and fingerprints, it will protect your iPad Pro screen from everyday scratches and wear and tear.
  You’ve just put your hands on the iPad 7th generation and are looking forward to experiencing all of its features. And why not; Even though the tablet only costs $329, it takes away most of the basics. The highlight of this affordable iPad is the 10.2-inch Retina display (2160 x 1620 pixels), which delivers a peak brightness of 500 nits, which is perfectly acceptable for both streaming media and gaming needs. Given the high cost of screen repairs, it’s best to put a durable screen protector on the screen before taking your tablet to its full potential. And for that, look no further than this list of the best 10.2-inch iPad screen protectors, as they are fully equipped to protect your Retina display from not only unexpected bumps, but also ugly scuffs.
  99. In terms of responsiveness, most of the screen protectors listed below have an extra coating to resist fingerprints, smudges, and oil. Since they are able to maintain transparency and sensitivity for a long time, they are ideal display companions. That’s all, as they say, let’s look at the composition!
  Tech Armor
 Even this time, he came up with tempered glass screen protector for 10.2″ iPad.
 Oil and sweat proof, ELTD screen protector is able to keep clean and sensitive intact. In terms of price, this comes priced at $6.99 and is available in a double pack of making it affordable.