
Camera stabilizer for iphone: The 8 Best Gimbals For Your iPhone in 2023 (By Category)
The best iPhone gimbal in 2023
When you purchase through links on our site, we may earn an affiliate commission. Here’s how it works.
(Image credit: Future/DJI/Zhiyun)
The best iPhone gimbal will elevate your footage to a professional standard. You’ll get excellent stabilisation and remote control of your phone’s camera, helping make your videos look both smooth and seamless.
Gimbals allow you to smoothly pan over landscapes and track fast moving subjects whilst on the go, whilst steadying your footage. They work by using a mechanical arm to stabilise your device, which means goodbye to camera shake! Most gimbals use a three-axis stabilising system, but advanced ones have five-axis compatibility, which differentiates between unintentional and intentional camera movements.
Here we detail the best iPhone gimbals available on the market today. Also check out our guide to the best iPhone for photography, and make sure you’re fully powered up when filming with the best power banks around.
Why you can trust Creative Bloq
Our expert reviewers spend hours testing and comparing products and services so you can choose the best for you. Find out more about how we test.
01. DJI OM 6 Gimbal
The best iPhone gimbal overall
Fits phones: 67-84mm wide; 170-290g
Battery life: 6.5 hours
This gimbal is our pick for iPhone users overall. The 3-axis stabilisation means your footage will be smooth and shake-free to really give your footage a professional finish. And the integrated DJI Mimo app allows for easy filming, efficient editing and playback.
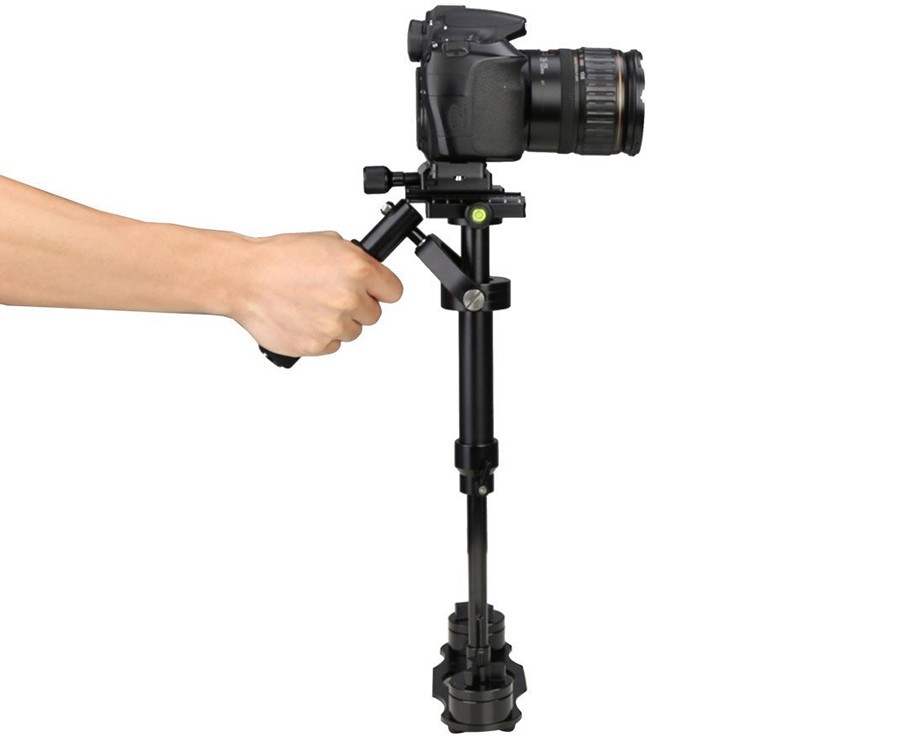
02. Zhiyun Smooth 4
Affordable gimbal with pro features
Fits phones: 65 to 82mm wide; 75-210g
Battery life: 10 hours
This gimbal produces super-smooth footage via its 3-axis stabilisation system, and the well laid-out control panel is a winner. We especially like the intuitive focus/zoom ring and shooting features such as time-lapse, long exposures and panoramas.
03. MOZA Mini-S gimbal
One of the best iPhone gimbals for travel
Fits phones: 57-88mm wide; up to 280g
Battery life: 8 hours
With a lightweight build, this folds down to 130mm by 195mm, making it easy to slip into a small travel bag. The build might feel a little plasticky and cheap, but the 3-axis stabilisation is smooth and stable, and there are loads of useful modes, including Object Tracking.
04. DJI OM 5
Cheaper version of the best iPhone gimbal
Fits phones: 67-84mm wide; 170-290g
Battery life: 6 hours
This slightly older DJI gimbal has big potential. Versatile and portable, with a built-in extension rod, it uses a 3-axis system to provide the kind of class-leading stabilisation DJI has become known for. Footage is super-smooth in a huge variety of situations.
05. Zhiyun Smooth Q3
The best iPhone gimbal for TikTok
Fits phones: 55-90mm wide; up to 280g
Battery life: 6 hours
If you don’t want to buy a gimbal and a ring light, this is a good way of combining the two. With its built-in 4300K fill light, TikTokers will love this gimbal. Its sophisticated 3-axis stabilisation system is complemented by an intuitive control layout and an intuitve and easy-to-use joystick.
06. DJI OM 4
Older model that’s still worth a look
Fits phones: 67-84mm wide; 170-290g
Battery life: 15 hours
This gimbal is bigger and heavier than many on this list, but there is a purpose to all that weight, housing as it does an extremely sophisticated 3-axis system that provides smooth, cinema-like movement. The DJI Mimi app also lets you play with different modes and effects.
Today’s best iPhone gimbal deals
Zhiyun Smooth 4
£159.99
View
See all prices
MOZA Mini-S
£75.31
View
See all prices
FeiyuTech VLOG Pocket
£99
£84.15
View
See all prices
Deal ends in 12h 48m 59s
Zhiyun Smooth-Q3
£72.49
View
See all prices
Read more:
- The best laptops for photo editing
- The best free video editing software
- The best website builder for photographers
Daily design news, reviews, how-tos and more, as picked by the editors.
Contact me with news and offers from other Future brandsReceive email from us on behalf of our trusted partners or sponsors
Jon is a freelance writer and journalist who covers photography, art, technology, and the intersection of all three. When he’s not scouting out news on the latest gadgets, he likes to play around with film cameras that were manufactured before he was born. To that end, he never goes anywhere without his Olympus XA2, loaded with a fresh roll of Kodak (Gold 200 is the best, since you asked). Jon is a regular contributor to Creative Bloq, and has also written for in Digital Camera World, Black + White Photography Magazine, Photomonitor, Outdoor Photography, Shortlist and probably a few others he’s forgetting.
Stabilize a shaky clip in Motion
You can use the Stabilize tracking behavior to smooth shaky motion in a video clip or image sequence, such as eliminating teetering from handheld walking shots, or reducing vibrations in automotive shots.
There are three ways to analyze a clip using the Stabilize behavior:
-
Use the behavior’s default advanced motion analysis to evaluate the entire frame of a clip to extract movement data without using onscreen trackers. This automatic analysis works best with real images—artificial images (such as those with no texture) or shots with very strong pans are not recommended.
-
Use onscreen trackers to analyze a reference pattern (a small group of pixels) in the canvas. These are the same trackers used by the Match Move and Analyze Motion behaviors.

-
Use a combination of the advanced motion analysis and onscreen trackers.

Correct a shaky clip using the Stabilize behavior
-
In the Layers list, select the video clip you want to stabilize, click Behaviors in the toolbar, then choose Motion Tracking > Stabilize.
-
In the Behaviors Inspector, set the options for the analysis:
-
Click the Quality pop-up menu, then choose an option:
-
Faster: Allows for a faster operation, but motion analysis is less detailed.
-
Better: Provides a more detailed analysis, but is slower.
-
-
To define a specific portion of the clip to be analyzed (and to speed processing), select the Track Region checkbox. See the following task, Limit the area analyzed by the Stabilize behavior.
-
Click the Method pop-up menu, then choose an option:
-
Stabilize: Locks down an image, removing problems such as camera shake.
The resulting effect is similar to footage shot on a camera mounted to a stationary tripod. -
Smooth: Eliminates camera jitter while maintaining the general motion of the camera. When Smooth is selected, the Translation Smooth, Rotation Smooth, and Scale Smooth parameters become available. See Stabilize controls in Motion.
-
-
Click the Borders pop-up menu, then choose an option:
-
Normal: Maintains the size of the stabilized footage. Resulting transformations made to the stabilized image may cause moving black borders to appear around the edges of the clip. A very shaky clip results in large black borders.
-
Zoom: Expands the clip to the full size of the canvas, preventing black borders from appearing around the edges of the stabilized clip.
-
-
Click the Direction pop-up menu, then choose one of the following options:
-
Horizontal and Vertical: Applies the stabilize transformation to the X and Y positions.
-
Horizontal: Applies the stabilize transformation to the X position.
-
Vertical: Applies the stabilize transformation to the Y position.
-
-
Select (or deselect) the Adjust settings:
-
Position: Applies the analyzed position data to the clip. (The X and Y position changes in the footage are smoothed or stabilized.) To stabilize the X and Y position of the shot and leave scale or rotation changes intact, enable Position and disable Scale and Rotation.
-
Scale: Applies any analyzed scale data to the clip. (Scale changes in the footage are smoothed or stabilized.) To stabilize or smooth changes in scale and leave position or rotation changes intact, enable Scale and disable Position and Rotation. (The Scale option is not related to the Zoom option in the Borders pop-up menu.)
-
Rotation: Applies analyzed rotation data to the clip. (Changes in the rotation of the footage are smoothed or stabilized.
) To stabilize or smooth changes in rotation in the shot and leave position or scale changes intact, enable Rotation and disable Position and Scale.
For the smoothest result, select all three Adjust buttons (Position, Scale, and Rotation).
Note: You can change the Method, Borders, Direction, and Adjust parameters before or after the clip is analyzed.
-
-
-
In the Behaviors Inspector (or HUD), click Analyze (or the right arrows next to the Analyze button).
The clip is stabilized according to defined parameters. Any motion blur present in the original image remains.
By default, the Stabilize behavior does not use onscreen trackers to analyze motion or create keyframes in the Keyframe Editor. But you can add trackers for additional smoothing. See the Add trackers to a portion of a stabilize operation task, below.
Note: The stabilized object’s transformation can be converted to keyframes. See Advanced tracking strategies in Motion.
When trackers are added to and analyzed with the Stabilize behavior, keyframes are created.
 The resulting effect is similar to footage shot on a camera mounted to a stationary tripod.
 ) To stabilize or smooth changes in rotation in the shot and leave position or scale changes intact, enable Rotation and disable Position and Scale.
Limit the area analyzed by the Stabilize behavior
When stabilizing a clip, you can define a specific region to be analyzed. During analysis, the area outside this region is ignored. Use this option for faster processing of a clip.
-
In the Layers list in Motion, select an applied Stabilize behavior.
-
In the Behaviors Inspector, select the Track Region checkbox.
A transparent red overlay representing the track region appears in the canvas.
-
Do any of the following:
-
Change the position of track region: Drag in the region.
-
Resize the track region: Drag a handle on the bounding box of the region. The corner handles simultaneously resize width and height; the top and bottom center handles resize height; the left and right center handles resize width.
-
Resize the track region from its center: Press and hold the Option key while dragging a handle.
-
Change the angle of the track region: Drag the rotation handle in the center of the track region.
-
-
After defining the track region, click Analyze in the Behaviors Inspector.
Because analysis takes place in the defined track region, the clip is analyzed more quickly.

Add trackers to a portion of a stabilize operation
If a stabilized clip has a bumpy section that’s not getting smoothed (from an accidental camera bump affecting a range of frames, for example), you can add point trackers to correct that section of the clip.
-
In Motion, after the Stabilize motion analysis is complete, play the clip to determine the section you want to correct.
-
Set an Out point for the tracker analysis by positioning the playhead at the frame where you want to stop the analysis, then choose Mark > Mark Play Range Out.
To yield the best results, use a large range of frames.
-
Position the playhead at the frame where you want to start the tracker analysis, then do one of the following:
-
Analyze X and Y position changes in the footage: Click the Add button in the Behaviors Inspector to add an Anchor tracker.
-
Analyze changes in X and Y position as well as rotation and scale in the footage: Click the Add button in the Behaviors Inspector once to add an Anchor tracker, then click Add again to add a Rotation-Scale tracker.
-
-
In the canvas, position the newly added point tracker on the reference pattern you want to track, then click Analyze in the Behaviors Inspector.
The play range is tracked, creating track points in the canvas and tracking keyframes in the Keyframe Editor.
Any stabilization data from the automatic motion analysis is overwritten by the portions of the clip analyzed using the onscreen trackers.
Tip: When using this strategy to track multiple noncontiguous sections of the clip, use the same tracker to simplify the track and to avoid clutter in the Keyframe Editor.


Modify smoothing parameters
If you’re trying to smooth the motion in a stabilized clip, first try adjusting the smoothing parameters (without reanalyzing the clip).
-
In the Layers list in Motion, select the Stabilization behavior (that’s already analyzed the clip).
-
In the Behaviors Inspector, click the Method pop-up menu, then choose Smooth.
-
Do any of the following:
-
Smooth motion in the X and Y positions: Adjust the Translation Smooth slider.
-
Smooth image rotation: Adjust the Rotation Smooth slider.
-
Smooth an uneven zoom: Adjust the Scale Smooth slider.
Note: Don’t set the Scale Smooth value above 0 unless you’re positive the clip is being zoomed.
-

Perform multiple stabilization analyses on a shaky clip
If a clip is particularly shaky, it may be necessary to stabilize the clip more than once to remove camera movement not corrected in the first stabilization analysis.
-
In Motion, stabilize a clip, export the clip, import the clip, then stabilize the clip again.
For a full description of the Stabilize parameters, see Stabilize controls in Motion.
TOP 7 Best iPhone Stabilizers in 2023
We’ve ranked the best iPhone stabilizers for amazing photos and videos.
The Best iPhone Stabilizer is a must if you are going to shoot professional-looking videos on your iPhone. While the iPhone has video stabilization, especially the latest iPhone 13 Pro and Pro Max, you’ll still need help if you’re shooting handheld without a tripod. The latest iPhone’s cinematic video mode offers more options than ever, and the best stabilizer can help you get the most out of it.
What is a stabilizer (suspension)? These wonderful devices, which use a mechanical system, make the footage smooth and stable, even when the camera is moving. The system compensates for camera movement in multiple axes of rotation, typically three for non-specialized purposes, although professional systems may use five-axis stabilization. Using algorithmic technology, they distinguish between intentional and unintentional camera movement.
This opens up a lot of possibilities for video, allowing you to follow a fast-moving subject, move smoothly through a landscape or other scene, for example, while shooting while walking, without the camera shake that usually accompanies footage shot with a handheld camera. It gives your video a much more professional look at a very reasonable investment.
In this ranking, we’ve selected the best iPhone stabilizers available right now based on user reviews, features, quality and value. We have included options for highly rated brands such as DJI, Zhiyun, and more.
1
DJI OM 5
The best stabilizer for the iPhone in general
CASHBACK for purchases, learn more… 02 Compatibility: phones 67-84 mm wide; thickness 6.9-10 mm; 170-290g weight
Stabilization: 3-axis
Weight: 326g (with magnetic clamp)
Battery life: approx. 6 hours
Pros
- Excellent stabilization
- Sleek, expandable design
- Good subject tracking
Cons 900 03
- Smaller size = smaller battery
The DJI OM5 is a small gimbal with big potential. Versatile and portable, with a built-in extension arm, it uses a 3-axis system to provide the best-in-class stabilization that DJI has become known for. The footage we’ve seen shot with phones using this gimbal is very smooth in a wide variety of situations. And as an added bonus for those new to this style of shooting, you can download the DJI Mimo app to use the ShotGuides feature, which gives you some useful features.
This isn’t exactly a replacement for the OM4, and some users may prefer the older iPhone gimbal with its larger battery and power bank capability – if that sounds like your choice, we’ve included it a bit lower in this rating. But we love the OM5 for its great price-performance ratio, and DJI’s enhanced features like ActiveTrack 4.0, which lets you control the gimbal to follow moving objects (again, you’ll need the Mimo app for this as it works). through the touch screen of the phone).
The magnetic group system is secure and well thought out, and the expandable functionality of the OM5 selfie stick makes it especially handy for vloggers and TikTokers.
2
Zhiyun Smooth 4
Stabilizer for iPhone with professional features
CASHBACK for purchases, learn more…
Compatibility: phones 65 to 82 mm wide; weight 75-210g
Stabilization: 3-axis
Weight: 560 g
Battery life: approx. 10 hours
Pros
- Intuitive controls and focus wheel
- Excellent battery life
Cons
- No face tracking
- Does not support iPhone 12 Pro Max and iPhone 13 Pro Max
Zhiyun Smooth 4 is an extremely popular stabilizer. Zhiyun has a general reputation for making high quality and affordable iPhone stabilizers. You will see a few more of them in this ranking. Thanks to the 3-axis stabilization system, it allows you to take ultra-smooth footage, and the well-designed control panel is very convenient. We especially like the intuitive focus/zoom ring, which is easy to use and comfortable to use.
Connect your phone to the ZY Play app and enjoy several fun shooting features, including time-lapse photography, long exposures, panoramas and more. This is a particularly good choice for those who need a stabilizer that will open up new possibilities for photos and videos.
Our only caveat with the Zhiyun Smooth 4 is its somewhat small payload; it’s only rated for phones under 210g, which excludes the iPhone 12 Pro Max and iPhone 13 Pro Max. Other than that, it’s a great stabilizer for a variety of applications, available at an impressively competitive price.
3
Moza Mini-S
Best value for money iPhone stabilizer
Compatibility: phones 57-88mm wide; weight 280g
Stabilization: 3-axis
Weight: 490g
Battery life: approx. 8 hours
Pros
- Folds nice and compact
- Great value for money
- Intuitive controls
Cons
- Hollow, plastic construction
The Moza Mini-S is one of the best iPhone travel stabilizers. Thanks to its lightweight design, it folds up to 130mm by 195mm, making it easy to fit into a small travel bag. The design of the device may seem a little plastic and cheap, but this is what kept the cost down, and the Moza Mini-S really performed well in use.
3-axis stabilization is smooth and reliable in a wide range of conditions, and the gimbal provides many useful additional modes, including tracking moving objects. Eight hours of battery life is also quite a lot, giving you more than enough time for daytime shooting – again making the Moza Mini-S a great travel option.
4
FeiyuTech VLOG Pocket
Best pocket stabilizer for iPhone
Compatibility: phones 41-89mm wide; 250g weight
Stabilization: 3-axis
Weight: 272g
Battery life: approx. 9 hours
Pros
- Converts to mini tripod
- Tiny and portable
Cons
- Shallow holder
- The zoom function is jerky
FeiyuTech VLOG Pocket, another extremely portable gimbal, great for putting in your bag (or large pocket) and taking it with you wherever you go.
It’s capable of holding phones up to 250g, which should cover all but the largest – though the shallow holder means you’ll definitely need to remove the case if you’re using it. The 3-axis stabilization is smooth and solid, and while it doesn’t require the use of the FeiyuTech On app, you’ll find plenty of extras if you download the app, including object tracking and gesture control.
5
Zhiyun Smooth Q3
Best TikToker iPhone Stabilizer
Compatibility: phones 55-90mm wide; 7-10 mm thick; weight 280g
Stabilization: 3-axis
Weight: 340g
Battery life: 15 hours
Pros
- Integrated light
- Excellent battery life
Cons
- Seems fragile
With built-in 4300K light, Zhiyun Smooth Q3 attracts the attention of TikTokers and other users who will enjoy their phone’s selfie camera a lot.
If you don’t want to buy a gimbal and a ring light, this is a good way to combine the two, giving the phone some stability and some fill light on the face. And that’s not to say it’s just a gimbal – the Smooth Q3 has a sophisticated 3-axis gimbal system with intuitive controls that includes a smart, easy-to-use joystick.
6
DJI OM4
Classic Stabilizer for iPhone
Compatibility: phones 67-84mm wide; thickness 6. 9-10 mm; 170-290g weight
Stabilization: 3-axis
Weight: 434g (with clip and holder)
Battery life: approx. 15 hours
Pros
- Excellent stabilization
- Excellent battery life
Cons
- Comparatively expensive
- The app can be unreliable
We ranked the lighter DJI OM5 at the top of the list, but its larger, more powerful sibling DJI OM4 still gets great user reviews and remains one of the most respected stabilizers for smartphones. It’s pricey compared to the competition, and yes, it does have some oft-discussed issues, such as pushing the phone’s volume rocker, or general incompatibility with phone cases. But the fact remains that it does what it does very well, with some of the best stabilization you can get for a smartphone.
It’s bigger and heavier than many of the iPhone stabilizers on this list, but all that weight has a purpose as it contains an extremely complex 3-axis system that delivers smooth, cinematic handheld movement. The DJI Mimi app also lets you play with a variety of modes and effects (although some users have reported some unreliability and stuttering, especially on Android).
7
Zhiyun Smooth X
The most affordable stabilizer for iPhone
CASHBACK for purchases, learn more…
LOOK IN Y.MARKET LOOK IN SBERMEGAMARKET
Compatibility: phones 50-90 mm wide; 200g weight
Stabilization: 2-axis
Weight: 246g
Battery life: approx. 5.5 hours
Pros
- Surprisingly affordable
- Palm sized
Cons
- Only 2- x axial stabilization
- Limited payload
If you don’t want to spend too much on an iPhone gimbal, be sure to check out the Zhiyun Smooth X, which is the cheapest on our list and offers amazing value for money.
True, it doesn’t have as advanced a stabilization system as the others – only a 2-axis system, not a 3-axis one – but it will still get the job done, and its telescopic handle means the gimbal works like a selfie.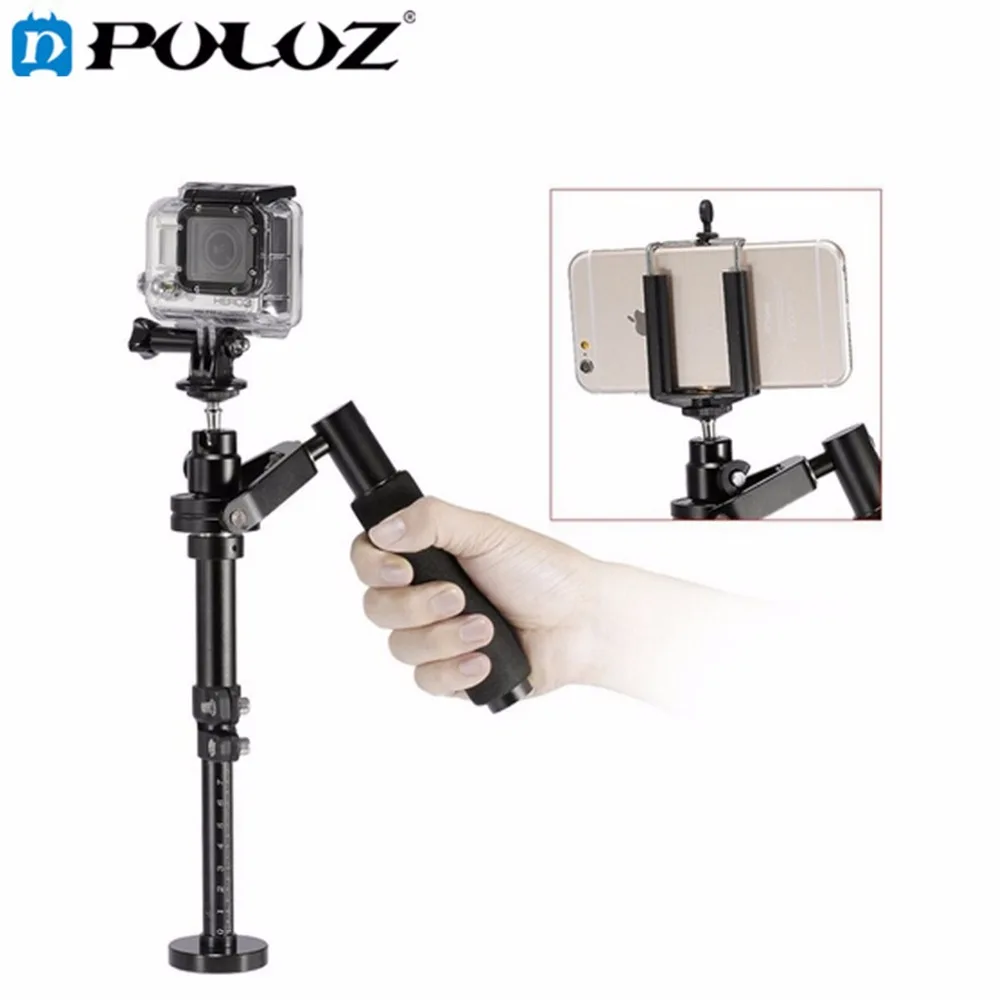 -stick. However, you should keep an eye on compatibility – it’s only rated for phones under 200g, and many larger iPhones exceed that.
- Best Smartphone and Camera Stabilizers
- Best iPhones
- Best Phones
- Best Android Phones
- Best Cameras for Vlogging
- Best Camera Phones
- Photo and Video
- Audio
- Gadgets
- Accessories
- Smart home
-
Stabilizer Feiyu SCORP-Mini
Design features : built-in display • Load : — 1200 g • Power supply : built-in battery • Battery capacity : 2500 mAh • Working time : 13 h • Charging time : 1.
6 h • Quick charge : Power Delivery • Quick release plate : Arca Swiss24 19$0
Hooray! Stabilizer Feiyu SCORP-Mini in the basket. Proceed to checkout >>>
-
Stabilizer Sirui DUKEN Switch X Perk B Dark Gray
Foldable design • Telescopic handle • Quick release holder • Remote control • Built-in battery: 1000 mAh
built-in battery: 1000 mAh4 49$0
Hooray! Stabilizer Sirui DUKEN Switch X Perk B Dark Gray in the basket. Proceed to checkout >>>
-
Stabilizer single axis Momax Selfie Stable for iPhone and other smartphones Pink
Transforms into a monopod • Remote control • Built-in battery • Telescopic handle
3 990 ₽
Hooray! Single-axis stabilizer Momax Selfie Stable for iPhone and other Pink smartphones in the basket.
Proceed to checkout >>> -
Stabilizer (steadicam) Feiyu VLOG Pocket Black for iPhone and other smartphones
Designed for vlogging • Lightest folding smartphone steadicam • Supports built-in smartphone camera
6 390 ₽
Hooray! Stabilizer (steadicam) Feiyu VLOG Pocket Black for iPhone and other smartphones in the cart. Proceed to checkout >>>
-
Stabilizer Zhiyun CRANE-M3 PRO
microphone connection • Battery capacity: 1150 mAh • Built-in display • Charging time: 2 hours • Backlight • Fast charging: Power Delivery
67 700 ₽
Hooray! Stabilizer Zhiyun CRANE-M3 PRO in the basket.
Proceed to checkout >>> -
Stabilizer (steadicam) Feiyu VLOG Pocket Pink for iPhone and other smartphones
Designed for vlogging • Lightest folding smartphone steadicam • Supports built-in smartphone camera
6 39$0
Hooray! Stabilizer (steadicam) Feiyu VLOG Pocket Pink for iPhone and other smartphones in the cart. Proceed to checkout >>>
-
Stabilizer Sirui DUKEN Switch X Perk A Light Gray
Foldable design • Telescopic handle • Quick release holder • Remote control • Built-in battery: 1000 mAh
4 49$0
Hooray! Stabilizer Sirui DUKEN Switch X Perk A Light Gray in the cart.
Proceed to checkout >>> -
Sirui DUKEN Switch X Perk F Dark Gray Stabilizer + Anamorphic Lens
Foldable design • Telescopic handle • Quick release holder • Remote control • Built-in battery: 1000 mAh • Anamorphic lens
11 990 ₽
9 490 ₽
Hooray! Sirui DUKEN Switch X Perk F Dark Gray Stabilizer + Anamorphic Lens in Basket. Proceed to checkout >>>
-
Sirui DUKEN Switch X Stabilizer Perk E Light Gray + Anamorphic Lens
Foldable design • Telescopic handle • Quick release holder • Remote control • Built-in battery: 1000 mAh • Anamorphic lens
11 990 ₽
9 490 ₽
Hooray! Sirui DUKEN Switch X Stabilizer Perk E Light Gray + Anamorphic lens in basket.
Proceed to checkout >>> -
Universal stabilizer Sirui Swift P1 + anamorphic lens for smartphone Sirui VD-01
Dual stabilization • Comfortable control • Sirui anamorphic smartphone lens
17 990 ₽
16 490 ₽
Hooray! Universal stabilizer Sirui Swift P1 + anamorphic lens for smartphone Sirui VD-01 in the basket. Proceed to checkout >>>
-
Stabilizer (steadicam) Feiyu G6 Max for GoPro, smartphones and other cameras
Bluetooth • Convenient operation • Protection class: IP67 • Battery: built-in • Axle lock
20 290 ₽
Hooray! Stabilizer (steadicam) Feiyu G6 Max for GoPro, smartphones and other cameras in the basket.
Proceed to checkout >>> -
Discount!
Stabilizer (steadicam) Zhiyun Smooth 4 Black for iPhone and other smartphones
Hotkeys for instant control • Object tracking • Two-way charging
16 890 ₽
11 990 ₽
Hooray! Stabilizer (steadicam) Zhiyun Smooth 4 Black for iPhone and other smartphones in the cart. Proceed to checkout >>>
-
Zhiyun Smooth X stabilizer for iPhone and other smartphones White
Foldable design • Telescopic handle • Built-in battery • Multifunctional
5 990 ₽
Hooray! Zhiyun Smooth X stabilizer for iPhone and other smartphones White in the cart.
Proceed to checkout >>> -
Zhiyun Smooth X Stabilizer for iPhone and other smartphones Gray
Foldable design • Telescopic handle • Built-in battery • Multifunctional
5 990 ₽
Hooray! Zhiyun Smooth X stabilizer for iPhone and other Gray smartphones in the shopping cart. Proceed to checkout >>>
-
Feiyu Vimble One Black Smartphone Stabilizer
Selfie stick • Weight 118g • Extremely compact • Proprietary app
3 990 ₽
Hooray! Feiyu Vimble One Black smartphone stabilizer in the shopping cart.
Proceed to checkout >>> -
Stabilizer (steadicam) Feiyu Vimble 2S for iPhone and other smartphones
Ultra Powerful App • Up to 10 hours on a single charge + external battery charging • Trigger for quick and easy operation • Object and face detection and tracking • Full grip shooting control
6 990 ₽
Hooray! Stabilizer (steadicam) Feiyu Vimble 2S for iPhone and other smartphones in the cart. Proceed to checkout >>>
-
Stabilizer (steadicam) Zhiyun Crane M2 for smartphone / action camera / camera
Suitable for action cameras and small gadgets weighing up to 720 grams • Miniature design • Easy setup
24 990 ₽
Hooray! Stabilizer (steadicam) Zhiyun Crane M2 for smartphone / action camera / camera in the basket.
Proceed to checkout >>> -
Stabilizer (steadicam) universal Feiyu Tech G6 plus
Super performance motors • Smart power consumption • LCD display • Wireless connection
16 39$0
Hooray! Stabilizer (steadicam) universal Feiyu Tech G6 plus in the basket. Proceed to checkout >>>
-
Stabilizer Zhiyun CRANE-M3
Microphone connection • Battery capacity: 1150 mAh • Built-in display • Charging time: 2 hours • Backlight • Fast charging: Power Delivery
29690 ₽
Hooray! Stabilizer Zhiyun CRANE-M3 in the basket.
Proceed to checkout >>> -
Stabilizer Zhiyun Smooth 5S Gray
• Maximum load: 300g • Minimum load: 150g • Power supply: Built-in battery • Operating time: 24 hours • Charging time: 2 hours • Compatibility: ZY Cami, StaCam, Filmic Pro Functionality: Adjust Settings, Remote Control, Setup, View Live Feed
15 49$0
Hooray! Stabilizer Zhiyun Smooth 5S Gray in the basket. Proceed to checkout >>>
-
Stabilizer Zhiyun Smooth 5S Combo Gray
• Maximum load: 300g • Minimum load: 150g • Power supply: Built-in battery • Operating time: 24 hours • Charging time: 2 hours • Compatibility: ZY Cami, StaCam, Filmic Pro Functionality: Adjust Settings, Remote Control, Setup, View Live Feed
18 69$0
Hooray! Stabilizer Zhiyun Smooth 5S Combo Gray in the basket.
Proceed to checkout >>> -
Feiyu Vlog Pocket 2 Black stabilizer for iPhone and other smartphones
Foldable design • Weighs less than 300g • Works even with large smartphones weighing up to 250g • Proprietary app
7 990 ₽
4 990 ₽Out of stock
-
Stabilizer Feiyu SCORP-C
• Design features : built-in display, axis lock • Load : — 2500 g • Power supply : built-in battery • Battery capacity : 2500 mAh • Quick charge : Power Delivery • Quick release plate : Arca Swiss
24 690 ₽
Out of stock
-
Stabilizer (steadicam) Snoppa Atom Black for iPhone and other smartphones
Microphone operation • Smartphone charging • 24 hours operation • Convenient operation
14 990 ₽
Out of stock
-
Moza Mini P stabilizer for smartphones and cameras
Flat platform of versatile models • Vertical shooting • Camera control • Durable
15 490 ₽
Out of stock
-
Stabilizer Momax Selfie Stable2 single axis Black
Folding design • Built-in battery • Remote control • Telescopic handle
3 250 ₽
Out of stock
9004 7
Stabilizers for iPhone and other phones
DJI
Feiyu Tech
Momax
Moza
Sirui
snoppa
Zhiyun
 6 h • Quick charge : Power Delivery • Quick release plate : Arca Swiss
 Proceed to checkout >>>
  Proceed to checkout >>>
  Proceed to checkout >>>
  Proceed to checkout >>>
  Proceed to checkout >>>
  Proceed to checkout >>>
  Proceed to checkout >>>
  Proceed to checkout >>>
  Proceed to checkout >>>
  Proceed to checkout >>>
  org/Product”>
Moza Mini MX stabilizer for iPhone and other smartphones
Foldable design • Amazing smoothness • Unique design • Proprietary application
7 290 ₽
Out of stock
 org/Product”>
Stabilizer (steadicam) DJI Osmo Mobile 3 Combo for iPhone and other smartphones
Foldable design • One-hand operation • Creative possibilities • DJI Mimo app • Battery capacity: 2450 mAh
11 990 ₽
Out of stock
 org/Product”>
Stabilizer Zhiyun Smooth-Q3 Combo
Foldable Design • Built-in Battery • Additional Functions: Flashlight • Additional Benefits for Zhiyun Prime Membership Membership
9 190 ₽
Out of stock

 Because of Samsung’s big push for 5G, however, that model is much harder to find in most markets.
 You’ll find a 13MP selfie lens tucked away in an Infinity-V notch to complete your budget-friendly setup.
/cdn.vox-cdn.com/uploads/chorus_asset/file/22654068/ajohnson_20210608_4627_0001.jpg) The 48MP primary camera is especially crisp in good lighting, though the images bin down to 12MP by default. It’s easy to adjust for the full resolution, though you’re limited to the 4:3 ratio. You can check out some of the differences between the two shots in the slider image in the camera samples section later in this Galaxy A32 5G review.
The 48MP primary camera is especially crisp in good lighting, though the images bin down to 12MP by default. It’s easy to adjust for the full resolution, though you’re limited to the 4:3 ratio. You can check out some of the differences between the two shots in the slider image in the camera samples section later in this Galaxy A32 5G review. It did come up short on a weekend trip to watch a football game, but it’s never been easy to get reception surrounded by quite so many people. Otherwise, I had no problems with call clarity, and the mono speaker worked well for my occasional speakerphone needs. There’s no mmWave support here for the very fastest 5G speeds, but this is typically reserved for flagships and mmWave coverage is still scarce (and practically non-existent outside the US).
 It unlocked quickly when I pulled the phone from my pocket, even if the positioning on the side is only suitable for a few fingers. Otherwise, you can try out the software-based facial recognition for an easy unlock, though it’s far less secure.
 A case can solve this issue, but without one, holding the Galaxy A32 5G is like trying to keep a firm grip on a baby seal.
 Notably, the Galaxy A32 5G comes with a complete set of Microsoft apps to go with the Google and Samsung options. You’re looking at both OneDrive and Google Drive right out of the box, as well as both Gmail and Outlook. On the bright side, you can uninstall most of the extras right away, but there’s a lot of app redundancy out of the box.
 5 inches
 It offers a great budget camera setup, excellent battery life, a classy design, and Samsung’s smooth, well-supported One UI software. As long as you’re ready to do battle with a slippery phone that easily gets covered in fingerprints, there’s not much missing at $279. Those things that are missing — mostly an IP rating and fast charging — aren’t necessarily dealbreakers considering this price tag.
 It’s the defacto pick between the Galaxy A13 and Galaxy A53, and it brings a 120Hz adaptive refresh rate to the mix. The Galaxy A23 is slightly more expensive than the Galaxy A32, but it brings a big battery and flexible cameras to the table as well.
 Find out more about how we test, analyze, and rate.
 Samsung’s midrange A models now include 5G, and the cheapest of the lot — the Galaxy A32 5G — lets you enjoy faster networking speeds for $280. That’s a major bargain, even with some serious shortcomings.
  And with much longer support, the A32 is a safer bet long-term, making it one of the best cheap phones you can buy.
 The buttons ring hollow and loud. You do get a headphone jack, something you don’t find on the much more expensive flagships.
 That higher frame rate means that scrolling will be smoother. Games that support high refresh rates will also theoretically look better, too, if the Galaxy A32 could muster the power it would need for such a task.
 It’s an awful picture.
 The blur radius, however, is quite artistic, so I’m left to wonder if the issue here was just with the A32’s inability to handle poorer lighting conditions. Compare the image to the Nord N200’s portrait shot which, while more zoomed in with a weaker bokeh effect, looks more color accurate with a stronger focus on me.
  The Nord N200 applied too much face smoothing and it’s not a selfie I’d ultimately be willing to post anywhere.
 The Galaxy A32 5G uses the Dimensity 720 system-on-chip paired with 4GB of RAM. It’s not a powerhouse, but this chip lines up well with some of Qualcomm’s lower-tier offerings like the Snapdragon 480 5G found in the OnePlus Nord N200 5G. In day-to-day use, the Dimensity 720 does well enough, but anything more intensive than browsing social media and checking your messages is where you’ll notice slowdown.
 8 FPS.
 Samsung has done a good job with making One UI very easy to use with slick animations, pretty transitions, and plenty of things tucked away in the settings.
 That’s all you can ask for sometimes.
 5″
5″  2 mm
2 mm  2 °C
2 °C  1
1  8
8  11 a/b/g/n/ac)
  5 mm audio port
 You could already read the Galaxy A52 review on our website, but now it’s the turn of the younger model Galaxy A32.
  I also like the color scheme. There are four colors to choose from: classic white and black, as well as blue and lilac, as in our review.

 1 proprietary shell.
  As for me, the solution is rather fashionable, because the speed of its operation is far from ideal. But, perhaps, this is again the problem of the test device. Alternatively, you can set the user’s face unlock. Of course, it is not as secure as Face ID and similar systems, and it works much slower, but this option is present.
 At just about $50, it features a long slot design perfect for fitting a single piece of artisan sourdough or two slices of sandwich bread side by side. Its narrow design also means it takes up less space on your countertop. We love that it features a clear window to monitor how toasted your bread is getting, and it comes in seven different colorways (black, white, cream, gray, aqua, red and yellow) to add a pop of color to your countertop.
  It’s great for entertaining too — not only can it toast up to four slices at once, but if there’s a crowd at the table, it will pop up slice after slice to the same degree of doneness without burning by the second or third batch. This model features dual independent control panels so you can toast a frozen bagel on one side and a fresh piece of whole grain bread on the other, and each will be cooked to the correct doneness.
  That said, if you value consistent toast, it’s a champion. We made five batches of toast consecutively, and it toasted consistently from batch to batch. With the push of a button, the grates lower your toast automatically — no lever-pressing. It also features extra-wide slots for bagels and thicker slices of bread. We found the “Lift and Look” setting to be particularly convenient: It allows you to check on your toast’s progress, and if your toast isn’t browned enough, you can use the “A Bit More” setting to add extra time.
  This model comes with a shade selector featuring seven different levels of browning and preset buttons that feature bagel, defrost and reheat. In our Lab tests, slices of bread came out very evenly toasted (no un-toasted edges, like some competitors), and the shade selector did produce different results, offering users a variety of toast shades.
  2″
2″:max_bytes(150000):strip_icc()/CuisinartCPT-1424-SliceCompactPlasticToaster-b7cb7c7dd7e84192bd15c4ef4c68394a.jpg)
 And in our most recent Lab test, we tested nine new toasters, toasting up over 144 slices of white bread.
  And we note whether slices pop up high enough for easy grabbing.
 These make toasting bagels and thicker slices of bread easier and fuss-free.
 Reheat settings typically toast bread or other ingredients for a short amount of time, perfect for a toaster pastry or adding a touch more color.

 Eva conducted the most recent side-by-side test of both toasters and toaster ovens. Eva is always looking for the next best toaster to create delicious toast, whether it’s topped with fluffy scrambled eggs or cottage cheese and seasonal fruit.
  Eva has more than 10 years of experience in the food industry, working as a food stylist, personal chef and marketing manager.
 color h3-transform.text-transform”>Air Fryer-Perfectly Done, Heavenly French Toast

 color”>Keywords: air fryer french toast casserole air fryer french toast bites frozen french toast in air fryer cooking frozen french toast sticks in air fryer how to make frozen french toast sticks in air fryer how long to cook frozen french toast sticks in air fryer vegan air fryer french toast farm rich french toast sticks in air fryer


 The slots are large enough to accommodate thick pieces.
 If you’d rather have more control over the toast’s features, a model with more controls and settings is ideal.
 This makes it easier to clean the toaster.
  of toasts: 4, No. of compartments: 2 0348 Clatronic , Number of toasts: 2
 :max_bytes(150000):strip_icc()/Cuisinart_4_Slice_Toaster_Hero5x4-7cdbb729ad394ee58efb23a168df711d.jpg)
 This means that one appliance can take on the role previously occupied by several more specialized pieces of equipment!
 The trapped steam and much lower quantity of water makes this possible, and the results are astounding.
 It can also be used as a steamer.
 This method retains the flavor and the nutrients much better than if you boil them in water.
 The easiest way to achieve this is to use a steamer basket to hold your food inside the Instant Pot inner bowl.


 High pressure, Quick Release
 This allows the steam to be retained in the Instant Pot, steaming the food more quickly and evenly.

 It is easier to list a few products that, according to manufacturers, cannot be cooked in a pressure cooker. They name in this list apple, lingonberry compotes, pearl barley, oatmeal and other cereals, crushed peas, pasta, noodles, spaghetti, rhubarb. These products have the ability to form foam and spatter when cooked, which can contaminate and clog the working valve from the inside.
  The liquid volume should be at least 250 ml (2 cups).
  Transfer the finished dish to a plastic container and refrigerate.

 To release steam after the end of cooking, move the regulator to the fast or slow decompression position.
  Then you need to reduce the heat and start counting the time provided by the recipe for cooking this dish.
  Induction hobs require cookware with magnetic properties, and steel pressure cookers meet this requirement. Always choose a burner that is equal to or smaller in diameter than the diameter of the base of the pressure cooker. On a gas stove, the flame should not go beyond the bottom of the pressure cooker.
  The manufacturer must inform about the possibility of washing the lid in the dishwasher in the attached instructions. In addition to the control panel, before washing such a cover in the machine, the rubber seal must also be removed.
  How do I take care of my multicooker, pressure cooker and steamer?
  How to cook in a slow cooker? ⇑

 The reasons for this similarity are simple – the lid fits snugly on the multicooker, preventing steam from escaping, and the temperature itself is lower than if you were cooking on the stove. Because of this, often cereals in a slow cooker are cooked longer than in a saucepan.
  Of course, you can add cold water (or cold broth), but then the dish will cook a little longer.
  For example, 300 ml of liquid per 150 grams of pasta.
  Also remember that you should not lift the lid of the multicooker too often during the cooking process so that the pastries do not settle.
  Somewhere it takes a couple of minutes, and somewhere a little more.
  Otherwise, there will be a risk that the boiling liquid will flow out of the edges and ruin the device.
  This is normal, because the technique is all different.

 For small portions, a small multicooker with the “Steam” mode is suitable.
 Careless handling can lead to unforeseen consequences, and no one wants to spoil their assistant.


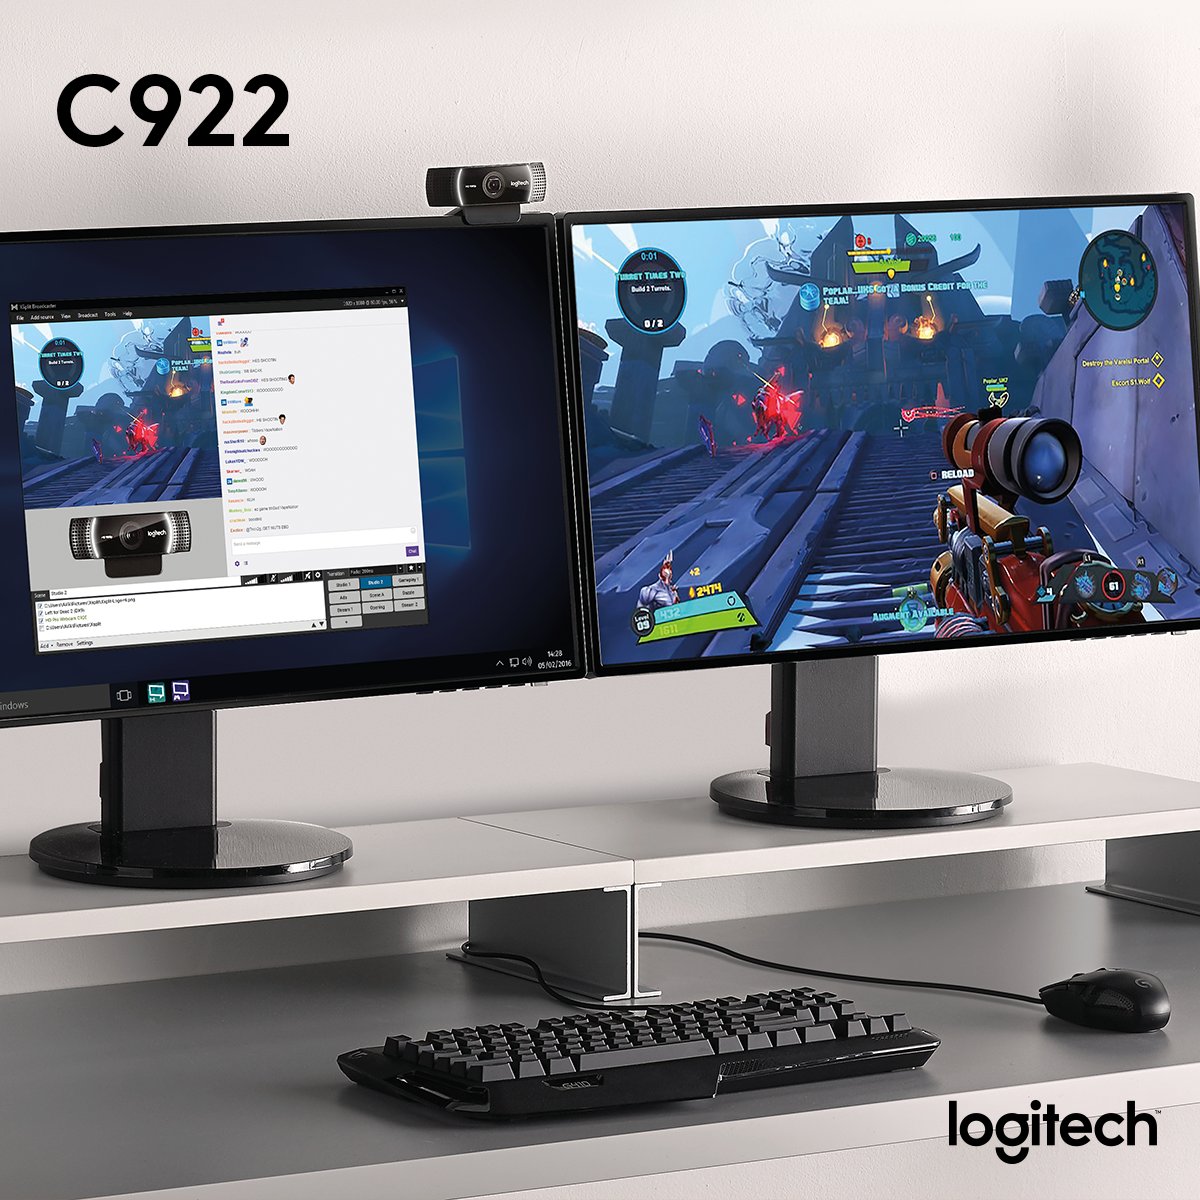
 And it has something that’s rare in the Logitech webcam universe: a tripod.
 Since this tripod was made for the webcam, it fits perfectly. (For other options, check out our list of the best iPhone tripods.)

 If, on the other hand, you’re trying to save money, the C920s remains our top Logitech webcam pick. It’s about $30 less than the C922 but has many of the same features, including a glass lens, Full HD 1080p video, auto focus, and auto light correction. While it doesn’t come with a tripod, it does have a privacy shutter. But if you’re looking for something in between, then the Logitech C922 Pro HD is the webcam to get.
 The C922 is optimum for recording, game streaming, or video conferencing – basically all of your webcam needs.
 Up until now, I was using a webcam that I paid nearly $200 for about 10 years ago. I thought it was a great webcam (it was when I bought it). As soon as I plugged in the C922 and fired up a video window, I literally said “Oh wow!” out loud. The video was that good!
 It has a standard 1/4-20 thread socket in the bottom for attaching it to a tripod and adjusts to fit monitors up to 2 inches deep. The tripod legs also pull out to double their length and making the footprint a 7″ triangle – plenty stable enough for any use. The base also is designed to just sit on a flat surface and has a rubberized surface to prevent sliding. It can easily fit on top of any modern monitor or laptop screen.
 When it crashed in Firefox it crashed the entire browser, and then repeated that each time the browser started because the page kept reloading automatically. Although it’s probably something particular to my computer, I’ve never seen a software based background replacement solution work very reliably.
 This is currently the best Logitech HD Webcam, with only the 4K Pro Webcam model ($199) being better. I really wish I had bought one of these a long time ago.
 Stream any content in 1080p at 30fps or super-fast HD 720p at 60fps. Stream content without delays or interruptions, taking advantage of high-quality autofocus and a wide viewing angle (78 degrees). Comes with a 3-month premium XSplit license.
 0012
0012 

 00 rub.
  0
0  5×4.4×7.1 cm
 If you do, remember to contact the app service provider to let them know billing should be stopped.
 For example, a TV that has a 60Hz refresh rate will refresh an image 60 times per second. Refresh rates can vary for different TVs and cannot be adjusted. They are determined by the manufacturer.
 0
0

 0
0

 They are available in various types, sizes and functions.
  Save the file to your computer, preferably your desktop, and use it as needed.
 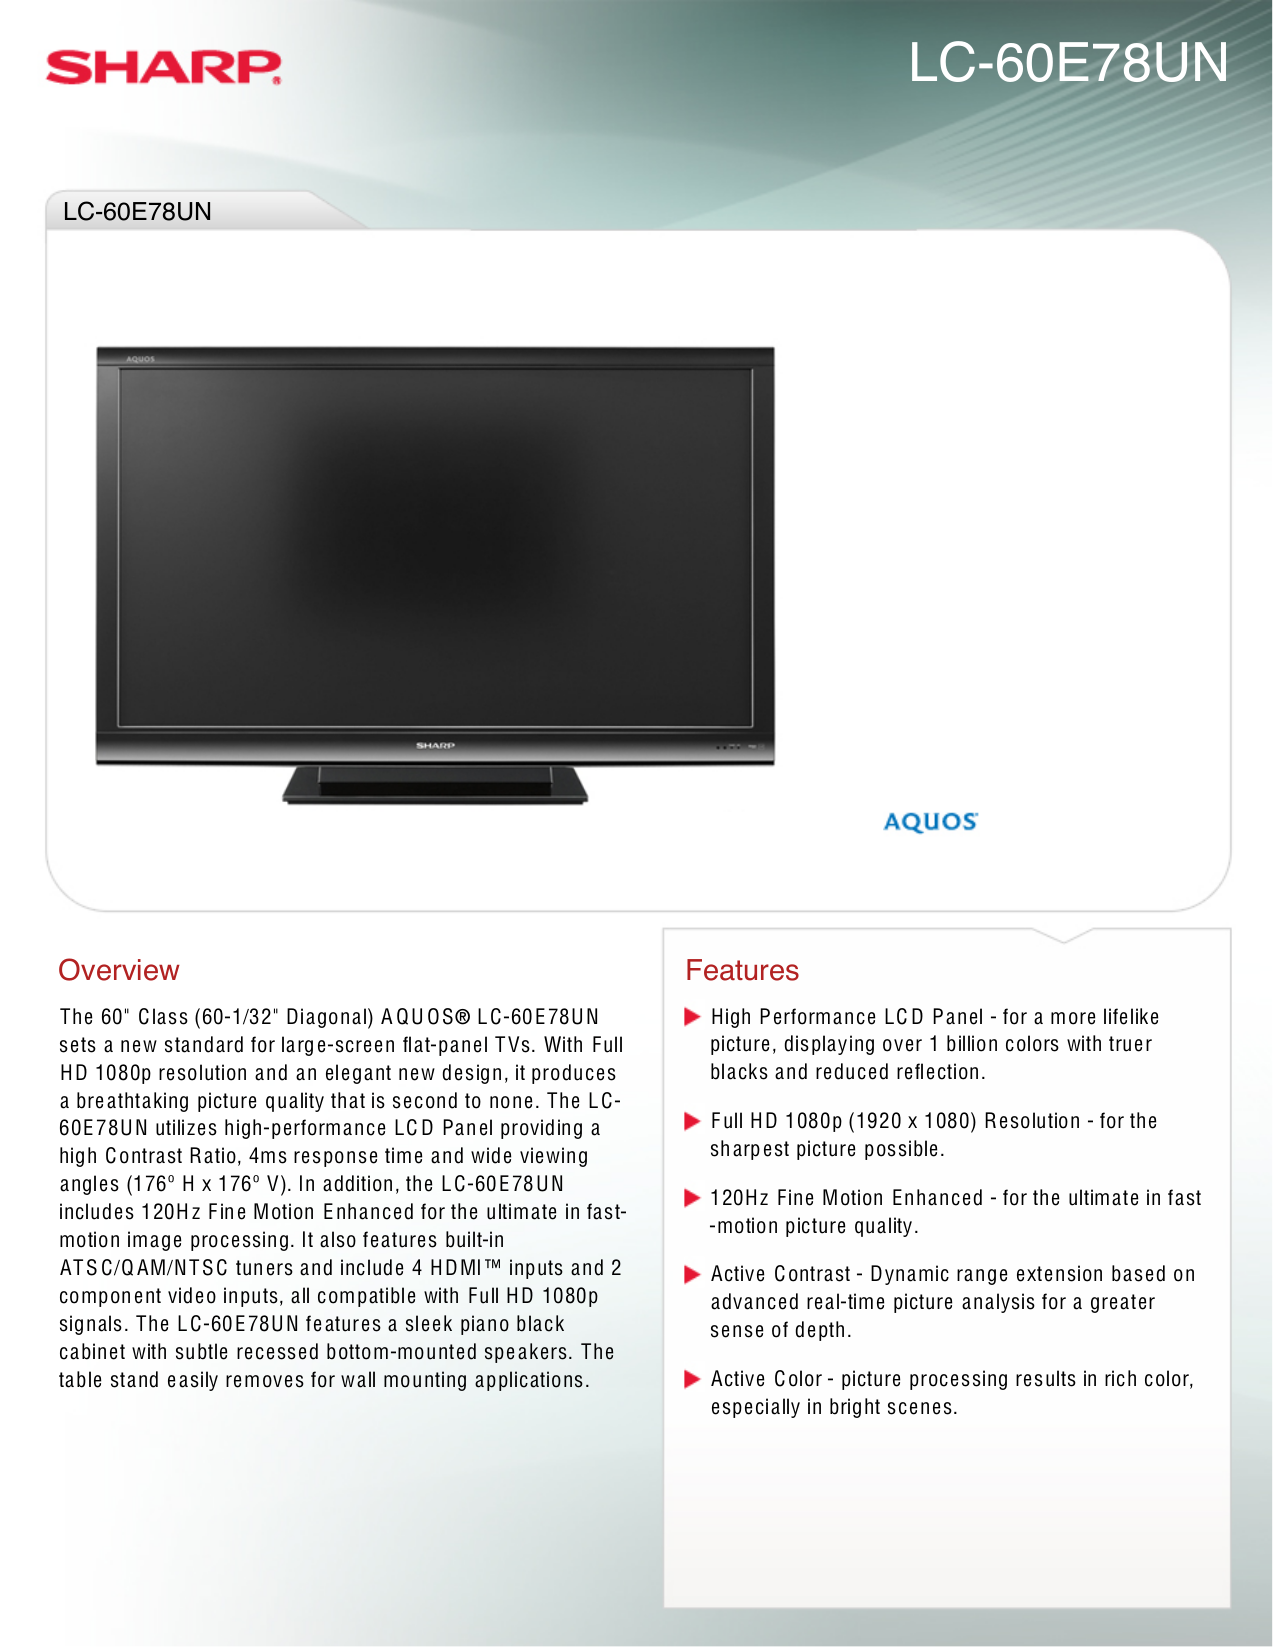 It’s no surprise that all…
 If you’re not sure which refrigerator is the right fit for you, don’t worry–KitchenAid has a great guide to help you find the perfect fridge to fit your kitchen.
 removeItem(‘pdpSignUp’)
 Instead, interior designers turn to high-end refrigeration to give kitchen spaces a customized look and functionality tailored to a user’s needs. Refrigerator without freezer models are great examples of that luxury, but what exactly are these appliances, and are they worth it?
 Because they work independently, designers can create an optimized refrigeration system that works best for a kitchen’s unique layout.
 To give you an idea of how far your budget goes when it comes to a refrigerator without freezer, we’ve put together a list of five brands ranging from least to most expensive.
 0 Cu. Ft. Monochromatic Stainless Steel All Refrigerator
 9 cubic feet of storage capacity across three different units for a total of 37.9 cubic feet of total food storage when paired with a matching freezer.
 9 Cu. Ft. Panel Ready Freezerless Refrigerator

 Major points were also given to advanced humidity-controlled drawers and a dedicated evaporator system, both of which keep foods fresh, tasty, and ready to enjoy in your next meal.
 8 and 20.5 cubic feet. Prices for Miele all-refrigerator units range between $3,550 and $9,400.


 Better yet, stop by our Duerden’s Appliance Bountiful, Utah location. Visit us today!
 2N two-chamber, volume 243 liters, freezer No frost, electronic control, autonomous cold storage
  4 GHz, Stand-alone control panel for refrigerator , air conditioner,
  2NFZC two-chamber, volume 256 liters, No frost freezer, electronic control panel with LED backlight, autonomous cold preservation
  number of bottles (Bordeaux), pcs.: 154, Cooling: Compressor, Material


 99
99 99
99 99
99 99
99 8 cu. ft. Smart Front Load ENERGY STAR Washer with Ultra…
 0 cu. ft. Extra Large Capacity Smart Front Load Washer with Super Speed Wash and Steam in Ivory”>Samsung WF50BG8300AEUS 5.0 cu. ft. Extra Large Capacity Smart Front Load Washer with…
 99
99 99
99 99
99 8cu.ft. Front Loading Washer – White
 5 C…
5 C…
 99
99 0cu.ft. Front Load Washing Machine with UltraFresh Vent System – White”>GE Appliances GFW850SSNWW 5.0cu.ft. Front Load Washing Machine with UltraFresh Vent …
 0 cu. ft. Mega Capacity Smart Front Load Washer with TurboWash®…
 8cu.ft. Front Loading Washer – White
 6LBs Capacity Portable Washer w/Drain Pump&Faucet …
 90
90 99
99 99
99 5 cu. ft. Front Load Perfect Steam Washer with LuxCare® Plus Wash & SmartBoost® – Titanium”>Electrolux ELFW7637AT 4.5 cu. ft. Front Load Perfect Steam Washer with LuxCare®…
 Sears has many popular brands like GE, Samsung, LG, Maytag, Whirlpool etc. that serves your need to get your laundry done conveniently and efficiently.
 0″ data-id=”msrp”>
 0″ data-id=”msrp”>
 0″ data-id=”msrp”>
 0″ data-id=”msrp”>
 0″ data-id=”msrp”>
 2 Cu. Ft. Front Load Washer with Steam and TurboWash in Black Steel
 When shopping for chairs, the height of the seat should be adjustable so that the user’s feet can sit flat on the floor with their knees at right angles. Likewise, the accompanying office desk should be at a height where the users’ elbows can sit comfortably at right angles at their sides while typing or writing. Browse our selection to find the combination that’s right for you. If size if a concern, check out our big & tall chairs which can support up to 500lbs.
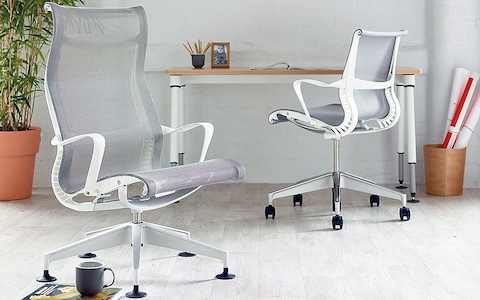 Browse our selection of laptops and Chromebooks to find the perfect on-the-go computer for schoolwork, homework, hybrid work, and play. If you’re a gamer, streamer, or work with large files, a gaming laptop or desktop PC might be the best option for you. With installed RAM up to 64GB and up to 2TB SSD, gaming laptops can handle everything from the newest online games to editing audio, films and more. Need more file storage? Increase capacity with an external hard drive.
 Start with an air purifier to strip the air of allergens like pollen and pet dander and replace existing air filters for improved air quality. Frequently dust, wipe down hard surfaces, and vacuum carpets and furniture to help eliminate pollen tracked in from outside and dander left behind by pets. When leaving the house, check the pollen count and bring a face mask to help filter the air you breath outside.
 Use storage bins and a label maker to make sorting and organizing easier. Prepare extra boxes for donations and trash bags for the things you no longer need. Look for decorative boxes & baskets that will compliment your home’s décor and use them to organize. You can also use closet organizers and storage drawers anywhere they are needed.
 No matter what printer you have, enter the brand, cartridge or printer model into the easy-to-use Ink and Toner Finder, and browse for compatible ink.

 They are fine to support your arms for short periods. But they provide no alternative to change position. Then, rather than helping, they just get in the way of keeping yourself comfortable.
 On the positive side, it’s a comfortable, good-looking chair. It has a black padded seat and black mesh backrest. This provides a nice contrast to the white frame and base.
  It has basic features, a comfortable seat and it looks good. The lack of warranty information is annoying. But the price is the main selling point, not durability or customer service.
  But it has a taller backrest, which helps it to accommodate larger sizes.
 But everything else is fixed, except for the ability to swivel and rock the chair. This is a basic chair with limited support. Like other cheap office chairs, this model can be bad for your back if you use it too often.


 As a result, flaws in a chair become more pronounced. The first sign of trouble in a cheap office chair is often tightness or pain in the lower back.
  12″ long and 4.5″ in diameter, this roll comes stuffed with high-density foam. Over top is a machine-washable breathable mesh cover.
 Today, there is a wide range of ergonomic options ranging from $170 to $1500. Even at the cheapest levels, you can expect solid ergonomic features. These include adjustable armrests, lumbar support, and headrests. The more you spend, the more sophisticated the features get.
  These models stand out with robust synchro-tilt functionality. ($450 to $1500)
 org/ListItem”> Catalog
 It is easy to buy products on our website. It is enough to add the model you like to the basket or order a call back at any time – the manager will contact you, provide information on the conditions and terms of delivery from the warehouse, help you choose the product based on the required dimensions, type, type, purpose, design and other features. You can save on purchases thanks to frequent discounts, promotions and sales on new items and popular products (limited quantities), we present high quality office chairs and chairs from trusted manufacturers of different price categories (cheap, medium, premium) with delivery around the city and region. We accept MIR, Visa, MasterCard for payment.
  org/ListItem”> Office chairs and chairs

 Certain restrictions apply. Features available until 30th day. Coverage and services not available everywhere. Rates, services, coverage, and features subject to change. Phone selection and availability may vary. Metro by T-Mobile features and services for personal use only. Service may be slowed, suspended, terminated, or restricted for misuse, abnormal use, interference with our network or ability to provide quality service to other users, or significant roaming. 5G capable device required. Coverage not available in some areas. See store or metrobyt-mobile.com for details, coverage maps, restrictions and Terms and Conditions of Service (including arbitration provision).
 Service may be slowed, suspended, terminated, or restricted for misuse, abnormal use, interference with our network or ability to provide quality service to other users, or significant roaming. 5G capable device required. Coverage not available in some areas. ACP Discount: The Affordable Connectivity Program (ACP) is a government program that reduces the customer’s broadband internet access service bill. One discount per eligible household and is non-transferable across households. Eligible consumers may obtain ACP service from any participating provider and may transfer their ACP benefit to another participating provider at any time. For details on the ACP program, visit https://www.fcc.gov/acp. $30 Off With ACP: Allow one billing cycle for monthly ACP discount after confirming eligibility through National Verifier and completing enrollment in ACP. May not be combined with some offers or discounts. Pricing may require port-in from eligible carrier.


 Sometimes there are connection issues or possibly a payment issue that your bank puts on the transaction that we can easily fix with a quick call.
 ” Those transactions do not settle and will fall off your account as per the terms of your bank.
 Best of all, it’s completely simple and free.
 Relevant research has been carried out to learn about the choice and preferences of subscribers. There are even a plethora of add-on pricing plans on the market so that the main users can get variety. The cost of each plan is kept according to the analysis. The main goal of Metro PCS is to meet the needs of customers. In addition to unlimited packages, the operator also wants subscribers to be satisfied with the additional features they provide. Free downloads of games, videos, songs, apps and audiobooks are Metro PCS bonus services.
  In addition, users also get the opportunity to save $10 on adding a new line.
  Well, some bill payment options charge a “handling fee” and some don’t. This article is sure to help you learn about the easiest way to pay your bill.

 Metro PCS (Personal Communications Service) tried its best to satisfy users. Gradually, from a developing company, it turned into a developed one. As a result, more than 1.5 million people became their subscribers.
